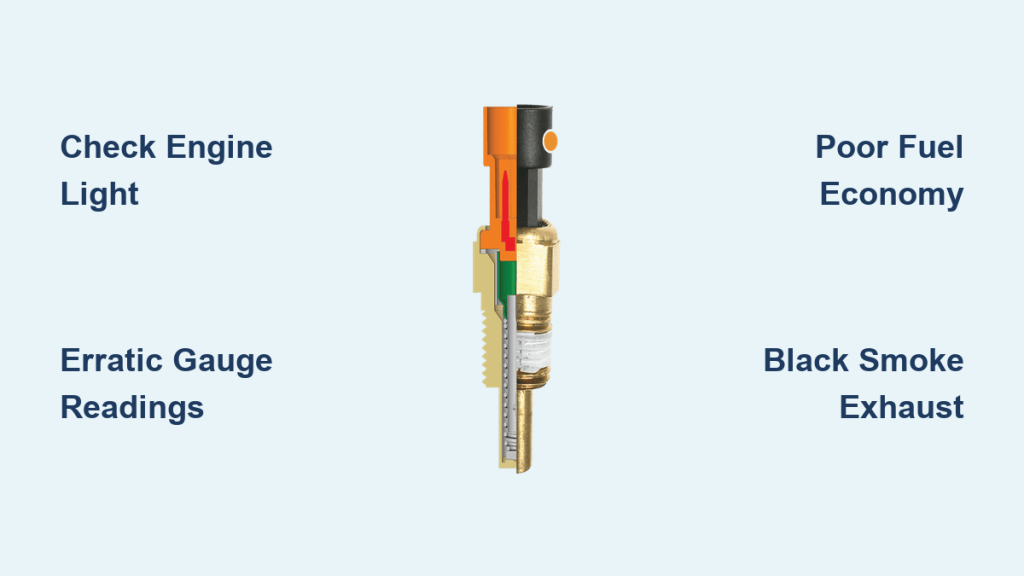
A faulty engine coolant temperature (ECT) sensor can silently sabotage your vehicle’s performance, fuel economy, and emissions. This small but vital component feeds real-time temperature data to the engine control unit (ECU), which uses it to manage fuel delivery, ignition timing, idle speed, and cooling fan operation. When the ECT sensor fails or sends inaccurate signals, the ECU makes incorrect adjustments, leading to drivability issues that mimic more serious mechanical problems.
You might notice a sudden drop in gas mileage, black smoke from the exhaust, or your temperature gauge pegging to hot even when the engine feels normal. These are all classic signs of engine coolant sensor problems. Left unaddressed, a bad ECT sensor can cause long-term damage, including catalytic converter failure or engine overheating. In this guide, you’ll learn how to identify symptoms early, test the sensor accurately, and fix the problem with confidence.
Recognize Key Warning Signs of Coolant Sensor Failure
Check Engine Light with ECT Codes
The Check Engine Light is often the first clue of a failing coolant temperature sensor. Your vehicle’s OBD-II system monitors the sensor’s voltage signal and triggers specific diagnostic trouble codes when it detects out-of-range readings.
The most common codes include P0115 for ECT sensor circuit malfunction, P0116 for range or performance problems, P0117 for low input (short to ground), and P0118 for high input (open circuit). These codes indicate electrical faults like broken wires, shorts, or internal sensor failure, not just a bad sensor. A scan tool showing a static temperature (like always negative 40°F or stuck at 192°F) confirms the sensor is not responding to actual engine heat.
Pro Tip: Always check freeze frame data when retrieving codes. It shows engine conditions at the moment the code was set, helping you determine if the failure was real or intermittent.
False or Erratic Temperature Gauge Readings
If your dashboard temperature gauge behaves strangely, jumping to red immediately, staying cold after warm-up, or fluctuating wildly, it may point to an ECT sensor issue. However, the solution depends on your vehicle’s sensor configuration.
In single-sensor systems, one ECT sensor feeds both the ECU and the gauge, so a fault affects performance and display. In dual-sensor systems, a separate sensor drives the gauge while another serves the ECU. A stuck needle in these vehicles may mean only the gauge sensor is bad, while the engine runs fine. Use an OBD2 scanner to compare live data with the gauge. If the scanner shows normal temps but the gauge reads hot, the gauge-specific sensor or cluster is likely at fault.
Poor Fuel Economy and Black Smoke
A sensor stuck in cold mode tricks the ECU into thinking the engine needs cold-start enrichment all the time. This causes continuous rich air-fuel mixture, excessive fuel injection, black smoke from unburned fuel in the exhaust, and noticeable drop in MPG. You may also see high short-term fuel trims (plus 20% or more) on a scan tool.
Warning: Prolonged over-fueling can damage the catalytic converter, a far more expensive repair. Address engine coolant sensor problems promptly to avoid costly damage.
Diagnose the Sensor Accurately
Test Resistance with a Multimeter
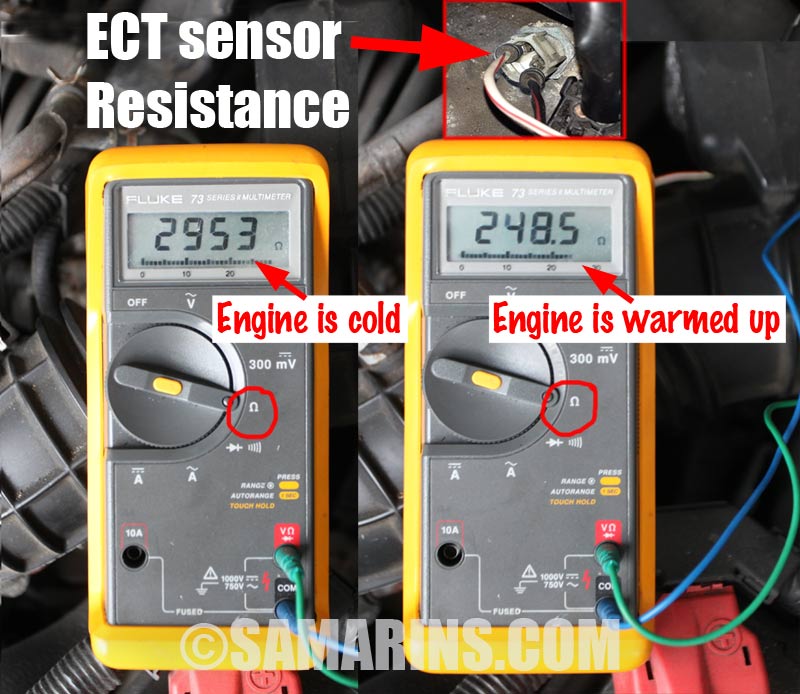
The ECT sensor is a thermistor whose resistance changes predictably with temperature. You can verify its function using a digital multimeter by following these steps.
First, disconnect the sensor’s electrical connector and set your multimeter to measure resistance (ohms). Then measure resistance across the sensor terminals and compare readings to standard values. At 32°F, expect approximately 5,000 to 6,000 ohms. At 68°F, look for 2,500 to 3,500 ohms. At 176°F, the reading should drop to 300 to 500 ohms, and at 212°F, expect 100 to 200 ohms.
Test at cold, warm, and hot engine states. If resistance does not decrease smoothly as temperature rises, the sensor is faulty. A passing sensor shows resistance dropping steadily with heat. A failing sensor shows an open circuit (infinite resistance), no change, or erratic jumps.
Check Voltage Signal at Key On
With the sensor plugged in, you can test the voltage signal to confirm circuit integrity. Turn the ignition to ON (engine off), back-probe the signal wire, and measure voltage between signal wire and ground.
Expected readings are 3.0 to 4.5V for a cold engine and 0.5 to 1.5V for a warm engine. Abnormal readings indicate specific problems. Zero volts suggests a short to ground, requiring wiring insulation inspection. Five volts suggests an open circuit or lost ground, meaning the sensor is not completing the circuit properly.
Verify Actual Engine Temperature
Do not rely solely on the ECU reading. Use an infrared thermometer to measure the engine block or thermostat housing near the sensor, then compare the IR reading to OBD2 live data. If live data says 240°F but IR reads 130°F, the sensor is faulty. If both show overheating, the issue is mechanical (thermostat, water pump, etc.). This step prevents misdiagnosis, especially after replacing a sensor with no improvement.
Identify Common Root Causes

Corrosion and Coolant Contamination
Old or incompatible coolant degrades and forms sludge, rust, or electrolytic deposits that coat the sensor tip. This insulation prevents accurate heat transfer, causing false readings.
Signs of bad coolant include milky or gel-like texture, rust particles in the radiator, and corroded radiator fins or hoses. Always use OEM-specified coolant mixed with distilled water (never tap water). Flush the system every 30,000 to 100,000 miles, depending on coolant type.
Wiring and Connector Damage
The ECT sensor’s wiring runs near hot engine components, making it prone to melted insulation, chafing, or rodent damage. Inspect the connector for corroded or greenish terminals, bent pins, moisture or coolant residue, and loose locking tabs.
Gently wiggle the harness while monitoring live data. If the temperature reading jumps, you’ve found an intermittent connection that needs repair.
Failed Engine Grounds
A poor engine ground disrupts the sensor’s return circuit, distorting the signal. The ECU may interpret this as an open or short circuit, triggering P0117 or P0118.
Check engine-to-frame ground straps, ground near the thermostat housing or cylinder head, and clean connections with a wire brush to ensure metal-to-metal contact. Perform a voltage drop test by setting multimeter to DC volts, connecting one probe to battery negative and the other to engine block, then cranking the engine. Reading should be less than 0.1V. Higher values indicate a bad ground.
Replace the Sensor Correctly
Drain Coolant and Remove Old Sensor
Never work on a hot engine because pressure can cause serious burns. Let the engine cool completely, disconnect the negative battery terminal, and remove engine covers or shields.
Partially drain coolant below the sensor level, disconnect the electrical connector, and use a deep socket or wrench to remove the sensor. Spray penetrating oil if the sensor is stuck to avoid breaking it off in the block.
Install New Sensor with Proper Seal
Do not reuse the old O-ring because it can cause leaks and air pockets. Clean the sensor bore with a lint-free cloth, lubricate the new O-ring with coolant or silicone grease, and thread the new sensor in by hand to prevent cross-threading.
Tighten to 10 to 20 Nm (check your service manual for exact specifications). Use OEM or high-quality aftermarket sensors because cheap units often fail within months.
Bleed Air from Cooling System
Air pockets trap heat and create false hot readings. Many vehicles require a specific bleeding process. BMW and Mercedes vehicles require a scan tool to activate bleed mode. Honda and Toyota vehicles require loosening the bleed screw on the thermostat housing. GM vehicles require running the engine with the radiator cap off until fans cycle.
Run the engine to operating temperature and check for leaks, proper heat output, and stable temperature on the scanner.
Reset ECU After Replacement
Resetting the ECU means clearing the adaptive memory, not the sensor itself. The ECU learns fuel trims over time, and if the old sensor caused a rich condition, the ECU may still compensate incorrectly after replacement.
The reset procedure involves disconnecting the battery negative terminal, waiting 5 to 10 minutes to discharge control modules, reconnecting the battery, starting the engine and letting it idle for 5 to 10 minutes, and using an OBD2 scanner to confirm normal temperature rise. This allows the ECU to relearn baseline fuel and timing values.
Avoid Misdiagnosing Mechanical Issues
Thermostat Stuck Open or Closed
A stuck-closed thermostat causes real overheating, and the ECT sensor correctly reports high temps. A stuck-open thermostat prevents the engine from warming up, causing the ECU to see cold continuously. This leads to rich fuel mixture, poor fuel economy, and delayed cabin heat. The ECT sensor is not at fault in either case because it accurately reports the actual temperature.
Replace the thermostat if the engine takes more than 15 minutes to reach operating temperature.
Water Pump or Fan Failure
A failed water pump impeller reduces coolant flow. The sensor may read high due to localized heating, even if the rest of the engine is fine. Similarly, a blown fan fuse or bad relay can cause overheating that the ECT sensor correctly detects.
Always verify coolant flow and fan operation before blaming the sensor for engine coolant sensor problems.
Final Tips for Long-Term Reliability
Use OEM-Spec Coolant Only
Mixing incompatible coolants (like OAT with IAT) creates gel or sludge that clogs passages and coats sensors. Stick to what the manufacturer specifies, whether Honda Type 2, DEX-COOL (if required), or Zerex G-48 for European vehicles. Always mix 50/50 with distilled water.
Inspect Wiring During Routine Maintenance
Include the ECT sensor connector in your annual inspection. Look for rodent damage, check for cracked insulation near exhaust, and ensure the connector is fully seated and latched. A few minutes of inspection can prevent a no-start or limp mode later.
Monitor Live Data Periodically
Connect an OBD2 scanner every few months to view coolant temperature rise at startup, fuel trims, and fan activation points. A healthy system should warm up steadily in 5 to 10 minutes, reach 195 to 220°F and stabilize, and trigger fans at approximately 220°F. Deviations signal early cooling system issues.
Frequently Asked Questions About Engine Coolant Sensor Problems
Can I drive my car with a bad coolant temperature sensor?
Short-term driving is possible but not recommended. Risks include undetected overheating due to disabled fans, catalytic converter damage from unburned fuel, spark plug fouling and misfires, failed emissions tests, and reduced engine performance and fuel economy. Address the problem as soon as possible.
How much does it cost to replace an engine coolant temperature sensor?
Replacement costs vary by vehicle make and model. The sensor itself typically costs $20 to $100 for OEM quality parts. Labor costs depend on engine bay accessibility but usually range from $50 to $150. Total cost is generally $70 to $250, making it one of the more affordable engine repairs.
What happens if you don’t replace a bad coolant temperature sensor?
Prolonged operation with a faulty sensor can lead to catalytic converter failure from excess unburned fuel, engine overheating and potential head gasket damage, severely reduced fuel economy, failed emissions tests, and hard starting or stalling. The ECU may also enter limp mode, limiting performance.
How do I know if my coolant sensor is bad or my thermostat is faulty?
A bad sensor reads incorrectly regardless of actual temperature, while a stuck thermostat causes real temperature issues. Use an OBD2 scanner to check live data. If the sensor shows a static reading or impossible temperature (-40°F or 300°F), the sensor is likely bad. If actual temperature rises slowly or overheats while the sensor reads normal, the thermostat or cooling system has a mechanical problem.
Can a bad coolant sensor cause black smoke from the exhaust?
Yes. A sensor stuck in cold mode tricks the ECU into delivering excessive fuel, causing incomplete combustion. This results in black, sooty smoke particularly noticeable during idle or acceleration. The condition also fouls spark plugs and increases hydrocarbon emissions.
Do all vehicles have one or two coolant temperature sensors?
It depends on the vehicle design. Single-sensor systems use one CTS for both the ECU and instrument cluster. Dual-sensor systems have a primary sensor for the ECU and a secondary sensor for the dashboard gauge. Some vehicles also have a dedicated fan control switch separate from the main ECT sensor.
Key Takeaways for Fixing Engine Coolant Sensor Problems
Engine coolant sensor problems are common but often misdiagnosed. Always test the circuit comprehensively before replacing parts. Start with an OBD2 scan to retrieve codes and review freeze frame data, then move to resistance and voltage testing to confirm whether the sensor or wiring is at fault.
The most common symptoms include Check Engine light illumination with specific DTCs, erratic temperature gauge readings, poor fuel economy, black exhaust smoke, and cooling fan operation problems. Root causes range from internal sensor degradation and coolant contamination to wiring damage and poor engine grounds.
Proper replacement involves draining coolant, installing a new sensor with a fresh O-ring, bleeding air from the system, and resetting the ECU to relearn baseline values. Use OEM-specified coolant and inspect wiring during routine maintenance to prevent future failures.
With accurate diagnosis and proper repair, you can restore optimal performance, fuel economy, and emissions without unnecessary expense. Monitor your vehicle post-repair under real-world driving conditions to confirm complete resolution.