A cold room with an old, inefficient radiator is a frustration many homeowners know too well. Learning how to install a steam radiator the right way transforms your heating comfort while cutting energy waste. Steam radiators, especially classic cast iron models, deliver long-lasting warmth when installed using correct plumbing principles. This guide covers every step from planning and tool selection to final testing, with expert-backed techniques that prevent leaks, uneven heating, and broken fittings. You will learn why vent placement matters, how to drill and tap cast iron safely, and why thermostatic valves are worth the upgrade. By the end, you will feel confident tackling this moderate-difficulty project in about four hours.
Choose the Right Radiator Type
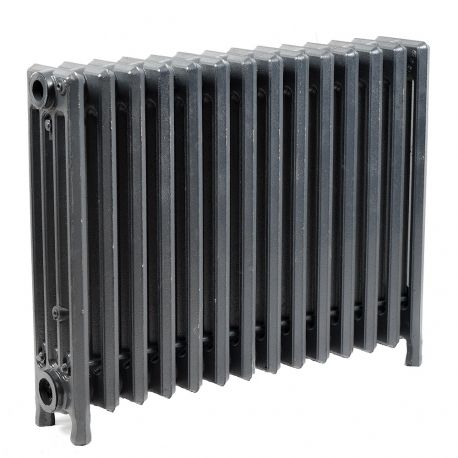
Verify Cast Iron Specifications
When replacing a steam radiator, confirm the new unit matches your system requirements. Most residential steam systems use freestanding cast iron radiators that connect via a single pipe and rely on air venting for operation. Check that the new radiator has two 1-1/4″ NPT bottom openings, one for the supply valve and one for a plug, along with two 1″ NPT top openings. These are standard across brands like Governale and similar manufacturers.
Pay close attention to manufacturing origin. Despite marketing claims, some radiators sold as American-made are actually produced overseas. Inspect casting marks or request origin verification before purchase, especially if domestic quality standards matter to you. Incorrect materials or thread types can lead to installation delays or leaks under steam pressure.
Match Spud and Valve Components
The spud, a large threaded nipple connecting the radiator to the floor valve, is often paired with a specific hand valve. These components form a matched set, meaning replacing one may require replacing the other to ensure a proper seal. If your new radiator comes with a spud already installed, confirm its thread compatibility with your existing valve. Mismatched spuds can cause misalignment or leaks, so always test-fit before final assembly.
If either the spud or valve shows signs of wear, corrosion, or stripped threads, replace both together. This proactive step prevents future service calls and ensures a durable, leak-free connection.
Plan Vent Placement Correctly
Use Lower Bung for Air Vent
A critical decision in steam radiator installation is where to place the air vent. Contrary to advice sometimes given for hot-water systems, steam radiators operate best with the vent located in the 1/8″ NPT bung about one-third up the end section, not at the very top.
Steam rises naturally, pushing air out through the lowest effective vent point. Placing the vent here allows air to escape efficiently as steam enters. Historical installations dating back to 1939 prove this method works, with radiators heating fully and quietly. Top-mounted vents using 1″ to 1/8″ reducers are unnecessary and create a bulkier, less attractive profile.
Avoid Top Vent Misconceptions
Some plumbers recommend top vents, assuming they purge all air for complete heating. But this logic applies to hydronic systems, not steam. In steam systems, air does not get trapped at the top. Instead, it gets pushed down and out through the lower bung by rising steam. Installing the vent at the top adds cost, complexity, and visual clutter without benefit.
For a cleaner look and correct function, always use the factory-provided 1/8″ bung hole near the top corner but one-third up the section. This location keeps the thermostatic valve low and discreet while maintaining optimal airflow dynamics.
Gather Tools and Materials
Essential Tools for Installation
Install a steam radiator with confidence by preparing the right tools ahead of time. This job rates moderate difficulty (3 out of 5) and typically takes four hours.
You will need:
- Adjustable wrench for general tightening
- Spud wrench (long-handled) to reach inside radiator sections and secure spud nuts
- Two pipe wrenches, one to hold the supply pipe steady and one to turn fittings
- Hex wrench for removing internal hex plugs from bungs
- Center punch to mark drill points on cast iron
- Drill with tool steel bits for drilling undrilled bungs
- 1/8″ NPT tap and tap handle for threading bung holes
- Tapping lubricant to prevent overheating during drilling
- Screwdriver for inspection
- Leverage pipe for stubborn fittings
A drill press is not required, but steady hands and patience are essential. If you feel uncomfortable drilling cast iron, consider having a machine shop tap the bung.
Required Materials and Sealants
Use high-quality materials to ensure a steam-tight, long-lasting installation.
Key supplies:
- Thick Teflon tape (3–4 mil), preferably Oatey brand, for sealing male threads
- Pipe dope used with wicking on high-pressure spud connections
- Wicking (jute or synthetic) inserted into spud threads for flexible, heat-resistant sealing
- Dish soap applied to mating faces to prevent galling and ease future disassembly
- Thermostatic steam radiator valve (such as a Macon single-pipe model)
- 1/8″ NPT air vent (if separate from valve)
Avoid thin, hardware-store Teflon tape. It compresses under steam pressure and can fail. Use thick tape only on threads entering the radiator body, and never apply sealant to nut-to-nut compression joints.
Prepare Radiator Bungs for Venting
Drill Undrilled Bung Holes
Many new radiators, especially imported models, arrive with solid bungs instead of pre-tapped 1/8″ NPT holes. You will need to drill and tap them yourself.
Start by inspecting the bung:
- If it has an internal hex socket, unscrew it with a hex wrench
- If it is a solid casting, proceed to drilling
Use a center punch to mark the exact center of the bung. This prevents the drill bit from wandering on the hard cast iron surface. Select a sharp tool steel drill bit sized for a 1/8″ NPT tap (typically 0.250″ or 17/64″). Apply tapping lubricant liberally and drill at low speed, since high RPMs can overheat and harden cast iron, making it brittle.
Let the bit do the work and avoid forcing it. Drill straight and stop once you reach sufficient depth (about 3/4″).
Tap Threads for 1/8″ NPT
After drilling, clean out metal chips and prepare to tap.
Insert a 1/8″ NPT tap into a tap handle. Apply more lubricant and start threading slowly, turning the tap about 1/4 turn forward, then 1/8 turn back to break chips. This prevents clogging and tap breakage.
Continue until you achieve full thread depth, typically 8 to 10 threads. Test the fit with a 1/8″ NPT plug or air vent. It should screw in smoothly by hand for the first few turns.
If tapping feels tight or binds, stop and clear chips. Never force the tap, since a broken tap in cast iron is extremely difficult to remove.
Install Thermostatic Valve and Vent

Select Thermostatic Over Manual Valve
Upgrade your system by installing a thermostatic steam radiator valve instead of a manual one. Unlike basic valves that stay open or closed, thermostatic models automatically regulate heat based on room temperature.
Here is how it works:
- The valve head senses ambient air temperature
- When the room reaches the set point, it closes the air vent
- With no air escaping, steam cannot enter and heat output stops
- As the room cools, the vent reopens, allowing steam back in
This creates individual zone control for each radiator, improving comfort and cutting fuel costs. According to heating expert Richard Trethewey, thermostatic valves allow radiators to silently emit a steady, comfortable warmth only when needed.
Mount Valve in Correct Opening
Most thermostatic valves install into the 1″ NPT top opening or directly into the newly tapped 1/8″ bung, depending on model design.
Apply 3 to 4 wraps of thick Teflon tape to the male threads before threading the valve in. Hand-tighten first, then finish with an adjustable wrench, taking care not to over-tighten. Cast iron is strong but brittle, and excessive force can crack the bung or damage internal threads.
Once the valve is secure, attach the air vent (if separate) to the top port. Use tape on the vent threads, but keep it minimal to avoid debris entering the mechanism. Orient the vent so it directs air away from walls, curtains, or furniture.
Assemble and Connect the Radiator
Reuse or Replace Hand Valve
Before mounting the radiator, decide whether to reuse or replace the hand valve at the floor connection.
If the existing valve is in good condition with no leaks and smooth operation, clean and reuse it. But if it is corroded, stiff, or leaking, replace it along with the spud. Remember that spuds and valves are often a matched pair, so replacing one may necessitate replacing the other.
To remove the old valve:
- Use two pipe wrenches, one to hold the supply pipe and one to turn the valve
- Turn counterclockwise; if stuck, apply penetrating oil and use a leverage pipe for extra force
- Never force so hard that you break the supply pipe
Install the new valve with pipe dope and wicking on the threads for a high-temperature, flexible seal.
Align Spud and Valve Parallel to Floor
Position the hand valve so its outlet is parallel to the floor. This alignment ensures the spud will line up straight with the radiator inlet.
Attach the spud to the valve outlet. Then lift the radiator into place, guiding the spud into the radiator’s bottom opening.
Use the spud wrench inside the radiator to tighten the internal spud nut while holding the valve steady with a pipe wrench. Tighten until snug, but again, avoid over-torquing.
Check that the radiator sits level and stable. Adjust feet or shims if necessary.
Seal Threads Properly for Steam

Use Teflon Tape on Radiator Threads
Thread sealing is critical in steam systems due to high temperatures and pressure cycles.
Apply thick (3–4 mil) Teflon tape to all male threads that enter the radiator body:
- Spud threads
- Plug threads
- Vent and valve threads
Wrap the tape clockwise (as viewed from the end of the thread) for 3 to 4 full turns. Do not cover the first thread, since this prevents tape from shearing off and clogging the system.
Apply Dope and Wicking on Spud Joints
For the main spud-to-valve connection, use pipe dope and wicking instead of tape alone.
Here is the correct method:
- Wrap wicking (jute or synthetic) around the spud threads
- Saturate it with pipe dope
- Screw the spud into the valve
This combination creates a flexible, durable seal that withstands thermal expansion and contraction. It also resists drying out over time, unlike tape, which can degrade.
Never apply sealant to the nut-to-nut connection between the spud and valve body. The seal comes from the compressed wicking inside, not the external threads.
Prevent Rust-Bonding with Dish Soap
One pro tip for future maintenance: apply a thin layer of dish soap to cleaned metal mating surfaces before reassembly.
This acts as a mild anti-seize compound, preventing rust from bonding cast iron and steel components together. Years later, when you need to remove the radiator, it will come apart easily instead of requiring extra force and risking broken pipes.
Turn On System and Test Operation
Follow Safe Startup Sequence
After installation, follow a precise sequence to avoid scalding or system damage.
- Close the hand valve at the floor
- Open the boiler drain valve to release pressure
- Fill the boiler and restore power only after all radiators are reconnected
- Once the system is pressurized, open the hand valve slowly
- Turn on the thermostat to call for heat
Wait for the next heating cycle to begin.
Listen for Air Vent Hissing
As steam builds in the boiler, it will travel toward the radiator. Watch and listen:
- You should hear a hiss of air escaping from the new vent
- This means air is being displaced by steam, indicating correct operation
- After 2 to 5 minutes, the hissing should stop as the radiator fills with steam and begins to radiate heat
If the radiator heats unevenly or not at all:
- Check that the vent is not clogged with paint or debris
- Confirm it is installed in the correct bung
- Ensure no sealant entered the vent mechanism during installation
Once the room reaches the set temperature, the thermostatic valve should close the vent, stopping steam flow. The radiator will cool gradually, then restart when the room temperature drops.
Fix Common Installation Issues

Handle Broken Air Vents Carefully
One of the most common problems during radiator work is breaking an old air vent in the bung.
To avoid this:
- Turn the vent counterclockwise slowly
- Feel for resistance; if it binds, stop and apply penetrating oil
- Never use excessive force
If a vent breaks off inside the bung:
- Do not attempt extraction with drill bits or easy-outs unless experienced
- A broken brass piece in cast iron is hard to remove and risks damaging the radiator
- Consider professional help or radiator replacement
Prevention is key: always hand-tighten new vents, and never use a wrench beyond snug.
Diagnose Incomplete Heating
If your new radiator does not heat fully, consider these causes:
- Clogged vent from paint, debris, or excess Teflon tape blocking airflow
- Incorrect vent placement; while lower bungs are standard, verify your model does not require top venting (rare)
- Faulty thermostatic valve; test by temporarily bypassing it with a manual vent
- System imbalance where other radiators may be stealing steam
Maintain Radiator for Long Life
Inspect and Clean Annually
Steam radiators can last decades with basic maintenance.
Each year, before heating season:
- Check for leaks at all joints
- Ensure the air vent is not painted over or clogged
- Test the thermostatic head; it should close when warm and reopen when cool
- Wipe down the radiator to remove dust and improve heat output
If the valve fails to respond, replace the thermostatic element or entire unit.
Paint Safely Without Clogging Vents
When painting near the radiator:
- Remove the air vent or cover it tightly with tape
- Avoid spraying paint directly onto the valve or bung
- Never paint over the vent, since this seals it shut and prevents steam entry
Repaint the radiator itself only when completely cold and disconnected from the system.
Replace Matched Components Together
Remember that spuds and valves are a team. If one fails, inspect the other. Replacing both at the same time ensures compatibility, proper alignment, and a reliable seal. It is a small added cost that prevents repeat visits and leaks.
Frequently Asked Questions About Steam Radiator Installation
How Long Does It Take to Install a Steam Radiator?
Most installations take about four hours for someone with moderate DIY skills. The time includes shutting down the system, removing old components, drilling and tapping if needed, mounting the new radiator, and testing. Complex jobs involving seized fittings or extensive drilling may take longer.
Can I Install a Steam Radiator Without Professional Help?
Yes, homeowners with basic plumbing knowledge can complete this project. The most challenging tasks are drilling and tapping cast iron, plus removing old, corroded fittings. If you feel unsure about drilling cast iron, a machine shop can pre-tap the bungs for you.
What Is the Difference Between a Manual and Thermostatic Steam Valve?
A manual valve stays fully open or fully closed based on user input. A thermostatic valve automatically modulates based on room temperature, closing the air vent when the room reaches the set point. Thermostatic valves provide zone control, energy savings, and quieter operation.
Where Should the Air Vent Be Placed on a Steam Radiator?
The air vent should be installed in the 1/8″ NPT bung located about one-third up the end section of the radiator. Top mounting is unnecessary for steam systems and adds cost without functional benefit. Lower placement has been proven effective since 1939 installations.
Why Is My New Steam Radiator Not Heating Evenly?
Common causes include a clogged air vent, incorrect vent placement, a faulty thermostatic valve, or system imbalance. Start by inspecting the vent for paint or debris. If the vent is clear, temporarily bypass the thermostatic valve to test whether it is the issue.
How Do I Prevent Leaks in Steam Radiator Thread Connections?
Use thick (3–4 mil) Teflon tape on all male threads entering the radiator body. For the main spud connection, use pipe dope combined with wicking for a flexible, durable seal. Avoid thin Teflon tape, which compresses under steam pressure and can fail.
Key Takeaways for Installing a Steam Radiator Successfully
Installing a steam radiator is a manageable DIY project when you focus on the details that matter most. Correct vent placement in the lower 1/8″ bung ensures full heating and quiet operation. Thick Teflon tape and pipe dope with wicking create reliable seals that withstand steam pressure and thermal cycling. Thermostatic valves transform your system by providing individual zone control and energy savings. Annual inspections keep the system running efficiently for decades.
Your next step is to gather your tools and inspect your existing radiator setup. Confirm thread sizes, check spud and valve compatibility, and decide whether you need to drill and tap new bungs. With proper preparation and the techniques covered here, you will enjoy silent, zone-controlled heat that lasts for years.