A water tank that won’t stop filling is a silent crisis wasting up to 10 liters every minute. This persistent overflow can add nearly 5,000 liters of weight to your roof in under eight hours while encouraging mold and corroding steel supports.
You can solve this problem by diagnosing three main culprits: a faulty float valve, excessive water pressure, or a blocked overflow pipe. This guide provides step-by-step repairs to stop the flood fast and prevent expensive structural damage to your home.
Diagnose the Exact Cause of Your Water Tank Overflow

Misdiagnosing the root cause leads to wasted effort and repeated failures. You must identify whether the issue stems from mechanical failure, pressure spikes, or pipe blockages before attempting repairs.
Check Float Valve Function First
The float valve acts as the primary shut-off mechanism using a floating ball attached to an arm. Failure here is the most common reason for continuous water flow.
- Water continues flowing even when the float arm is fully raised.
- The float ball sits partially submerged when the tank should be full.
- A constant trickle runs through the overflow pipe despite a high water level.
Lift the float arm gently by hand to test it. If water does not stop immediately, the valve is not sealing due to a worn washer or waterlogged float.
Identify Nighttime Overflow Patterns
If your tank overflows only between 11 PM and 5 AM, high water pressure is likely forcing water past the valve. Standard valves handle 1 to 3 bar, but mains pressure can spike to 5 bar during low-demand hours.
This scenario is common in newer homes or areas with booster pumps. You will need to install a pressure reducing valve if overflow correlates strictly with off-peak hours.
Inspect the Overflow Pipe for Blockages
The overflow pipe serves as a safety release rather than a continuous drain. Continuous flow from this pipe indicates a system failure upstream.
- Check for blockages: Look for wasps’ nests, leaves, or mineral buildup inside the pipe.
- Verify pipe size: The overflow must be larger than the inlet pipe, such as 32 mm for a 25 mm inlet.
- Confirm position: The pipe inlet should sit 5 to 10 cm above the float valve shut-off level.
A blocked overflow pipe turns your tank into a dangerous pressure vessel. Immediate clearing is required if water spills over the tank rim.
Test for Cross-System Leaks
Homes with central heating may experience mysterious overflows caused by a perforated coil in the hot water cylinder. Water from the higher heating expansion tank leaks into the domestic supply via gravity.
- Turn off water supplies to both tanks.
- Mark water levels in both tanks with a pencil.
- Wait 8 to 12 hours without using water.
- Check if the main tank level rose while the heating tank level dropped.
This specific leak requires professional repair or cylinder replacement since it bypasses the float valve entirely.
Repair the Float Valve to Stop Continuous Flow

Most float valve repairs take under 30 minutes and require only basic tools. Focus on this component if diagnostics ruled out pressure issues and pipe blockages.
Replace a Waterlogged Float Ball
A cracked float ball fills with water and sinks, preventing the arm from rising high enough to shut off the valve.
- Turn off the water supply at the isolation valve immediately.
- Drain the tank slightly by opening a tap below the tank.
- Unscrew the float ball from the arm using your hand or gentle grip.
- Shake the ball to check for sloshing water inside.
- Install a new plastic float ball of the same size.
Plastic floats resist corrosion better than metal ones and last longer in humid environments.
Fix a Leaking Valve Seat
A worn washer or damaged nozzle allows water to seep through even with a good float. You will need an adjustable spanner and a replacement kit.
- Hold the valve body steady with grips to prevent twisting the pipe.
- Loosen the locking nut with a spanner and remove it by hand.
- Remove the retaining clip and extract the internal cartridge.
- Inspect the rubber washer for cracks and the nozzle for warping.
- Replace parts ensuring you use a white nozzle for standard flow systems.
- Reassemble the unit and realign the float arm.
Replace the entire valve assembly if it is over five years old or located in a hard water area. Scale buildup often damages internal parts beyond simple fixes.
Adjust the Float Arm Position
Sometimes the fix is as simple as bending the float arm to lower the shut-off point.
- Bend the float arm slightly downward using your knee as a pivot.
- This action lowers the water level at which the valve closes.
- Test the system to ensure water stops 5 to 10 cm below the overflow inlet.
Do not over-bend the arm as this reduces your usable water capacity significantly.
Fix High Water Pressure Issues Causing Night Overflow
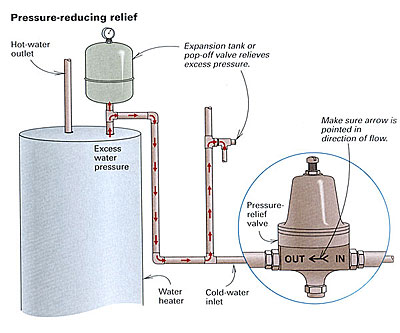
High pressure overwhelms standard valves during off-peak hours. You must reduce incoming pressure to protect your system.
Install a Pressure Reducing Valve
A pressure reducing valve limits incoming pressure to a safe 1.5 to 2.5 bar range.
- Turn off the main water supply and drain the line.
- Cut into the inlet pipe above the tank carefully.
- Install the pressure reducing valve ensuring the flow arrow matches direction.
- Set the output pressure to 2 bar using a gauge.
- Turn the water back on and monitor the tank overnight.
This installation protects the float valve from future pressure spikes and prevents recurrent overflow.
Clear and Upgrade the Overflow Pipe Capacity
A blocked or undersized pipe cannot handle excess water even if the float valve functions correctly.
Clear a Blocked Overflow
Water spilling over the tank rim indicates a blockage in the discharge path.
- Locate the white PVC overflow pipe extending from the tank side.
- Check for kinks or sharp bends that restrict water flow.
- Use a plumbing snake to remove debris, nests, or scale buildup.
- Flush the pipe with hot water and baking soda to dissolve remaining residue.
- Verify clear flow by pouring water directly into the pipe entrance.
Upsize an Undersized Overflow Pipe
Upgrade the pipe if the inflow rate exceeds the current discharge capacity. The overflow diameter must be at least one size larger than the inlet pipe.
- Cut out the old pipe section using a hacksaw or pipe cutter.
- Install new larger-diameter PVC pipe with solvent weld fittings.
- Route the discharge safely to a drain or ground level.
- Ensure the pipe never discharges directly onto a roof or slab.
Test and Verify the Repair Was Successful

Never assume the fix worked without systematic testing. Verification prevents future water waste and structural risks.
Perform a Slow Refill Test
- Turn the supply back on slowly to monitor the filling process.
- Watch the float arm rise to ensure it moves freely without sticking.
- Confirm water stops completely before reaching the overflow inlet.
- Check for leaks around the valve body and overflow pipe connection.
- Ensure the valve remains stable with no wobbling or shifting.
Conduct an Overnight Monitoring Test
Use this method for suspected cross-system leaks or pressure issues.
- Mark water levels in both domestic and heating tanks with a pencil.
- Isolate all water supplies before going to bed.
- Check levels the next morning for any changes.
- Contact a professional if the main tank rose while the heating tank dropped.
Prevent Future Overflows with Regular Maintenance
Fixing the problem once is not enough. Regular maintenance ensures your water tank operates safely for years.
Schedule Quarterly Inspections
Check your system every three months to catch issues early.
- Visually inspect the float ball for cracks or water accumulation.
- Ensure the float arm moves freely without obstruction.
- Confirm the overflow pipe is clear and dry during normal operation.
- Listen for hissing sounds that indicate a leaking valve.
Flush the overflow pipe annually and inspect tank supports for rust. Descaling the valve extends its life in hard water areas.
Upgrade to Reliable Components
Invest in durable parts to reduce future repair frequency.
- Use brass float valves in high-use areas for a 10 to 15 year lifespan.
- Install a float switch with automatic shutoff on pump-fed systems.
- Choose valves with built-in shut-off features for added safety.
Keep a Repair Kit On Hand
Store a plumber’s ball valve repair kit with spare washers, nozzles, and clips. This allows you to fix minor issues immediately without waiting for professional help.
Avoid Common Repair Mistakes
Even experienced DIYers make preventable errors that lead to recurring problems.
Don’t Just Bend the Arm to Stop Overflow
Lowering the float arm stops the overflow but reduces usable capacity. A 1,000 liter tank might only hold 800 liters after such an adjustment. Replace worn parts instead of masking the problem.
Never Ignore a Running Overflow Pipe
A constantly draining overflow is not normal operation. It signals a fault in the valve, pressure, or pipe that requires immediate attention.
Don’t Replace a Valve Without Checking Pressure
Installing a new float valve in a high-pressure zone without a pressure reducing valve guarantees failure. Always test pressure first.
Don’t Delay Clearing Blockages
A clogged overflow removes your safety net. If the float fails, the tank can overfill structurally and risk collapse.
Frequently Asked Questions About Water Tank Overflow
Why does my water tank overflow only at night?
Nighttime overflow usually indicates high mains pressure overwhelming the float valve. Municipal demand drops at night causing pressure to spike to 4 or 5 bar. Install a pressure reducing valve to limit incoming pressure to a safe 2 bar level.
How much water does an overflowing tank waste?
An overflowing tank can waste up to 10 liters per minute. This adds up to nearly 5,000 liters in under 8 hours. This waste increases water bills significantly and adds dangerous weight to your roof structure.
Can a heating system leak cause water tank overflow?
Yes, a perforated coil in your hot water cylinder can cause overflow. Water from the higher central heating expansion tank leaks into the domestic supply via gravity. Mark water levels in both tanks overnight to confirm this cross-system leak.
What size should my overflow pipe be?
The overflow pipe diameter must be at least equal to, ideally one size larger than, the inlet pipe. For a standard 25 mm inlet pipe, you need a minimum 32 mm overflow pipe to handle excess flow safely.
How often should I replace my float valve?
Replace PVC float valves every 3 to 7 years depending on water hardness. Brass valves last 10 to 15 years. Replace the entire assembly if the valve is over 5 years old or shows signs of scale buildup.
Key Takeaways for Fixing Your Water Tank Overflow

Fixing a water tank overflow starts with accurate diagnosis of the float valve, water pressure, or pipe blockage. Most repairs are quick, affordable, and prevent serious structural damage to your home. Acting fast stops water waste and protects your property from the risks of excess weight and mold.
Regular inspections and smart upgrades ensure your system remains reliable for years. Keep a repair kit on hand and address any signs of overflow immediately to avoid costly emergencies.