A cracked coolant reservoir can quickly turn into a costly engine problem if ignored. The reservoir handles coolant expansion and contraction as your engine heats up and cools down, operating under pressure up to 15 psi and temperatures near 220°F. When cracks form, especially in vehicles over 15 years old, coolant leaks out and your engine loses its ability to regulate temperature. This guide walks you through diagnosing the problem, choosing the right repair method, and deciding whether to replace the tank entirely.
Spot the Crack Before It Worsens
Catching a coolant leak early prevents expensive engine damage. The sooner you identify the crack, the better your chances of avoiding overheating or a blown head gasket.
Look for These Warning Signs
• Puddles of green, orange, or pink coolant under your vehicle’s front
• Sweet smell emanating from the engine bay when the engine is warm
• Low coolant levels without visible hose or radiator leaks
• Steam rising from the engine compartment
• Illuminated low coolant warning light on your dashboard
• Engine temperature climbing higher than normal, especially at idle
Confirm the Leak with Simple Tests
Verifying the crack saves you from guessing wrong. A cracked reservoir often hides in plain sight, so testing confirms exactly where your coolant is escaping.
Perform a Visual Inspection
- Wait for the engine to cool completely
- Shine a bright flashlight around the reservoir base, hose connections, and fill neck
- Look for hairline cracks, cloudy or chalky plastic, or wet spots that keep reappearing
- Check mounting bracket stress points and seams carefully
Try the Dry-and-Observe Method
- Wipe the entire reservoir completely dry with a clean rag
- Start the engine and let it reach normal operating temperature
- Watch the suspect area closely for beading coolant that appears as the plastic heats up
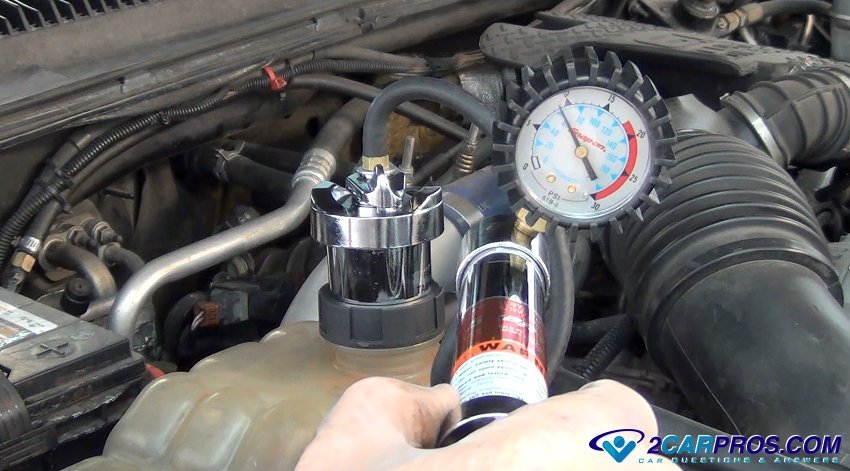
Pressure Test the System
- Rent a hand-operated cooling system pressure tester from an auto parts store
- Attach the tester to the radiator or reservoir neck
- Pump the system to 15 psi (standard operating pressure)
- Monitor for 10 to 15 minutes
- A pressure drop combined with visible seepage confirms an active leak
Emergency Repair: Superglue and Silicone Sealant
Need to get home or reach a parts store quickly? This temporary fix can buy you up to 72 hours of driving time.
Apply CA Glue with High-Temp RTV
- Ensure the engine is completely cool before starting
- Relieve system pressure by slowly loosening the coolant cap
- Wipe the crack area completely dry and clean
- Apply cyanoacrylate (CA) glue directly into the crack
- Cover with a thick layer of high-temperature orange RTV silicone
- Allow 1 to 2 hours of curing time before refilling coolant and testing
This method works for short distances only. Avoid high-speed highway driving and check coolant levels every 20 minutes.
Epoxy Repairs That Actually Work

Most epoxies fail on plastic reservoirs because standard adhesives cannot bond to polyethylene or polypropylene. The right product with proper preparation makes all the difference.
Skip Standard JB Weld
User reports consistently show standard JB Weld failing within 30 minutes under pressurized conditions. The plastic material simply does not bond well with conventional steel-reinforced epoxies.
Use Plastic-Specific Epoxy Instead
Devcon Plastic Welder is formulated specifically for low-surface-energy plastics like those used in coolant reservoirs. Users report strong, lasting bonds when proper prep is followed.
Step-by-Step Epoxy Application
- Drain coolant below the crack level using a syringe or siphon
- Sand the area 1 to 2 inches around the crack with 80 to 120 grit sandpaper in a crosshatch pattern
- Clean thoroughly with isopropyl alcohol to remove all grease and residue
- Mix Devcon Plastic Welder according to package directions
- Apply the first layer and allow it to tack for approximately 1 hour
- Add a second reinforcing layer for strength
- Let cure for a full 24 hours before reinstalling
Pro tip: Embed a small piece of metal, such as a cut section from an aluminum beer can, under the epoxy for added structural strength.
Fiberglass Resin for Strong Patches
Fiberglass matting can create a near-indestructible repair, but the process carries risks that make it suitable only for experienced DIYers.
Apply Fiberglass Reinforcement
- Clean and sand both the inside and outside surfaces around the crack
- Apply resin-soaked fiberglass matting over the damaged area
- Add 2 to 3 layers for sufficient structural integrity
- Clamp or weight down the patch during the 24-hour cure period
- Sand smooth and inspect carefully for any pinholes
The main risk involves loose fiberglass fibers breaking off and circulating through the cooling system, potentially damaging the water pump or radiator. This method works best for external repairs or tanks you plan to replace soon.
Plastic Welding: The Most Permanent DIY Solution
For those with some technical skill, plastic welding creates a molecular bond that handles heat and pressure better than any adhesive.
Use a Soldering Iron and Nylon Zip Ties
- Groove out the crack using a 60-watt or higher soldering iron tip
- Heat the plastic edges until they soften but do not burn through
- Melt nylon material from a zip tie into the groove, fusing it with the base plastic
- Build up a smooth weld bead
- Allow to cool completely before handling
This technique creates a genuine molecular bond rather than just a surface seal. Users report indefinite durability when done correctly. However, practice on scrap plastic first to avoid burning through your only reservoir.
Mechanical Fix for Large Breaks
When significant plastic is missing, a screw and sealant combination can hold a repair in place.
Insert a Screw with RTV Sealant
- Apply orange RTV silicone directly over the hole or crack
- Press a small stainless steel machine screw into the sealant
- Tighten slightly to compress the sealant without cracking the plastic further
- Allow 24 hours to cure fully before refilling the system
Never place screws inside the tank where they could break off and damage the water pump or radiator. This method works only for external repairs where the screw is fully sealed.
Replace the Reservoir: The Smart Long-Term Fix
Replacement is the only solution that guarantees reliable, worry-free operation. OEM tanks cost as little as $17, making this the most cost-effective approach in the long run.
Why Replacement Beats Repair
• OEM reservoirs cost $17 to $50 depending on your vehicle
• Aftermarket options range from $30 to $80
• Installation takes 10 to 60 minutes for most vehicles
• Zero risk of engine damage from failed repairs
• Factory materials handle UV degradation and thermal cycling properly
Quick Replacement Steps
- Allow the engine to cool completely
- Drain coolant below the reservoir level
- Disconnect hoses and any electrical connectors for level sensors
- Remove mounting brackets or screws
- Install the new tank with secure hose connections and tight clamps
- Refill with a 50/50 coolant mix
- Bleed air from the system according to manufacturer instructions
Upgrade to Aluminum for Durability
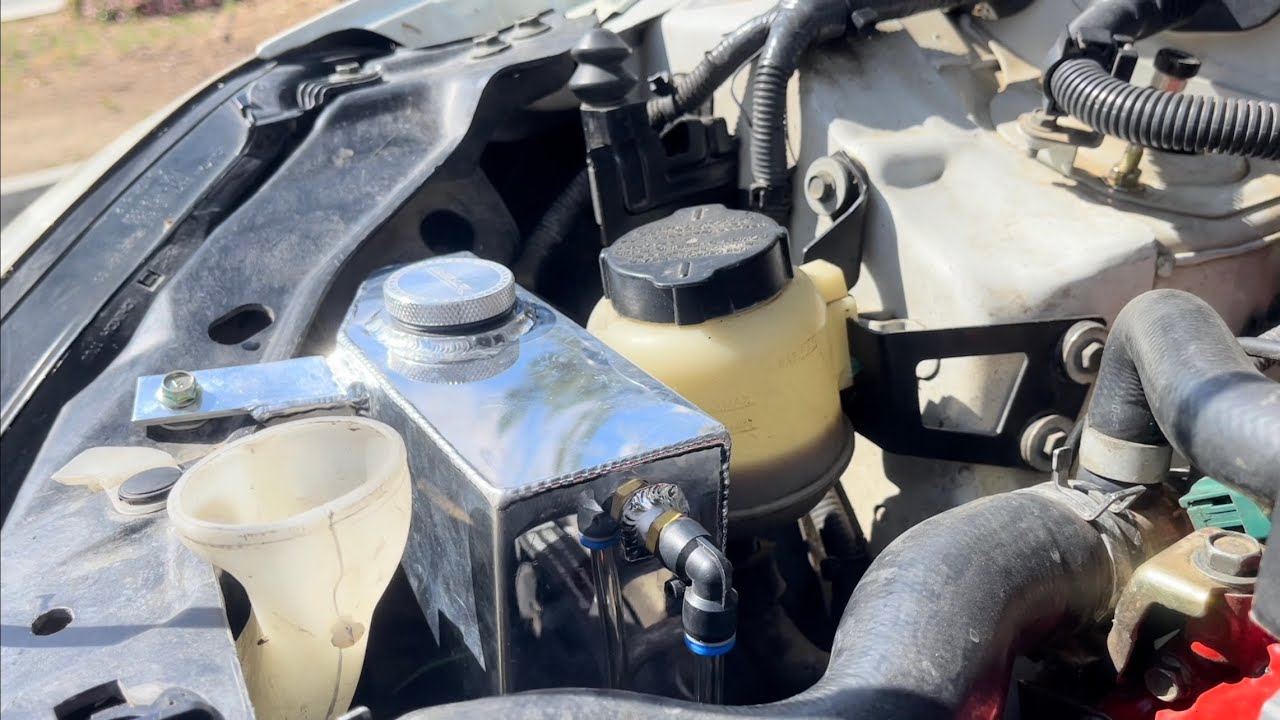
For enthusiasts seeking superior durability and under-hood aesthetics, a billet aluminum catch can eliminates cracking concerns entirely.
Install an Aluminum Coolant Tank
• Prices range around $50 for quality units like the Weapon-R 18oz universal
• Aluminum handles extreme heat and pressure without degrading
• Immune to UV radiation and chemical breakdown
• Provides a custom, high-performance look
• May require additional adapters or hoses for your specific application
This upgrade works well for modified vehicles or anyone wanting maximum reliability.
Never Open a Hot Cooling System
Safety matters more than any repair. The cooling system maintains pressure up to 15 psi when hot, and opening the cap suddenly causes scalding coolant spray.
Stay Safe During Repairs
• Always wait for the engine to reach room temperature before removing the cap
• If you must open it warm, wrap a thick towel around the cap and turn slowly to release pressure gradually
• Wear gloves and safety glasses to protect against coolant splashes
• Keep your face away from the reservoir when releasing pressure
Risks of a Failed Repair
A temporary fix that fails while driving can leave you stranded and cause serious engine damage.
What Can Go Wrong
• Engine overheating leads to warped cylinder heads costing $1,500 or more to repair
• Blown head gasket requires $2,000 or more in labor and parts
• Epoxy or fiberglass debris clogs the water pump or radiator
• Complete system failure leaves you stranded on the highway
A $17 to $50 reservoir is far cheaper than a $2,000 engine repair. The risk simply is not worth it for most drivers.
Test Your Repair Before Driving
Assuming a fix worked without verification invites trouble. Testing confirms your repair will hold under real conditions.
Verify Your Work
• Reattach the pressure tester and pump to 15 psi
• Monitor for 30 minutes with no pressure drop
• Check coolant level every 20 to 30 miles for the first few days
• Watch the temperature gauge closely during drives
• Use an OBD2 scanner with an app like Torque for real-time coolant temperature monitoring
Final Thoughts on Fixing Your Coolant Reservoir
While temporary repairs like superglue and silicone can get you home in an emergency, they are not reliable long-term solutions. The cooling system operates under significant heat and pressure, making adhesives prone to failure. Plastic welding offers a durable DIY fix for those with the necessary skills, but replacement remains the safest and most cost-effective approach for most vehicle owners. Spend $17 to $50 now on a new reservoir to avoid $2,000 in engine repairs later. For enthusiasts seeking maximum durability, upgrading to an aluminum catch can provides peace of mind and a sleek under-hood appearance.
Frequently Asked Questions About Coolant Reservoir Cracks
Can I drive with a cracked coolant reservoir?
Driving with a cracked reservoir is risky. The leak worsens under heat and pressure, leading to potential engine overheating. If you must drive, keep distances short, check coolant frequently, and have the vehicle towed if temperatures rise dangerously.
How long does a temporary repair last?
Superglue and silicone repairs typically hold for 72 hours or less under ideal conditions. Epoxy repairs using plastic-specific products can last weeks to months with proper preparation. However, no temporary fix matches the reliability of replacement.
Why does JB Weld fail on coolant reservoirs?
Standard JB Weld and similar epoxies do not bond well to polyethylene and polypropylene plastics commonly used in reservoirs. These materials have low surface energy that prevents proper adhesion. Use Devcon Plastic Welder or plastic-specific epoxies instead.
How much does a replacement coolant reservoir cost?
OEM reservoirs cost as little as $17 for some Honda models, with most falling between $30 and $50. Aftermarket options range from $30 to $80. Installation takes 10 to 60 minutes depending on your vehicle.
Can I plastic weld my own coolant reservoir?
Yes, plastic welding with a soldering iron and nylon zip tie filler creates a molecular bond that can be permanent. This method requires skill and practice. Attempt it on scrap plastic first, and do not attempt this repair if you are inexperienced with soldering tools.