
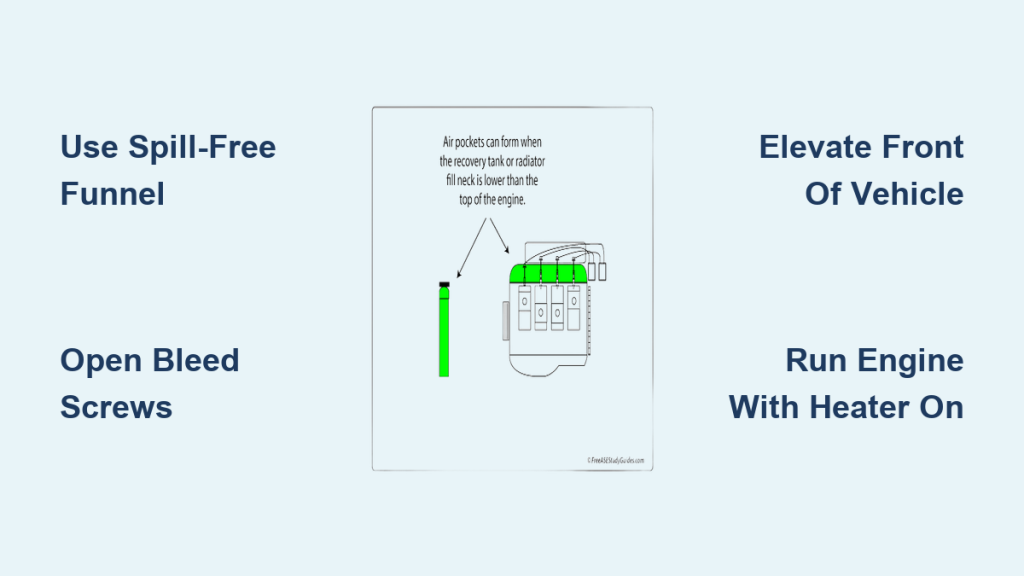
An air locked coolant system can silently damage your engine, causing overheating, poor heater performance, and costly repairs if ignored. When air gets trapped in the cooling passages after a coolant flush, water pump replacement, or radiator repair, it blocks proper circulation and creates dangerous hot spots in the engine block or cylinder head. You might notice your temperature gauge spiking, hear gurgling sounds under the dash, or get lukewarm air from your vents even when the engine is fully warmed up. The good news is that most air locks can be cleared at home with basic tools and the right technique.
This guide walks you through every step to diagnose, remove, and prevent airlocks in your vehicle’s cooling system. You’ll learn proven methods including using a spill-free funnel, locating and using bleed screws, and gravity bleeding techniques to restore proper coolant flow. We’ll cover safety precautions, model-specific tips, and how to verify the fix so your engine runs cool and your cabin stays warm.
Essential Safety Steps Before Working on Your Cooling System
Working on a cooling system requires proper safety precautions to prevent serious burns and injury.
Never Open a Hot System
Always wait until the engine is completely cool before opening the cooling system. Ideally, the engine should be below 100°F (38°C). Never remove the radiator cap or expansion tank cap while the engine is warm. Wrap the cap in a thick cloth and turn it slowly to release any residual pressure before fully removing it.
Gather Required Supplies
You will need these items before starting:
• Spill-free funnel or DIY version from a cut plastic bottle
• Correct coolant type (OAT, HOAT, IAT, or OEM-specified)
• Distilled water for mixing concentrate
• Heat-resistant gloves and safety glasses
• Jack and jack stands or ramps for elevation
• Socket set or screwdriver for bleed screws
Position Your Vehicle Properly
Park on a level surface or elevate the front of the vehicle using ramps or jack stands. This angles the engine upward, helping trapped air rise to the highest point where it can escape more easily through the radiator or expansion tank.
Recognizing Air Lock Symptoms in Your Vehicle
Catching an airlock quickly prevents engine damage and unnecessary part replacements.
Common Warning Signs to Watch For
Watch for these symptoms that indicate trapped air in your cooling system:
• Engine overheats within minutes of startup despite full coolant level
• Temperature gauge fluctuates wildly between normal and hot
• Cabin heater blows cold or lukewarm air when engine is hot
• Gurgling or bubbling noises from under the hood or dashboard
• Bubbles visible in the overflow tank when engine is running
Why These Symptoms Matter
Air acts as an insulator, blocking heat transfer and coolant flow. When trapped in the heater core, it stops hot coolant from reaching the cabin. In the engine, it causes localized boiling and hot spots that can warp cylinder heads or blow head gaskets, especially in aluminum engines.
Using a Spill-Free Funnel to Bleed the System
The spill-free funnel (also called a coolant bleeder funnel) is the most effective DIY tool for removing air from modern cooling systems.
Attach the Funnel Correctly
With the engine cold, remove the radiator or expansion tank cap and securely attach the spill-free funnel using the correct adapter. Ensure a tight seal to prevent air from being sucked back in during the bleeding process.
Fill and Start the Engine
Pour 50/50 pre-mixed coolant into the funnel until it is half full. Set the climate control to maximum heat with the fan on low. Start the engine and let it idle.
Monitor and Purge Air
As the engine warms and the thermostat opens (around 180-200°F), watch for bubbles rising into the funnel. Gently rev the engine to 2,500-3,000 RPM several times to dislodge stubborn air pockets. Squeeze the upper radiator hose firmly (wear gloves) to help push air out and confirm it feels solid rather than spongy.
Finalize the Bleed Process
Keep topping off the funnel as the coolant level drops. Continue until bubbling stops and the level stabilizes, typically within 15-30 minutes. Let the engine run for at least 15 minutes after stabilization. Then shut it off and allow it to cool completely before removing the funnel and reinstalling the cap.
Bleeding Air Through Factory Bleed Screws
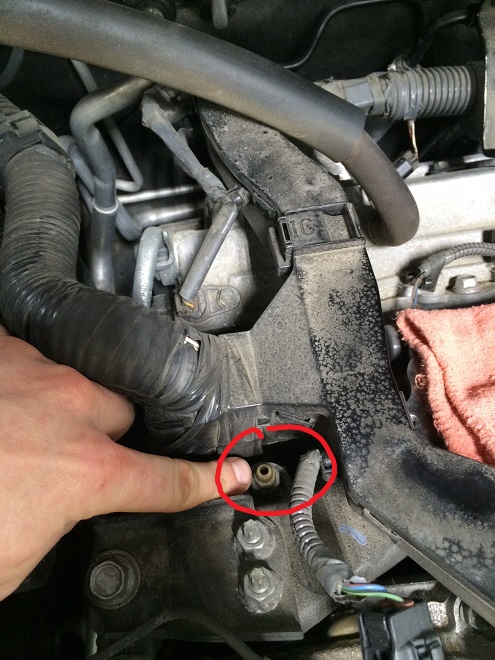
Some vehicles, especially European models and GM LS engines, have dedicated bleed screws to release trapped air.
Locate the Bleed Screw
Common locations include the top of the thermostat housing, upper radiator hose connection, cylinder head near the firewall, or water pump housing. Consult your service manual for exact placement.
Open and Flush Air
With the engine cold, place a drain pan beneath the screw. Loosen it slightly, just enough for coolant to seep out. Slowly add coolant to the radiator or reservoir. Watch for air bubbles escaping. Continue until a steady, bubble-free stream flows from the screw, then tighten it securely.
Complete the Process
Top off the coolant, start the engine with the heater on max heat, and gently rev it several times. Recheck the level after the engine cools. Repeat the bleeding process if necessary.
Gravity Bleeding Method Without Special Tools
If you do not have a spill-free funnel or access to bleed screws, gravity bleeding uses elevation and heat to purge air.
Elevate and Fill
Raise the front of the vehicle using ramps. With the engine cold, remove the radiator cap and fill the radiator to the top with the correct coolant mix. Do not install the cap yet.
Idle and Monitor
Start the engine and let it idle with the heater on full blast. Watch the filler neck for bubbles rising to the surface. Add coolant as the level drops. Lightly rev the engine every few minutes to help shake loose trapped air pockets.
Finish Safely
Once bubbling stops and the level stabilizes, shut off the engine and let it cool completely. Reinstall the radiator cap and top off the reservoir. Never drive without the radiator cap if the system is pressurized.
Cold Fill and Cycle Method for Modern Engines
Vehicles with electric water pumps or turbocharged systems often require a cold-start fill method for proper bleeding.
Initial Fill
Fill the expansion reservoir to the cold fill line. Do not open the radiator.
Start and Monitor
Start the engine cold and let it idle. The electric pump will activate as the engine warms. Watch the reservoir level drop as the thermostat opens and air escapes from the system.
Repeat Cycles
Top off coolant repeatedly during warm-up. Turn off the engine, let it cool, and repeat the cycle until the level remains stable after several heat and cool cycles. This method works best for turbo intercooler loops and dual-circuit systems.
Manufacturer-Specific Bleeding Techniques
Cooling system designs vary widely, and using the correct procedure matters for your specific vehicle.
European Vehicles
BMW, Audi, Mercedes, and Volkswagen models often have multiple bleed screws that must be opened in sequence. Some require a scan tool to activate the electric water pump or open the thermostat electronically. BMW and MINI vehicles often need ISTA software for a complete bleed.
Japanese Models
Toyota and Honda vehicles typically have no bleed screws. They rely on the spill-free funnel method or the elevated front-end approach. Fill the radiator, run the engine with the heater on, and monitor for bubbles.
American Performance Engines
GM LS engines benefit from temporarily plugging heater hoses during initial fill to prevent air trapping. Ford EcoBoost engines have a separate turbo intercooler coolant loop with its own bleed point that must be addressed separately.
Testing and Verifying the Repair
After bleeding, confirm the system is fully purged of air before calling the job complete.
Drive and Monitor
Take the vehicle on a 15-20 minute test drive under load, including highway speeds and hills. The temperature gauge should stay steady in the normal range. Test the heater to ensure it delivers consistent hot air within minutes of warm-up.
Listen and Inspect
Check for gurgling sounds when turning the heater on or off. Inspect all hoses, clamps, the radiator, and water pump for leaks. Look for steam or unusual noises under the hood.
Check Coolant Level After Cooldown
Wait several hours or overnight, then recheck the expansion tank. The level should remain between the min and max marks. Top off if needed and repeat bleeding if symptoms return.
Preventing Future Air Locks
Avoid recurring airlock issues with proper maintenance habits and correct refilling techniques.
Refill Coolant Correctly
Never pour coolant too fast, as it creates vortexes that trap air. Use a funnel to maintain a continuous fluid column. Pre-fill new radiators or reservoirs before installation to reduce air entrapment.
Use the Right Coolant
Always match OEM specifications for coolant type. Do not mix incompatible coolants, as they can form gel or sludge that blocks passages. Use pre-mixed 50/50 coolant or mix concentrate with distilled water only.
Maintain System Integrity
Replace radiator and reservoir caps every 3-5 years or 60,000 miles. Inspect hoses and clamps regularly for cracks or looseness. Tighten all connections properly after any cooling system service.
When to Call a Professional Mechanic
Some airlock cases require advanced tools or expertise that exceed typical DIY capabilities.
Seek Professional Help If
Call a professional if the engine still overheats after multiple bleeding attempts. White exhaust smoke or milky oil indicates head gasket failure that requires immediate professional attention. Coolant disappearing without visible leaks suggests an internal problem. Vehicles requiring scan tool-assisted bleeding (common on BMW and Audi models) or those with dual coolant circuits should be serviced by professionals who have proper vacuum-fill equipment.
Key Takeaways for Fixing Your Air Locked Coolant System
Fixing an air locked coolant system is a straightforward DIY task when done correctly. A spill-free funnel, proper vehicle positioning, and patience will clear most airlocks in under 30 minutes. Always follow manufacturer guidelines for your specific vehicle, use the correct coolant type, and verify the repair with a test drive. Monitor your temperature gauge and heater performance after the fix to confirm success.
For modern or high-performance engines, professional vacuum-filling may be worth the investment to ensure complete air removal and long-term reliability. Keep your cooling system well-maintained, and address any airlock symptoms immediately to prevent costly engine damage.
Frequently Asked Questions About Air Locked Coolant Systems
Can air in the cooling system cause overheating?
Yes. Air pockets reduce coolant flow and create localized hot spots, leading to overheating even with adequate coolant volume in the system.
How long does it take to bleed a cooling system?
Most bleeding procedures take 15-45 minutes depending on the method used and vehicle complexity. Complex or turbocharged engines may require multiple cycles or professional vacuum filling.
Is it safe to drive with air in the coolant system?
No. Prolonged driving risks engine overheating, head gasket failure, and expensive internal damage. Address the issue before operating the vehicle.
What happens if you do not bleed the cooling system properly?
You will experience persistent overheating, inefficient heater performance, premature water pump failure, and increased stress on hoses and the radiator. Severe cases can result in catastrophic engine damage.
Can a bad radiator cap cause air in the system?
Yes. A weak or leaking cap fails to maintain pressure, allowing coolant to boil at lower temperatures and drawing air back into the system as it cools.
Why does my coolant reservoir keep bubbling when the engine is hot?
This could indicate incomplete bleeding, a blown head gasket allowing combustion gases into the cooling system, or a cracked cylinder head or engine block. A block test can confirm the presence of exhaust gases in the coolant.



