

Your engine relies on coolant to stay cool and run efficiently. When coolant levels drop or the system is drained for maintenance or repairs, refilling it properly becomes critical. An improperly filled cooling system can trap air, leading to overheating, warped cylinder heads, or catastrophic engine failure. This guide walks you through the exact steps, tools, and safety practices needed to fill engine coolant correctly, based on manufacturer specifications and professional standards.
You will learn how to identify your vehicle’s system type, choose the right coolant, purge air effectively, and verify a successful fill. Every section covers actionable steps you can follow in your driveway, with warnings about common mistakes that could damage your engine.
Identify Your Coolant System Type

Before adding any fluid, determine how your vehicle’s cooling system is designed. The fill method depends on whether your car uses a reservoir-based system or a direct radiator cap system.
Reservoir vs. Radiator Fill Systems
Most modern vehicles (post-2000) use a pressurized expansion tank, which is a translucent reservoir connected to the radiator via hoses. The fill point is the reservoir, not the radiator. There is no accessible radiator cap in these systems. Instead, the reservoir cap maintains system pressure, typically 15-18 psi. Coolant expands into and retracts from this tank naturally as the engine heats and cools.
Older or performance vehicles often have a direct-fill radiator with a visible cap on top. In these systems, coolant is added directly into the radiator neck, and the overflow tank serves as a secondary container.
Pro Tip: Look under the hood for labels like “Coolant” or “Engine Coolant Only” near the reservoir. If you do not see a radiator cap, your system is reservoir-based.
Choose the Correct Coolant Type
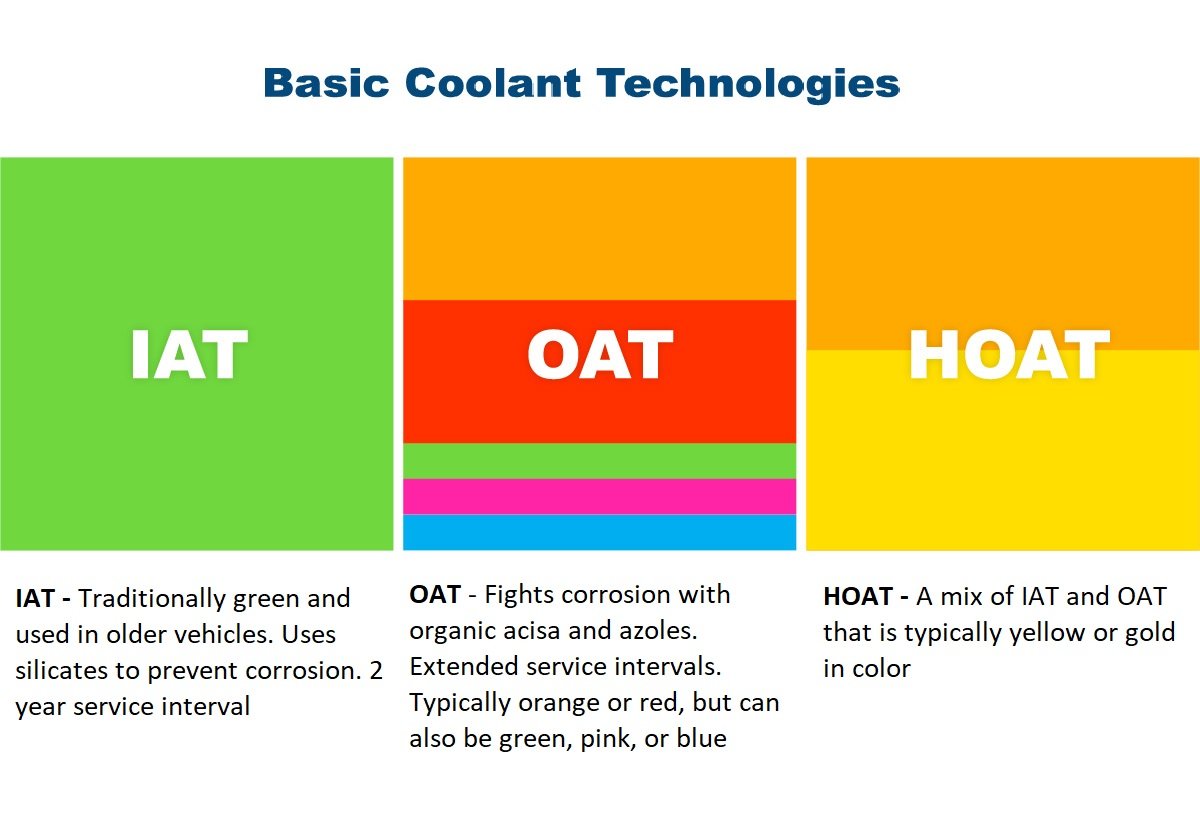
Using the wrong coolant leads to gel formation, clogs, and water pump failure. Always match the type specified in your owner’s manual.
Match OEM Coolant Specifications
Four main coolant chemistry types exist, each with specific applications and service intervals:
- IAT (Inorganic Acid Technology): Green in color, used in pre-2000 vehicles, requires replacement every 2 years or 30,000 miles
- OAT (Organic Acid Technology): Orange or red (such as GM Dex-Cool), offers long-life protection up to 5 years or 150,000 miles
- HOAT (Hybrid OAT): Yellow or turquoise, used by Ford, Chrysler, and BMW, service interval of 5 years or 100,000-150,000 miles
- Si-OAT (Silicate-free OAT): Blue or pink, used by Honda, Toyota, and Subaru, replace every 5 years or 100,000 miles
Warning: Never mix coolant types. Incompatible chemistries react and form sludge that blocks coolant flow and damages system components.
Use 50/50 Mix Ratio
Two options exist for coolant preparation. Premix (ready-to-use) is ideal for DIYers since no dilution is needed. Concentrate requires mixing 50% with distilled water (never tap water). Tap water contains minerals that cause scaling and corrosion inside the cooling system.
Pro Tip: Pour concentrate and water into a separate container first to ensure proper mixing before adding to your vehicle. Pouring them separately into the system leads to uneven mixing and poor freeze and boil protection.
Prepare the Engine and Work Area
Filling coolant on a hot engine risks severe scalding from pressurized steam and fluid. Safety must come first.
Cool the Engine Completely
Wait 30-60 minutes after engine shutdown, or ideally overnight, before opening the cooling system. Never open the system when it is hot. When removing the cap, use a thick rag and turn slowly to release any residual pressure gradually.
Set Up for Success
Park on a level surface for accurate level readings. Elevate the front of the vehicle slightly (using jack stands) to help air escape upward during filling. Work in a well-lit, ventilated area. Wear chemical-resistant gloves and safety goggles since coolant is toxic if ingested or contacted.
Toxicity Note: Ethylene glycol has a sweet smell that attracts pets and children. Store unused coolant out of reach and dispose of used coolant responsibly at recycling centers.
Drain and Flush the Cooling System
If replacing all coolant completely, start with a proper drain and flush to remove old, degraded fluid and contaminants.
Step 1: Drain Old Coolant
Lift the vehicle using a jack and jack stands for safety. Place a 5-gallon drain pan under the radiator. Open the drain valve (drain cock) and let the old fluid flow completely. Close the valve securely when finished.
Avoid: Draining through freeze plugs (core plugs) since they can crack or leak upon reinstallation, causing more problems than they solve.
Step 2: Flush the System
Refill with distilled water through the reservoir or radiator. Start the engine and run for 10-15 minutes with the heater set to maximum heat and fan speed on high. Shut off the engine, let it cool completely, then drain the water. Repeat this process 2-3 times until the water runs clear.
Inspect the flushed water carefully. Rust, sludge, or oil may indicate internal corrosion or head gasket failure that requires further attention before adding new coolant.
Refill with New Coolant
The filling method depends on your system design, so follow the correct procedure for your vehicle.
For Reservoir-Based Systems
Fill the coolant reservoir to the “COLD” or “MIN” line. If the radiator cap is accessible, also fill the radiator to just below the filler neck. The reservoir is your primary fill point on most modern vehicles.
For Direct Radiator Cap Systems
Remove the cap and pour coolant directly into the radiator neck. Fill to the base of the neck, not the top. Do not overfill since coolant expands significantly when hot.
Pro Tip: On vehicles equipped with an air bleed valve, open it before filling. Add coolant slowly until a steady, bubble-free stream flows out, then close the valve.
Purge Air from the Cooling System
Air pockets represent the number one cause of post-fill overheating. Use one of these proven methods to remove trapped air effectively.
Method 1: Vacuum Fill (Best for Modern Vehicles)
This professional method is used by technicians on BMW, Audi, Mercedes, and other complex systems. Connect a vacuum fill machine to the expansion tank using the correct adapter. Pull vacuum to approximately 27 inches Hg. If the vacuum drops rapidly, a leak exists in the system and must be repaired before proceeding. Switch to coolant supply and let atmospheric pressure push fluid into the system. The upper radiator hose will inflate when full. Close the system and start the engine.
Why it works: Vacuum filling removes over 99% of air, preventing localized overheating that can reach 300°F or higher and cause head gasket damage.
Method 2: Bleed Screw Air Removal
Locate the bleed screw, which is often near the thermostat housing or intake manifold. Open the screw before filling. Add coolant slowly until bubble-free flow appears from the port. Close the screw and top off as needed.
Method 3: Engine Run-Up (Burping)
Replace the cap loosely (if allowed by your manual). Start the engine and let it run until the thermostat opens, which typically takes 15-20 minutes. Watch for the upper radiator hose to become hot, the radiator fan to cycle on, and the temperature gauge to stabilize. Turn off the engine and let it cool completely, which takes 6+ hours or overnight. Recheck and top off the coolant level.
Example (2007 Honda Civic): Fill reservoir to MAX, add coolant to radiator to base of neck, loosely install radiator cap, start engine and run until fan kicks on, shut off and add more coolant as needed, then tighten cap securely.
Method 4: Multiple Cooldown Cycles
Repeat the heat-up and cool-down process over 2-3 days. Top off after each cooldown cycle. The final level stabilizes after 2-3 drive cycles as trapped air gradually escapes.
Note: Some systems lose up to one quart of coolant overnight as trapped air escapes through the system.
Final Top-Off and Verification
After the engine cools completely, perform the final check to ensure proper fill levels.
Recheck Coolant Level When Cold
Open the system carefully using a thick rag. Top off to the correct level: for reservoirs, aim between “MIN” and “MAX” (closer to “MIN” when cold); for radiators, fill to the base of the filler neck. Reinstall the cap securely.
Critical: The only accurate coolant check occurs when the engine is cold and turned off. Checking a hot engine gives false readings and risks scalding.
Avoid Common Mistakes
Even small errors lead to expensive engine damage. Learn what to avoid before starting your coolant fill project.
Critical Errors to Avoid
- Opening the system when hot causes severe scalding
- Using tap water leads to scaling and internal corrosion
- Mixing coolant types creates gel, clogs, and pump failure
- Running the engine with the cap off causes fluid ejection and overheating
- Skipping air purge步骤 results in airlocks and overheating
- Not rechecking after cooldown leaves you with low coolant and engine damage
Myth Busted: Running the engine cap-off to “burp” air is discouraged by factory manuals. This method is unsafe and often ineffective at removing all trapped air.
Maintain Coolant Long-Term
Prevent future issues with regular checks and timely replacements.
Best Maintenance Practices
Check coolant level every oil change. Inspect coolant condition every 6 months, looking for faded color, sludge, debris, or unusual smells. Replace coolant every 5 years even if mileage is low because corrosion inhibitors degrade over time. Replace the reservoir cap if it fails to hold pressure.
Service Intervals: IAT coolants require replacement every 2 years or 30,000 miles. OAT and HOAT coolants last 5 years or 100,000-150,000 miles.
Recognize Cooling System Failure Signs
Act quickly if you notice these symptoms to prevent serious damage.
Warning Signs to Watch For
- Temperature gauge in the red zone indicates low coolant, airlock, or failed pump
- Steam from under the hood means coolant is boiling
- Sweet smell or colored puddle under the vehicle signals a leak
- Poor heater performance points to air in the system or blocked heater core
- Milky coolant indicates oil contamination, typically from head gasket failure
Immediate Action: Pull over safely, turn off A/C, turn heater to maximum heat, and shut off the engine if overheating persists.
Dispose of Used Coolant Responsibly
Coolant is recyclable. Never dump it down drains or onto soil.
Eco-Friendly Disposal
Store used coolant in a sealed, labeled container marked “Used Antifreeze.” Recycle at auto parts stores (AutoZone, O’Reilly), hazardous waste centers, or licensed repair shops.
Why it matters: Ethylene glycol harms wildlife and contaminates water supplies. Recycling protects the environment while recovering valuable materials.
Frequently Asked Questions About Filling Engine Coolant
Can I add coolant to a hot engine?
No. Adding coolant to a hot engine causes thermal shock that can crack the engine block or cylinder heads. Always wait 30-60 minutes or overnight for the engine to cool completely before opening the cooling system.
What happens if I mix different coolant types?
Mixing incompatible coolant types causes a chemical reaction that forms gel and sludge. This blockage restricts coolant flow, leads to overheating, and can destroy the water pump. Always flush the system completely before switching to a different coolant type.
How do I know if air is still trapped in my system?
Signs of trapped air include poor heater performance (blowing cold air), temperature gauge fluctuations, and localized overheating. If the heater does not blow hot air after the engine reaches operating temperature, air is likely still trapped in the system.
Why does my coolant level drop after filling?
Coolant level drops after filling because trapped air escapes from the system over time. Some systems lose up to one quart overnight as air migrates upward and exits. This is normal. Recheck and top off the level after the engine cools completely.
Do I need to use distilled water for mixing concentrate?
Yes. Always use distilled or deionized water when mixing coolant concentrate. Tap water contains minerals that cause scaling, reduce heat transfer, and accelerate internal corrosion. Distilled water ensures proper mixture and protects engine components.
How often should I replace engine coolant?
Replacement intervals depend on coolant type. IAT (green) coolants need replacement every 2 years or 30,000 miles. OAT and HOAT coolants (orange, yellow, pink) last 5 years or 100,000-150,000 miles. Always follow your owner’s manual specifications.
Key Takeaways for Filling Engine Coolant
Filling engine coolant properly requires attention to system type, correct coolant selection, and thorough air removal. Always identify whether your vehicle uses a reservoir-based or direct radiator fill system before starting. Choose the exact coolant type specified by your manufacturer and never mix different chemistries. Use a 50/50 mix ratio with distilled water for concentrate products.
Air removal is the most critical step. Use vacuum filling for modern vehicles, bleed screws when available, or multiple heat-up and cool-down cycles as a backup method. Always verify the fill level when the engine is completely cold, then recheck after 24-48 hours of driving to ensure stability.
Following this guide keeps your engine running cool and protected for years to work on your vehicle with confidence.



