

A low or empty coolant level can lead to engine overheating, warped cylinder heads, and even total engine failure. Knowing how to fill antifreeze coolant correctly is essential for every vehicle owner who wants to protect their engine from costly damage. Whether you’re topping off a low reservoir after a long drive or performing a full system refill after a flush, doing it safely and accurately keeps your cooling system working properly. This guide walks you through the exact steps based on manufacturer standards and safety best practices.
Locate Your Coolant Fill Point
Modern and older vehicles use different fill locations. Finding the right one before you start prevents mistakes and potential burns.
Reservoir Versus Radiator Caps
Most vehicles from the 1990s onward use a coolant reservoir (also called an overflow tank). This translucent plastic tank sits near the radiator and has visible “MIN” and “MAX” fill lines. Older models and some performance vehicles still use a radiator cap directly on the radiator itself.
Tip: If you are unsure which system your vehicle uses, check your owner’s manual. Never guess—this prevents burns from opening a hot pressurized system.
Why Fill Point Matters
Reservoir-based systems allow coolant to expand and contract between the radiator and the tank. You fill the reservoir to the “MAX” line when the engine is cold. Radiator-cap systems require filling directly into the radiator neck, and the cap maintains 13-18 psi of pressure to raise the boiling point.
Choose the Correct Coolant Type
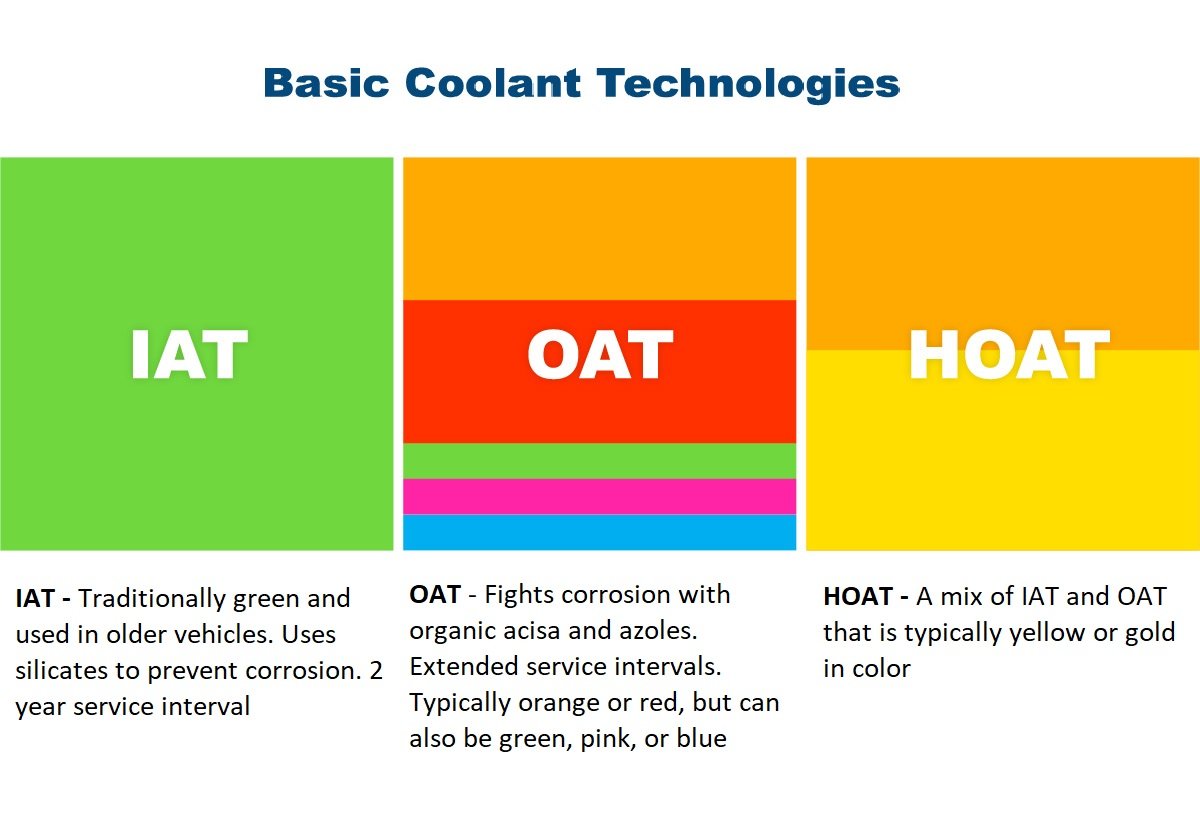
Using the wrong antifreeze can cause sludge, corrosion, and water pump failure. Matching your vehicle’s requirements is critical.
Coolant Types at a Glance
Different coolant chemistries serve different vehicles. Using the wrong type creates chemical reactions that clog cooling passages.
| Coolant Type | Typical Color | Lifespan | Common Vehicles |
|---|---|---|---|
| IAT | Green | 2-3 years | Pre-1996 vehicles |
| OAT | Orange/Red | 5 years | GM (Dex-Cool), newer imports |
| HOAT | Yellow/Blue | 3-5 years | Ford, Chrysler, BMW |
| Si-OAT | Pink/Purple | 5+ years | Honda, Toyota |
Warning: Coolant color is not a reliable identifier. Always check the product label and your owner’s manual for the correct type.
Mixing Rules to Follow
Use a 50/50 mix of coolant and distilled water unless purchasing premixed coolant. Never use tap water because minerals cause scale buildup and corrosion. Never mix different coolant types—chemical incompatibility creates gel that clogs narrow passages in the radiator and engine block.
Pro Tip: Buy premixed coolant if you are unsure about ratios. It eliminates the guesswork and ensures proper protection.
Gather Essential Tools and Safety Gear
Having the right supplies before starting prevents spills and ensures a smooth process.
What You Will Need
- Correct coolant type for your vehicle
- Distilled water (if using concentrated coolant)
- Funnel
- Chemical-resistant gloves and safety goggles
- Drain pan (for flush procedures)
- Wrench for drain valve
- Shop rags for cleanup
Critical Safety Precautions
Ethylene glycol is highly toxic and can be fatal to pets and children even in small amount. Wear gloves and goggles whenever handling coolant. Clean spills immediately and store used coolant in sealed, labeled containers away from children and animals.
Eco Note: Recycle old coolant at AutoZone, O’Reilly, or a household hazardous waste center. Never pour it down drains or onto soil.
Top Off Coolant Step by Step
Use this method when your coolant level is low but the system has not been drained or worked on recently.
Confirm the Engine Is Cold
Park on level ground and wait 30-60 minutes after shutting off the engine. Touch the radiator hoses—if they feel warm, wait longer. Opening a hot, pressurized system causes severe burns from steam and hot coolant.
Check and Add Coolant
For reservoir systems: Locate the coolant reservoir and check the level against the “MIN” and “MAX” lines. If below “MIN,” add premixed 50/50 coolant or properly diluted concentrate. Fill to “MAX” only—do not overfill because the coolant expands when heated.
For radiator-cap systems: Place a thick cloth over the cap and turn it slowly counter-clockwise. Listen for hissing that indicates pressure. If pressure is present, close the cap and wait longer. Fill the radiator to about one inch below the neck, then replace the cap loosely. Start the engine, let it warm up, then cool down and top off as needed.
Inspect the Coolant Condition
Look at the coolant in the reservoir. It should be clear and bright (green, orange, pink, or yellow depending on type). If it appears brown, rusty, or milky, flush the system or investigate for internal leaks like a head gasket failure.
Perform a Full Coolant Flush and Refill
A full replacement is needed every 2-5 years depending on coolant type, after replacing components like the radiator or water pump, or when the coolant appears dirty or contaminated.
Drain the Old Coolant
- Elevate the front of your vehicle with jack stands.
- Place a drain pan under the radiator.
- Remove any plastic undertray blocking access.
- Open the drain valve (drain cock) on the lower radiator.
- Drain both the radiator and reservoir completely.
Inspection Tip: Examine the drained fluid. Rust particles indicate corrosion. A milky appearance suggests oil contamination, possibly from a blown head gasket.
Flush the System
- Close the drain valve.
- Fill with distilled water only.
- Run the engine for 10-15 minutes with the heater on high.
- Shut off, cool down, and drain.
- Repeat 2-3 times until the drained water runs clear.
Refill with Fresh Coolant
Mix concentrate with distilled water in a 50/50 ratio unless using premixed. Pour slowly into the radiator or reservoir. For radiator-fill systems, remove the cap, fill to the base of the neck, and open any bleed valve until steady coolant flow (no bubbles) appears. For reservoir systems, fill to the “MAX” line when the engine is cold.
Bleed Air from the Cooling System
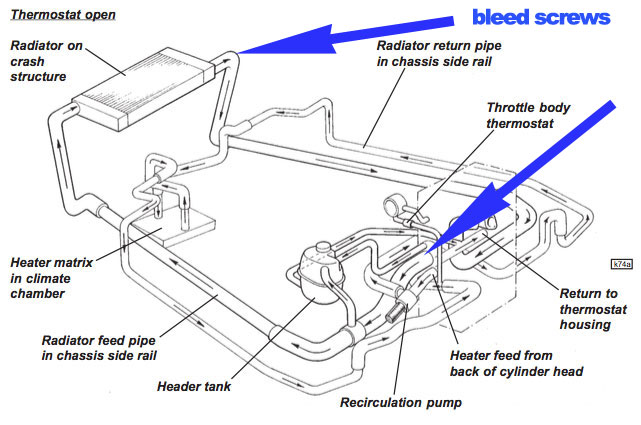
Trapped air pockets cause overheating, poor heater performance, false temperature readings, and water pump cavitation. Removing air is essential after any fill or flush.
Use a Bleed Valve
Many vehicles have bleed valves on the thermostat housing or high points in the engine. Open the valve while filling. Close it when you see steady coolant flow without bubbles.
Heater and Hose Method
Turn the cabin heater to maximum heat to open the heater core valve. Squeeze the upper radiator hose while the engine idles. Watch the reservoir for air bubbles rising and escaping.
Multiple Heat-Cool Cycles
- Start the engine and let it reach operating temperature.
- Shut off and let cool completely (1-2 hours).
- Recheck the level and top off if needed.
- Repeat this process for 2-3 cold starts to allow all air to escape.
Never run the engine with the radiator cap off. This outdated practice is unsafe for modern pressurized systems and leads to coolant loss and contamination.
Common Mistakes to Avoid
Opening a Hot System
Risk: Pressurized hot coolant causes severe burns. Fix: Always wait until the engine is completely cool. Touch the radiator hoses—if they are warm, wait longer.
Mixing Coolant Types
Risk: Chemical reactions form sludge that clogs passages and destroys the water pump. Fix: Use only one type. Flush the system if you have mixed incompatible coolants.
Using Tap Water
Risk: Minerals create scale buildup that reduces cooling efficiency. Fix: Always use distilled or deionized water for mixing or flushing.
Overfilling the Reservoir
Risk: Hot expansion causes overflow that can damage electrical components. Fix: Fill to the “MAX” line only when the engine is cold.
Skipping Air Bleeding
Risk: Air pockets cause overheating even when coolant levels are correct. Fix: Use bleed valves, the heater method, or multiple heat-cool cycles.
Troubleshoot Problems After Refill
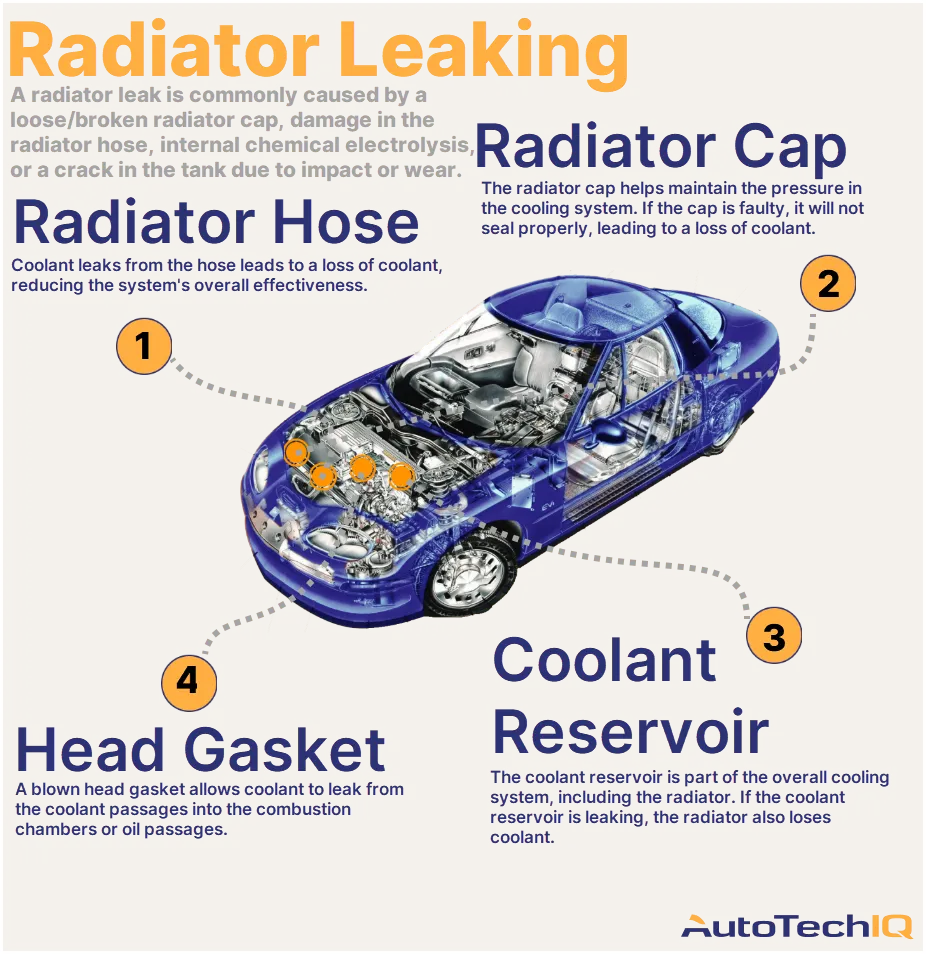
Coolant Level Keeps Dropping
A slight drop after the first few drive cycles is normal as air escapes. Ongoing loss indicates a leak. Check for puddles under the vehicle. Use UV dye and a black light to find small leaks. Perform a coolant pressure test to confirm.
Overheating After Refill
Likely causes include an air pocket, a stuck thermostat, or a faulty water pump. Bleed the air first, then inspect the thermostat and water pump if overheating continues.
Sweet Smell or Steam from the Hood
This indicates an external coolant leak. Inspect radiator hoses, the water pump weep hole, and the reservoir for cracks. Tighten loose clamps or replace damaged parts.
Maintenance Schedule for Coolant Health
| Coolant Type | Replacement Interval |
|---|---|
| IAT (Green) | 2-3 years or 36,000 miles |
| OAT (Orange) | 5 years or 150,000 miles |
| HOAT (Yellow/Blue) | 3-5 years or 100,000-150,000 miles |
Check coolant level at every oil change. Inspect for discoloration, rust, or oil residue. Ensure the radiator cap seal is intact.
Best Practice: Test coolant strength with a refractometer or test strips before assuming it is still good.
Final Thoughts on Filling Antifreeze Coolant
Filling antifreeze coolant is straightforward when you follow the right steps. Always wait for a cold engine, use the correct coolant type for your vehicle, and never mix different chemistries. Bleed air from the system after any fill to prevent overheating and ensure proper circulation. Monitor levels for the first few days after servicing and address any continued loss immediately.
Recycle your used coolant responsibly at an auto parts store or hazardous waste facility. Record the date and mileage of your service for future reference. By maintaining your cooling system properly, you protect your engine from overheating damage and extend the life of your vehicle.
Frequently Asked Questions About Filling Antifreeze Coolant
How often should I add antifreeze to my vehicle?
Under normal conditions, coolant should not require regular topping off. A consistent need to add coolant indicates a leak (external or internal) or a system failure like a blown head gasket.
Can I mix different types of antifreeze together?
No. Mixing incompatible coolants causes chemical reactions that create sludge, reduce heat transfer, and damage components. Always use the manufacturer-specified type for your vehicle.
What happens if I run my vehicle with low coolant?
Low coolant leads to engine overheating, warped cylinder heads, a blown head gasket, and potentially catastrophic engine failure. Address low coolant levels immediately.
Can I use water instead of antifreeze in an emergency?
Only as a temporary measure. Water provides no freeze protection, no boiling point elevation, and no corrosion inhibitors. Replace it with proper 50/50 coolant as soon as possible.
Why does my coolant level drop after I just filled it?
A slight drop is normal as air pockets escape during initial circulation. However, continued loss indicates a leak or internal combustion chamber intrusion (head gasket failure) that requires diagnosis.



