
Is your engine running hotter than usual? Clogged radiator coils and fins are a leading cause of overheating in vehicles. Over months of driving, dead bugs, road grime, and internal scale build up on and inside your radiator, restricting airflow and blocking coolant circulation. Ignoring this buildup forces your engine to work harder and can lead to expensive mechanical failures. This guide walks you through how to clean radiator coils safely and effectively, covering both the external fins and the internal cooling passages. You will learn which cleaners to use, which to avoid, and how to keep your cooling system running at peak performance.
Clean Radiator Fins Externally

The front face of your radiator collects the most debris because it faces forward into oncoming air. Cleaning these external fins restores airflow and is the easiest maintenance task you can perform at home.
Spray and Soak Fins
Mix a cleaning solution using 1 part Simple Green Pro HD to 3 parts water in a spray bottle. This non-corrosive formula cuts through grease, bug residue, and road grime without harming aluminum or rubber seals. Spray generously across the entire front surface of the radiator, paying extra attention to the lower grille area where debris collects most. Let the solution dwell for 2 to 3 minutes to break down stubborn buildup. Never use vinegar or bleach on radiator coils, since both cause corrosion and degrade gaskets over time.
Remove Debris Gently
Use a soft-bristled brush to loosen dirt and trapped particles from between the fins. Work in straight, vertical motions to avoid bending the delicate metal. For embedded pebbles or compacted insects, gently dislodge them with the edge of the brush or a plastic pick. Aggressive metal tools can crush fins and permanently reduce airflow. If fins are already bent, carefully straighten them with a fin comb or a flathead screwdriver to restore proper air passage.
Rinse from Engine Side
Rinse the radiator from the engine side toward the front of the vehicle whenever possible. This reverse-flush technique pushes debris out the same direction it entered, preventing particles from being driven deeper into the core. Use a low-pressure garden hose or pour water gently from a bucket. High-pressure sprayers can warp fins, especially on the backside, so keep pressure minimal. Repeat the spray, brush, and rinse cycle until runoff water runs completely clear.
Dry Before Operating
After rinsing, let the radiator air dry thoroughly. Wipe away excess water from surrounding engine bay areas to prevent electrical issues. Never start the engine while the radiator is wet or damp. Allow at least 30 minutes for full drying, especially in humid climates. Once dry, reinstall any panels or shrouds you removed. Your radiator can now breathe freely again.
Flush Internal Radiator Coils
External cleaning handles surface debris, but internal scale and old coolant residue require a deeper flush. This process circulates a cleaning solution through the entire cooling system to dissolve buildup inside the engine block and radiator tubes.
Prepare Flush Solution
Mix 1 part Simple Green Pro HD to 15 parts water in a large bucket. Most 4-cylinder vehicles hold roughly one gallon of coolant, so plan your mix accordingly. Stir well to ensure even distribution of the cleaner. Do not use undiluted cleaner or household chemicals like vinegar, which corrode aluminum and damage seals. Always check your owner manual for chemical compatibility before starting.
Drain Old Coolant First
Place a drain pan beneath the radiator petcock, which is the drain valve at the bottom of the radiator. Remove the radiator cap to break the vacuum, then open the petcock using gloves or pliers. Let all old coolant drain completely before closing the valve tightly. Dispose of used coolant at a certified recycling center. Never pour coolant down a drain or onto the ground, as it is toxic to animals and the environment.
Circulate Cleaner Safely
Pour the 1:15 cleaning solution into the radiator opening. Replace the cap and start the engine, then let it idle for 5 to 15 minutes or until it reaches normal operating temperature. Reaching operating temperature opens the thermostat, allowing the solution to flow through the engine block, heater core, and back to the radiator. Do not rev the engine during this cycle. After the cycle, turn off the engine and let it cool completely before draining.
Rinse Until Water Runs Clear
Refill the radiator with clean, distilled water and run the engine for 5 minutes. Cool the engine and drain the water. Repeat this rinse cycle until the drained water runs completely clear with no foam or discoloration. Residual cleaner can react with new coolant, so thorough rinsing is critical. For stubborn deposits, a second chemical flush may be necessary.
Refill with Correct Coolant
Check your owner manual for the correct coolant type and mix ratio, which is usually 50/50 coolant to water. Pour the fresh coolant into the radiator until full, then replace the cap and inspect for leaks. Start the engine and let it warm up to confirm proper circulation. Top off as needed once the system stabilizes.
Use Safe Cleaning Agents Only
Choosing the right cleaner protects your engine from corrosion and seal damage. Many household products seem harmless but cause serious harm to cooling system components.
Avoid Vinegar and Bleach
Never use vinegar on radiator coils. Vinegar contains acetic acid, which corrodes aluminum and weakens rubber gaskets over time. Bleach is equally dangerous because it contains sodium hypochlorite that aggressively attacks steel and aluminum. Both chemicals can damage the engine block, cylinder head, and intake manifold. They also create sludge when mixed with coolant, leading to clogs and overheating. Despite online suggestions, these household cleaners are unsafe for any part of the cooling system.
Choose Non-Corrosive Cleaners
Opt for professional-grade, non-corrosive cleaners like Simple Green Pro HD. This product is specifically formulated to be safe on aluminum, stainless steel, chrome, and engine seals. Its clean-rinsing formula removes grease, oil, and grime without leaving harmful residues. Always dilute according to the task, using 1:3 for external cleaning and 1:15 for internal flushing. Proper dilution ensures effectiveness without risking component damage.
Apply Off-Road Cleaning Techniques

Off-road vehicles face unique challenges from mud, dust, and debris. Specialized techniques help clean radiator coils without requiring full disassembly.
Blow Out Debris with Air
For off-road vehicles frequently exposed to dust and mud, use low-pressure compressed air to blow debris from the front of the radiator. Follow with a soft brush to remove loosened particles, then rinse from the backside using a garden hose on a low setting. This combination clears deep buildup without disassembly. Always cover the engine bay and air intake to prevent water intrusion during cleaning.
Use Foaming Cleaner via Overflow
Spray an automotive-grade foaming radiator cleaner into the overflow tank. Let the foam sit for 15 to 20 minutes so it clings to internal surfaces and breaks down sludge. Then drain and flush with water. This no-disassembly method works well for light to moderate buildup and routine maintenance.
Brush Internally with Flexible Shaft
For hard-to-reach debris, use a flexible radiator cleaning brush, often powered by a drill. Insert the brush into the core and gently rotate to dislodge compacted grime. This mechanical method complements chemical flushing, especially in vehicles with dense fin spacing. Move slowly to avoid puncturing tubes or bending fins.
Try a Flush Kit for Speed
Radiator flush kits connect directly to heater or radiator hoses, letting you push cleaner and water through the system under pressure. These kits save time and improve circulation compared to manual filling. Always install the kit with the engine off and cool, and follow kit instructions carefully. Some kits require back-flushing to remove stubborn deposits.
Combine Methods for Heavy Buildup
For severely clogged radiators, use a combined approach that starts with a chemical flush, follows with a flexible brush to clear residual debris, and finishes with a final rinse. This thorough method avoids full radiator removal while ensuring deep cleaning. It is ideal for older vehicles or those driven in dusty environments.
Never Pressure Wash the Back
Avoid pressure washing the back of the radiator. High pressure will bend or collapse fins, destroying airflow efficiency. If using a pressure washer, limit it to the front side only and use the lowest possible setting. Always shield electrical components, the air intake, and fuse boxes from water spray.
Follow Critical Safety Rules
Cleaning radiator coils involves hot fluids, chemicals, and electrical components. Following safety rules prevents burns, injuries, and costly damage.
Work on a Cool Engine
Never clean a hot radiator. Wait until the engine is completely cool and touch the radiator cap to confirm. Opening a hot system can release scalding steam or coolant that causes serious burns. Always remove the cap slowly, pointing it away from your body, even when the system feels cool.
Wear Gloves and Protect Components
Wear gloves when handling drain valves or chemicals. Use pliers if the petcock is stuck. Cover sensitive engine parts, especially the air intake, alternator, and fuse box, before rinsing or using compressed air. Water intrusion can lead to electrical failures or hydrolock, which occurs when water enters a cylinder and prevents the engine from turning.
Dispose of Coolant Properly
Used coolant is toxic and environmentally hazardous. Collect all drained fluid in a sealed container and take it to an auto parts store or recycling center that accepts antifreeze. Never pour it on the ground or into storm drains.
Diagnose Cleaning Needs Early

Spotting problems early helps you clean radiator coils before serious overheating occurs. Watch for these warning signs during routine driving and maintenance.
Spot Overheating Signs
Engine overheating is the primary indicator of a dirty radiator. If your temperature gauge climbs into the red zone, especially in stop-and-go traffic, check the radiator fins first. External blockage from bugs and dirt is a common cause. Clean the fins before assuming thermostat or water pump failure.
Check for Cloudy Rinse Water
If rinse water remains cloudy after multiple cycles, the radiator still has internal buildup. Repeat the flush until water runs clear. Persistent cloudiness means more aggressive cleaning, possibly a second flush or mechanical brushing, is needed.
Identify Bent Fins Visually
Inspect the radiator face for bent or crushed fins. Even small bends reduce airflow and heat dissipation. Use a fin comb to straighten them immediately. Left uncorrected, bent fins lead to chronic overheating and reduced system lifespan.
Stop When Foam Persists
During final rinsing, if water continues to foam, residual cleaner remains in the system. Keep flushing. Adding fresh water and running the engine briefly can help clear trapped bubbles. Only refill with coolant when foam is completely gone.
Maintain a Clean Radiator
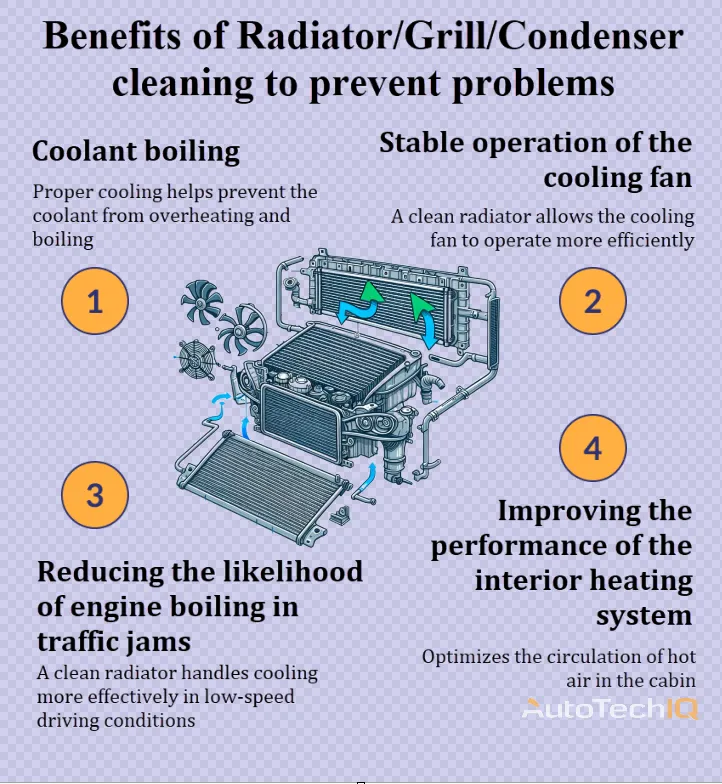
Regular maintenance keeps your radiator working efficiently and prevents future overheating problems. A simple schedule goes a long way toward extending cooling system life.
Clean Fins Yearly
Schedule annual external cleaning of radiator fins, especially before summer or off-road seasons. A quick spray, brush, and rinse prevent major buildup and keep cooling performance optimal. Vehicles in dusty or bug-heavy areas may need cleaning twice a year.
Flush Every Five Years
Perform a full internal radiator flush every five years or as recommended by your manufacturer. This removes internal corrosion and maintains coolant efficiency. Vehicles used for towing or in extreme climates should follow a more frequent schedule.
Prevent Future Buildup
Install a radiator screen if you drive off-road or in debris-prone areas. These mesh guards stop bugs, leaves, and rocks from entering the core. Clean the screen regularly to avoid restricting airflow. Also, use high-quality, long-life coolant to reduce sludge formation over time.
Frequently Asked Questions About Cleaning Radiator Coils
What is the best cleaner for radiator coils?
Simple Green Pro HD is the recommended cleaner for both external and internal cleaning. Mix it at a 1:3 ratio with water for spraying on fins, and at a 1:15 ratio for internal flushing. It is non-corrosive to aluminum, stainless steel, chrome, and rubber seals.
Can I use vinegar to clean radiator coils?
No. Vinegar contains acetic acid, which corrodes aluminum and degrades rubber gaskets. It can cause rust and permanent damage to your cooling system. Use a professional-grade, non-corrosive cleaner instead.
How often should I clean my radiator coils?
Clean the external fins at least once per year. Perform a full internal flush every five years, or more often if you tow heavy loads or drive in extreme climates. Vehicles in dusty or bug-heavy environments may need external cleaning twice a year.
How do I know if my radiator coils need cleaning?
Common signs include engine overheating, especially in traffic, and a temperature gauge that climbs into the red zone. Cloudy rinse water during flushing and bent or crushed fins are also indicators that cleaning is overdue.
Is it safe to pressure wash radiator coils?
Only use a pressure washer on the front side of the radiator, and only at low pressure. Never pressure wash the back of the radiator, as high pressure will bend or collapse the delicate fins and destroy airflow efficiency.
Can I clean radiator coils without removing them?
Yes. External cleaning with spray, brush, and rinse works without removal. Internal flushing also requires no disassembly if you use the drain petcock, overflow tank foaming cleaners, or a flush kit connected to the radiator hoses.
Key Takeaways for Cleaning Radiator Coils
Cleaning radiator coils is a straightforward task that prevents overheating and extends engine life. Use Simple Green Pro HD at the correct dilution ratios (1:3 external, 1:15 internal) and avoid vinegar and bleach entirely. Always work on a cool engine, wear gloves, and dispose of used coolant at a certified recycling center. Schedule annual external cleaning and a full internal flush every five years to keep your cooling system efficient. Start by inspecting your fins today, and if you spot buildup or bent fins, gather your supplies and tackle the job this weekend.



