

A dirty coolant bottle can hide serious cooling system issues or simply accumulate grime over time. If you have noticed sludge, discoloration, or reduced visibility in your coolant level, it is time to clean it. The good news is that most coolant bottles can be restored effectively with common household items and a few simple tools. Whether dealing with sticky orange gunk from degraded Dexcool, chalky mineral deposits from tap water, or yellowed plastic from UV exposure, this guide walks you through every safe, proven method to clean your coolant bottle thoroughly and correctly.
You will learn how to diagnose the type of contamination, choose the best cleaning method, avoid dangerous chemical mistakes, and decide whether cleaning is worth it or if replacement is smarter. By the end, you will have a crystal-clear reservoir that supports a healthy cooling system and accurate fluid monitoring.
Remove and Drain the Coolant Bottle
Before cleaning, safely remove the coolant reservoir for full access to all internal surfaces and ports.
Turn Off Engine and Let Cool
Never open the cooling system when hot. Wait at least one to two hours after driving to ensure pressure has dropped and coolant is cool to the touch. Opening a hot system can cause coolant to spray and cause burns.
Drain Coolant into a Sealed Container
Place a drain pan under the radiator petcock or use a turkey baster through the reservoir cap to withdraw coolant. Transfer old coolant to a sealed container because it is hazardous waste and must be recycled at an auto parts store or designated collection center. Never pour coolant down drains or on the ground.
Disconnect Hoses and Unfasten Mounts
Label overflow, return, and vent hoses with tape to avoid misconnection during reinstallation. Use pliers or a pick to loosen hose clamps if they are stuck. Remove mounting screws, which are often two Phillips-head bolts, securing the reservoir. Gently wiggle the tank free while watching for internal baffles that may snag on components.
Pro Tip: Some modern vehicles like certain Chevrolet G6 models and BMW N54 engines have sealed-loop designs where damaged tanks must be replaced rather than cleaned.
Flush Out Loose Debris First
Rinse the tank before applying chemical treatments to remove surface grime and prevent chemical reactions with loose particles.
Use High-Pressure Water
Attach a garden hose with a narrow nozzle or use a power washer on its lowest setting. Spray through each port, aiming at corners and baffles where sludge typically collects. Shake the tank with water inside to help dislodge clinging residue.
Soak and Repeat
Plug the top of the tank with your hand or a rag and let water sit for 30 minutes to loosen stubborn deposits. Shake the tank vigorously, then drain. Repeat this process until the outflow water runs mostly clear.
Visual Cue: If water drains brown, orange, or oily, deeper cleaning is definitely needed.
Choose the Right Cleaning Method by Residue Type

Match your cleaning method to the specific type of contamination for the best results.
For Organic Sludge: Rice Plus Dishwasher Tablet
This method works best for thick, gelatinous orange or brown buildup commonly found in Dexcool systems. Add one-half cup of uncooked rice, which acts as a gentle scrubber. Drop in one automatic dishwasher tablet. Fill the tank halfway with hot water. Seal the top with a rubber glove secured with cable ties. Shake hard for one to two minutes, repeating every 10 minutes. Let the mixture soak for 30 to 60 minutes, shaking occasionally. Drain and inspect, repeating if needed. Rinse five or more times with distilled water to remove all residue.
Why It Works: Rice provides mechanical agitation while dishwasher tablets contain alkaline builders that break down organic sludge more effectively than dish soap alone.
For Mineral Deposits: CLR or Vinegar Soak
This method works best for white, chalky crusts caused by using tap water. Fill the tank with CLR or undiluted white vinegar. Soak for 15 to 60 minutes, watching bubbles dissolve the scale. Swirl gently without shaking to avoid acid fumes building pressure inside the container. Drain and flush with distilled water repeatedly. Neutralize any remaining acid with a baking soda solution using one tablespoon per quart, then rinse again.
Warning: Vinegar is mildly acidic. Never add it directly to the radiator. Use it only on the reservoir and ensure complete removal before reinstallation.
For Oil or Emulsion: Coin Shake Plus Degreaser
This method works best for milky film or greasy residue that may indicate a head gasket leak. Add five to six quarters or dimes to the tank. Mix one ounce of Dawn Ultra dish soap with warm water and fill the tank halfway. Seal with a rubber glove and shake for two to three minutes. Let it sit for 30 minutes, then repeat the shaking process. Rinse thoroughly with multiple changes of water.
Caution: Oil in coolant often signals a blown head gasket. Clean only if you are replacing the engine or after the repair has been completed.
For Heavy Rust or Scale: Sulphamic Acid Soak
This method works best for reddish iron oxide or stubborn mineral crust. Mix sulphamic acid per the label instructions, typically one ounce per quart. Soak for 30 to 60 minutes, agitating gently. Rinse exhaustively with water. Optionally neutralize with baking soda solution, then rinse again.
Safety First: Wear nitrile gloves and goggles. Work in a well-ventilated area when handling sulphamic acid.
For Severe Buildup: Pool Acid (Last Resort)
This method works best for rock-like mineral encrustation that other methods cannot remove. Mix muriatic acid with water in a one-to-four ratio. Pour a small amount into the tank and swirl gently. Do not shake, as acid fumes can cause pressure buildup. Wait 10 to 30 seconds while watching for bubbling. Immediately flush with a large volume of water. Repeat the rinse five or more times with distilled water.
Extreme Risk: Acid can etch or weaken plastic. Use this method only when all other methods have failed.
Restore Yellowed Plastic (Cosmetic Fix)

UV exposure turns plastic yellow. These methods can reverse it, but always test a small area first.
Hydrogen Peroxide Plus Sunlight
Fill the tank with 12% hydrogen peroxide, available at beauty supply stores. Place the tank in direct sunlight for four to six hours. Check progress and reapply if needed. Rinse completely with distilled water when finished.
Result: This method often lightens yellowing significantly, especially on darker tanks.
Hair Bleach Treatment (Strongest Option)
Mix hair bleaching powder with developer at 40 volume per kit instructions. Apply the mixture inside and outside the tank using a gloved hand. Wait 10 to 30 minutes while monitoring for bubbling or softening of the plastic. Rinse thoroughly with distilled water. Repeat if necessary.
Warning: Bleach can damage skin and fabrics. Never mix bleach with vinegar or acid.
Final Rinse and Inspection
Skipping this step risks contaminating your cooling system with cleaning residue.
Rinse Five Plus Times with Distilled Water
Tap water contains minerals that can leave new deposits. Use distilled water only for the final rinses. Fill the tank, shake it, and drain. Repeat this process at least five times. Optionally test the rinse water with pH strips to confirm a neutral reading of 7.0.
Inspect with Flashlight
Shine a bright light through the tank to check for remaining issues. Look for residual film near the Full or Max lines. Check for particles stuck in baffles. Inspect for micro-cracks or cloudiness that could indicate structural problems.
Verification Test: Fill with clean water. The level should be clearly visible from outside the tank.
Reinstall with Fresh Parts
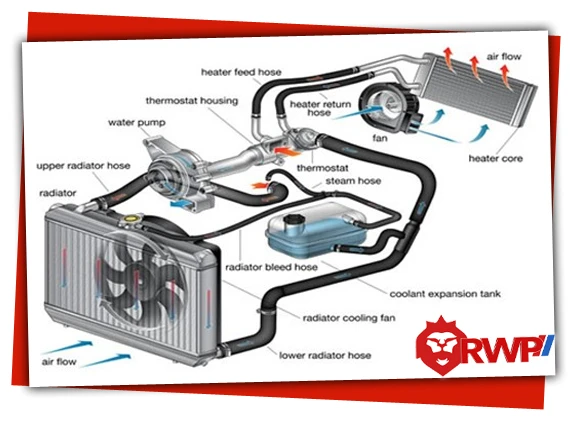
Do not reuse old, degraded components that could undo your cleaning work.
Replace Cap and Hoses
Cooling system caps fail over time and should be replaced every three to five years. Cracked or swollen hoses will eventually leak. Install new ones during reinstallation. OEM-quality caps cost five to eight dollars on Amazon and are worth every penny.
Refill with Correct Coolant Mix
Use 50/50 pre-mixed coolant or blend your own using approved coolant type and distilled water only. Never use tap water. Check your manual to confirm the correct coolant chemistry for your vehicle, whether OAT, HOAT, or IAT. Bleed air from the system per manufacturer instructions.
Pro Tip: Use a waterproof permanent marker to redraw faded Low and Full lines for better visibility after cleaning.
When to Replace Instead of Clean
Cleaning is not always the practical choice. Know when to simply buy a new part.
Replace If the Tank Shows These Conditions
Replace the tank if it is cracked, warped, or brittle. Replace if the plastic is severely yellowed and blocks your view of the coolant level. Replace if internal baffles trap debris and make cleaning impossible. Replace if your time and effort exceed the 20 to 30 dollar replacement cost.
Real-World Tip: OEM-equivalent reservoirs are available on Amazon for 90% less than dealership prices. Example: 23 dollars shipped versus 110 dollars or more at the dealership.
eBay Hack: Search with the exact OEM part number for new-old-stock parts at excellent prices.
Prevent Future Buildup
Keep your coolant bottle clean long-term with these maintenance practices.
Use Distilled Water Only
Tap water causes mineral scaling inside the cooling system. Always use distilled water when topping off or mixing coolant.
Avoid Stop-Leak Products
These products create gelatinous residue that clogs reservoirs and radiators. Use them only in true emergencies.
Flush System Every 30,000 to 50,000 Miles
Follow the manufacturer schedule for cooling system maintenance. Use a radiator flush solution compatible with your coolant type.
Replace Reservoir Cap Regularly
A faulty cap allows air into the system, accelerating coolant oxidation and sludge formation. Replace it every three to five years.
Inspect Annually
Pop the hood once a year and check the reservoir for discoloration, sludge, cracks, and hose condition. Catching problems early prevents major repairs later.
Expert Insight: Systems using Dexcool with distilled water and a sealed cap show zero sludge even after 10 or more years of service.
Safety Warnings You Must Follow
Protect yourself and your vehicle by following these critical safety guidelines.
Never Mix Bleach and Vinegar
This combination creates toxic chlorine gas that can be fatal in enclosed spaces.
Never Leave Acid or Lye Too Long
Extended contact can etch or weaken plastic, leading to leaks and premature failure.
Wear Gloves and Goggles
Acids, bleach, and solvents can burn skin and cause serious eye damage.
Work in a Ventilated Area
This is especially important when using muriatic acid, lye, or industrial cleaners.
Dispose of Waste Properly
Used coolant and chemical rinses are hazardous. Take them to an auto parts store or recycling center.
Never Reuse Cleaning Tools for Kitchen Use
Contamination risk is real. Dedicate brushes, containers, and gloves to automotive use only.
Final Thoughts on Cleaning Your Coolant Bottle
You will not always restore a coolant bottle to factory-new condition, and that is perfectly acceptable. Functional cleanliness, meaning the removal of sludge, biofilm, and scale, is the real goal. Cosmetic flaws like minor yellowing or stains are acceptable if the tank functions properly. Structural integrity matters more than appearance, so replace the tank if it is cracked or brittle.
Community Wisdom: “A clean reservoir gives peace of mind and prevents false readings. But if it takes three hours and 15 dollars in chemicals, just buy a new one.”
With the right method, most coolant bottles can be cleaned safely and effectively. But when in doubt, replace it. A 25-dollar part protects a 3,000-dollar engine.
Frequently Asked Questions About Cleaning Coolant Bottles
Can I clean my coolant bottle without removing it?
You can perform limited cleaning while the bottle remains mounted, but removing it provides access to all internal surfaces and baffles. Flushing with a garden hose through the ports is possible, but deep cleaning requires removal for thorough results.
How do I know if my coolant bottle needs cleaning or replacement?
Replace the bottle if it is cracked, severely yellowed to the point of blocking visibility, or brittle. Clean it if you see sludge or deposits but the plastic is otherwise sound. If cleaning requires more time and money than replacement, buy a new tank.
What is the fastest way to clean a coolant bottle?
The rice and dishwasher tablet method provides the best balance of speed and effectiveness for organic sludge. Complete the process in 45 to 60 minutes including removal and reinstallation. For light contamination, a simple Dawn soap and hot water shake takes about 30 minutes.
Why does my coolant bottle get dirty so quickly?
Using tap water instead of distilled water causes mineral deposits. An incompatible coolant type creates gelling or sludge. A faulty reservoir cap allows air to enter, accelerating oxidation. Stop-leak products leave behind residue. Address the root cause to prevent rapid recontamination.
Is it dangerous to clean a coolant bottle with acid?
Acids like CLR, vinegar, and muriatic acid are effective but require proper safety precautions. Wear gloves and goggles. Work in ventilated areas. Never leave acid in contact with plastic longer than recommended. Always rinse thoroughly with distilled water afterward to prevent damage to cooling system components.
How often should I clean my coolant bottle?
Inspect the bottle annually. Clean it when you notice discoloration, reduced visibility of the coolant level, or visible sludge deposits. Following preventive maintenance practices like using distilled water and replacing the cap every three to five years reduces how often cleaning becomes necessary.



