

Is your engine running hotter than normal? Are you spotting puddles of coolant under your car or watching the temperature gauge climb unpredictably? The fastest way to pinpoint cooling system trouble is by learning how to check radiator pressure correctly. A properly pressurized system keeps coolant from boiling and protects your engine from heat damage. When pressure drops or spikes, it points directly to leaks, bad caps, or internal engine faults.
Checking radiator pressure is not just for professional mechanics. It is a simple diagnostic test any DIYer can run with the right kit and a few safety steps. In this guide, you will learn how to safely pressurize your cooling system, read the gauge, find hidden leaks, and test the radiator cap. You will also learn what common pressure readings reveal and how to act before small issues turn into expensive engine repairs.
What Normal vs. Abnormal Radiator Pressure Looks Like
Standard Operating Pressure Ranges
Most automotive cooling systems operate between 12 and 16 psi, which equals roughly 80 to 110 kPa. Many modern vehicles target the higher end of that range, around 13 to 16 psi. This pressurization raises the boiling point of coolant well above 212°F, often past 265°F, so the engine can run hotter without the fluid boiling off.
The exact pressure your system requires is printed directly on the radiator cap or listed in your workshop manual. Never exceed that rating during testing. Pushing past the limit can rupture hoses, crack the radiator, or damage the heater core.
Warning Signs of Excessive System Pressure
High pressure inside the cooling system often signals serious mechanical faults. Watch for these symptoms:
- Blown hoses or a cracked coolant reservoir
- Coolant spraying from the overflow tube
- Frequent overheating even with a full coolant level
- Milky oil on the dipstick, which suggests coolant intrusion
The most common causes include a faulty radiator cap that fails to release pressure, a blown head gasket letting combustion gases into the coolant, a clogged radiator or heater core, a thermostat stuck closed, or an incorrect coolant mix. If pressure climbs above the cap rating during your test, stop immediately and inspect for blockages or head gasket failure.
Warning Signs of Low or No Pressure
A system that cannot build or hold pressure cannot cool the engine efficiently. Look for these indicators:
- Coolant boiling at lower than normal temperatures
- Constant need to top off the reservoir
- Temperature gauge swinging up and down
- Gurgling sounds coming from the heater vents
Common causes include leaking hoses, a worn radiator cap with a bad seal, low coolant level, trapped air pockets, or a failing water pump. If pressure drops during testing but no external leak is visible, suspect an internal leak such as a compromised head gasket.
Essential Tools and Safety Steps for Pressure Testing
Required Equipment
You will need a cooling system pressure tester kit, which is widely available at auto parts stores and online retailers. A basic kit includes:
- A hand-operated pump with a built-in pressure gauge
- A set of adapters for different radiator neck sizes
- A dedicated radiator cap testing attachment
- A quick-connect hose with a locking mechanism
Many stores rent these kits for a small deposit that is refunded on return. Make sure your kit includes adapters that fit both traditional radiator filler necks and modern plastic expansion tanks.
Critical Safety Precautions Before You Start
Never open a hot cooling system. Scalding coolant and pressurized steam can cause severe burns. Before testing, park on level ground and wait until the engine is completely cool, ideally overnight if the car was recently driven. Confirm the system is depressurized by gently twisting the cap and listening for any hissing sound. Always wear safety glasses and gloves.
During testing, never exceed the pressure rating stamped on the radiator cap. Avoid leaning directly over the engine bay while pumping, and keep children and pets well away from the work area.
Step-by-Step: How to Check Radiator Pressure
Prepare the Cooling System
- Confirm the engine is cold and depressurized.
- Open the hood and visually inspect for obvious leaks, cracked hoses, or low coolant.
- Check the coolant reservoir and top it off to the cold mark if needed, using a 50/50 mix or plain water if you plan to drain and refill later.
- Locate the pressure cap on either the radiator or the expansion tank. Confirm it is a pressure cap by checking for a spring underneath.
- Slowly twist the cap counterclockwise to release any residual pressure, then remove it fully.
Choose and Install the Correct Adapter
- Select the adapter that matches the diameter and groove pattern of your filler neck.
- Test the fit by hand. There should be no wobble or gap.
- Screw or snap the adapter securely onto the neck.
- Attach the quick-connect hose from the hand pump to the adapter.
- Push and twist the connector clockwise until it clicks, then tug gently to confirm it is locked.
Pressurize to the Specified Limit
- Read the pressure rating printed on the original radiator cap. Common values are 13, 15, or 16 psi.
- Pump the handle rapidly while watching the gauge.
- Reach the cap rating within 10 to 20 strokes.
- Stop pumping the moment the gauge matches the target pressure and let the system stabilize for 30 seconds.
Monitor the System for Pressure Loss
Leave the tester connected and wait 20 to 30 minutes, then recheck the gauge. A steady reading means the system holds pressure. A rapid drop points to a large leak. A slow decline suggests a minor leak or seepage.
While the system is pressurized, walk around the engine bay and look for wet spots. Listen for hissing or bubbling sounds. Shine a flashlight under the vehicle to spot drips. Focus your inspection on these high-risk areas:
- Radiator seams and fins
- Upper and lower radiator hoses and their clamps
- The water pump weep hole
- The thermostat housing
- Heater core lines near the firewall
- The engine block and cylinder head interfaces
Damp carpet near the driver or passenger footwell often points to a leaking heater core.
Diagnose Hidden Internal Leaks
If the gauge drops but no external leak is visible, the problem is likely internal. This usually means a head gasket failure, a cracked cylinder head, or an intake manifold gasket leak. To confirm, perform a block test using chemical combustion gas detection or a sniff test with a gas analyzer. These tests detect hydrocarbons in the coolant, which is a definitive sign of internal leakage. Never ignore unexplained pressure loss, since it can lead to engine warping or total failure.
Release Pressure and Reassemble
- Slowly open the pressure release valve on the tester.
- Wait until the gauge reads zero before disconnecting.
- Twist the quick-connect counterclockwise to unlock and remove the tester.
- Reinstall the original radiator cap, or a new one if replacing, and tighten until it clicks.
- Start the engine and let it warm to operating temperature while watching for leaks.
- Top off coolant once the system has cooled again.
How to Test the Radiator Cap Separately
Why Cap Testing Matters
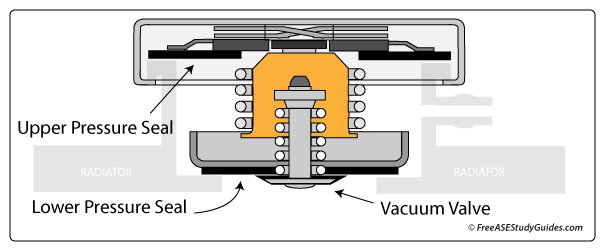
The radiator cap is a precision valve that regulates both pressure and vacuum inside the cooling system. A weak or failing cap is one of the most common causes of cooling problems. Even if the system passes the main pressure test, always verify the cap, especially if it is more than two years old or shows signs of corrosion.
The Cap Testing Procedure
- Attach the dedicated cap testing adapter to the hand pump.
- Screw the radiator cap onto the adapter.
- Pump to the exact pressure rating printed on the cap.
- Watch the gauge for at least two minutes.
- A steady reading means the seal and relief valve are good. An immediate or steady drop means the cap is faulty.
If the cap fails, replace it with an OEM or high-quality aftermarket unit rated for your vehicle. Never reuse a suspect cap, since a small part can prevent thousands of dollars in engine repairs.
Troubleshooting Based on Your Pressure Test Results
Fixing External Leaks
When your test reveals an external leak, address the source directly:
- Tighten loose hose clamps, but do not crush the hose
- Replace cracked hoses with OEM or reinforced units
- Repair or replace a seeping radiator
- Replace a water pump that is weeping from the seal
- Install a new gasket or O-ring at the thermostat housing
After any repair, repeat the pressure test to confirm the fix held.
Addressing Internal Engine Failures
If pressure drops but no external leak is found, the issue is usually internal. Common culprits include a head gasket breach or a cracked head or engine block. Symptoms include bubbles in the coolant reservoir while the engine runs, white exhaust smoke, milky oil on the dipstick, and overheating despite a full coolant level. These issues require professional diagnosis and major engine work. Do not continue driving, since catastrophic failure could happen at any moment.
When to Repeat the Pressure Test
Recheck radiator pressure after any cooling system repair, following a coolant flush or refill, if overheating returns, or as part of seasonal maintenance in spring and fall. Testing once a year catches small issues before they become roadside breakdowns.
Prevention and Long-Term Cooling System Care
Maintain Coolant Quality
Use the coolant type specified in your owner manual, whether OAT, HOAT, or traditional green. Mixing types can cause gel formation and internal corrosion. Flush the system every 30,000 to 60,000 miles, or as recommended, and always mix coolant with distilled water in a 50/50 ratio unless the product is pre-mixed.
Bleed Air from the System Properly
Trapped air causes false low-pressure readings, hot spots, and overheating. Bleed the system by opening the bleed valve if equipped, running the engine with the radiator cap off until coolant flow is steady, and gently squeezing the upper radiator hose while the engine runs. Some vehicles require a scan tool to activate the electric fan and water pump during bleeding.
Replace the Radiator Cap Proactively
Treat the radiator cap as a wear item, just like a filter or belt. Replace it every 2 to 3 years, or any time the cooling system is serviced. A fresh cap ensures proper sealing, pressure regulation, and vacuum return during cooldown.
Know When to Seek Professional Help
If you are unsure about interpreting pressure loss, locating a hidden leak, or diagnosing internal engine issues, consult a certified technician. Cooling system specialists use dye tracers, ultrasonic leak detectors, and combustion gas analyzers that go beyond the basic pressure test. Early professional intervention can save your engine.
Frequently Asked Questions About Checking Radiator Pressure
How long does it take to check radiator pressure?
The full test takes about 30 to 45 minutes. Pumping the system up takes a few minutes, but you should leave the pressure on for 20 to 30 minutes to detect slow leaks.
What pressure should my radiator hold?
Most systems should hold between 12 and 16 psi, with many modern vehicles targeting 13 to 16 psi. The exact figure is printed on your radiator cap or listed in the workshop manual.
Can I check radiator pressure without a tester kit?
Without a pressure tester, you cannot reliably measure system pressure. Visual inspection and a radiator cap test at an auto parts store are good alternatives if you do not want to buy or rent a kit.
What happens if I exceed the maximum pressure rating?
Over-pressurizing can rupture hoses, crack the radiator, damage the heater core, or blow the coolant reservoir. Always stop pumping the moment you reach the cap rating.
How do I know if my radiator cap is bad?
Symptoms include coolant loss with no visible leak, an overflowing reservoir, and a pressure test that drops steadily. Testing the cap separately confirms whether the spring or seal has failed.
Is checking radiator pressure safe for beginners?
Yes, as long as the engine is completely cool, you wear safety glasses and gloves, and you never exceed the cap rating. The procedure is straightforward and one of the safest diagnostic tests you can perform.
Key Takeaways for Checking Radiator Pressure Safely
Learning how to check radiator pressure is one of the smartest investments any DIYer can make. With a basic tester kit and 30 minutes of work, you can diagnose leaks, validate repairs, and confirm your cooling system is doing its job.
Always test on a cold engine, never exceed the cap rating, and replace any suspect radiator cap immediately. Make pressure testing part of your annual maintenance routine, especially before summer heat or winter cold pushes your cooling system to its limits. A small amount of preventive testing today can save you from a costly engine replacement tomorrow.



