

Is your car overheating? A low or empty radiator coolant level could be the culprit. Coolant, also known as antifreeze, keeps your engine from overheating in summer and freezing in winter. It protects your engine, water pump, hoses, and radiator from damage. Knowing how to check if the radiator has coolant is a simple but critical maintenance task every driver should master.
This guide walks you through a safe, step-by-step process to confirm coolant levels, assess fluid condition, and avoid common mistakes. You will learn where to look, what to watch for, and when to seek professional help.
Finding Your Vehicle’s Coolant Reservoir
Locating the Overflow Tank
The coolant reservoir, also called the expansion or overflow tank, is a translucent plastic container connected to the radiator by hoses. It is usually located near the radiator or along the fender well. Look for a cap labeled “Coolant,” “Engine Coolant,” or a radiator symbol.
This tank allows you to check coolant levels without opening the pressurized system, making it the safest and most common method for routine inspection.
Reading the MIN and MAX Marks
The reservoir has minimum and maximum level indicators molded into the side. When the engine is cold, the coolant level should sit at or above the MIN mark. After driving, the fluid expands and rises toward the MAX line.
Tip: If the reservoir is empty when the engine is cold, the cooling system is likely low on coolant, even if the radiator still has some fluid.
Checking Coolant Level in the Overflow Tank
Inspecting Fluid When Cold
Always inspect coolant when the engine is cold. Park on level ground, turn off the engine, and wait 30 to 60 minutes after driving. Open the hood and visually assess the reservoir.
Cold engine: Level should be between MIN and MAX, ideally near the middle or upper end.
Hot engine: Level naturally rises. Do not top off when hot.
Warning: Never remove the radiator cap or add coolant while the system is hot. Pressurized coolant can exceed 100°C and cause severe burns.
Evaluating Coolant Condition
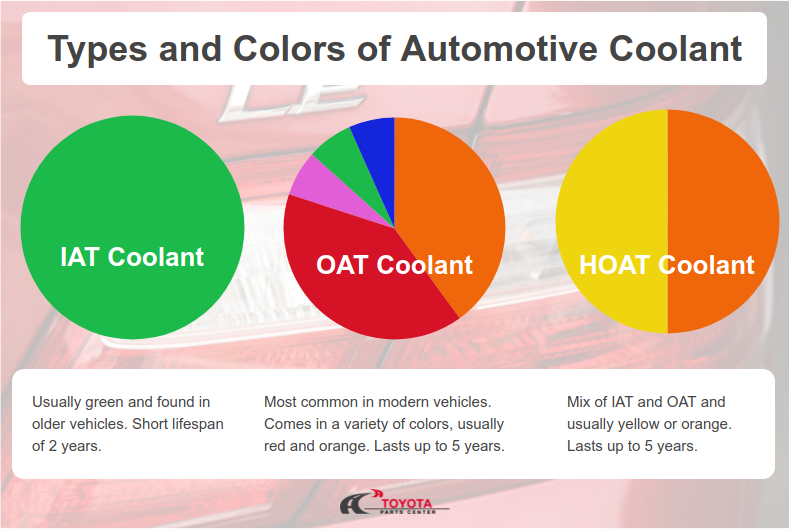
Good coolant is brightly colored, such as green, red, orange, blue, or yellow, and clear or slightly translucent. Signs of trouble include:
- Brown, murky, or cloudy fluid indicating old coolant or internal corrosion
- Rust particles or sludge showing deteriorating system components
- Oil-like film or milky texture suggesting oil contamination, possibly from a head gasket failure
- Colorless or faded liquid meaning degraded or improperly mixed coolant
Stop and seek help if you see milky residue, bubbles when running, or oil in the coolant.
Safely Opening the Radiator Cap
Confirming the Engine Is Cool
Before removing the radiator cap, verify the engine is completely cool. Touch the upper radiator hose. If it is warm or cool to the touch, you are safe to proceed. If it is hot, wait longer.
Never open the cap when the engine is hot. The cooling system is pressurized, and boiling coolant can erupt violently.
Releasing Pressure Safely
Wrap a thick towel or wear heat-resistant gloves before handling the cap.
- Press down slightly and turn the cap counter-clockwise just enough to release pressure.
- Listen for a hiss indicating pressure is escaping.
- If steam or coolant sprays out, retighten immediately and wait longer.
- Once quiet, fully unscrew and remove the cap.
Safety first: Most radiator caps have a “Do Not Open When Hot” label. Heed this warning.
Inspecting Coolant Inside the Radiator
Checking Fluid at the Filler Neck
Shine a flashlight into the radiator filler neck. When the engine is cold, coolant should be visible within 1 to 2 inches of the top. If you cannot see any fluid, the radiator is underfilled or empty.
Ideal level: Coolant reaches the base of the filler neck. This ensures proper circulation and prevents air pockets.
Looking for Contamination
While looking inside, check for floating debris or sludge, corrosion on internal fins or walls, and unusual odors. A sweet smell indicates normal glycol. A burnt odor means contamination.
Wipe the inside of the neck with a clean white paper towel. Any rust, oil, or gunk indicates internal problems needing attention.
Adding Coolant to Your Radiator
Using the Correct Coolant Type
Never guess the coolant type. Check your owner is manual for the exact specification, such as OAT, HOAT, IAT, or Si-OAT. Mixing incompatible coolants can form gel, clog passages, and damage the system.
Do not rely on color alone. Red coolant is not always the same type across brands.
Mixing with Distilled Water
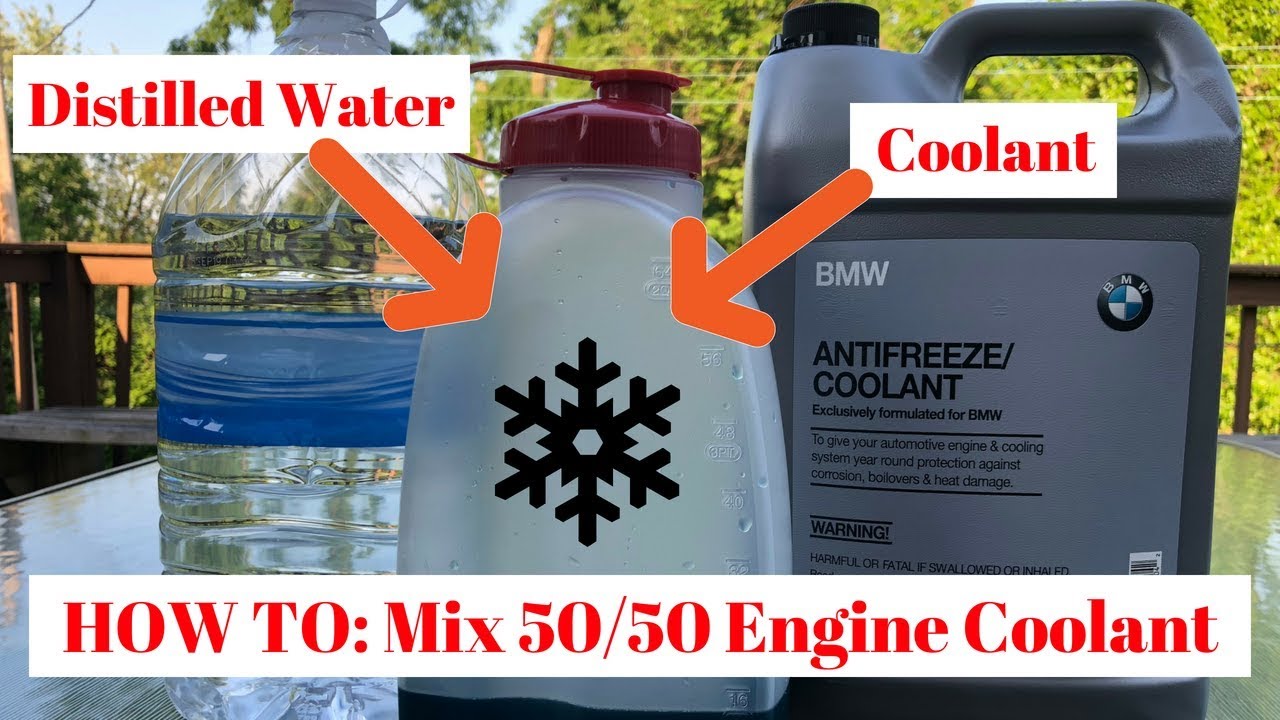
If using concentrated coolant, mix with distilled water in a 50/50 ratio. Tap water contains minerals that cause scaling and reduce heat transfer.
- Stir in a clean container before pouring.
- Use a funnel to avoid spills.
Pouring Coolant Properly
Top off the reservoir first. This is the standard method for minor top-ups. Fill the radiator directly only if severely low or after maintenance. Fill radiator until coolant reaches the base of the filler neck. Fill reservoir to between MIN and MAX marks.
Avoid overfilling. Excess coolant expands when hot and can overflow, damaging electrical components or creating slip hazards.
Verifying Coolant After Engine Warm-Up
Running the Engine to Operating Temperature
After refilling, start the engine and let it run for 10 to 15 minutes until the temperature gauge reaches normal. This allows the thermostat to open and the coolant to circulate.
Reinspecting After Cool-Down
Turn off the engine and let it cool completely. Recheck both the reservoir and radiator levels.
A significant drop means there is a hidden coolant leak, air trapped in the system, a failed radiator cap, or a head gasket issue.
Normal behavior: Reservoir level rises when hot, falls when cold. The system should draw coolant back from the reservoir as it cools.
Troubleshooting Common Coolant Problems
Why the Reservoir Is Empty But Radiator Is Full
If the reservoir is dry but the radiator has coolant, possible causes include a blocked return hose preventing coolant from flowing back, a faulty radiator cap with a failed vacuum valve, or a cracked or disconnected overflow hose.
Fix: Inspect hoses for kinks or damage. Replace the radiator cap every 3 to 5 years as preventive maintenance.
Understanding Bubbles in the Reservoir
Air bubbles in the coolant when the engine is running may indicate an air pocket in the system, which is common after refilling, or a blown head gasket allowing combustion gases into the cooling system.
Critical sign: Persistent large bubbles require immediate professional testing.
Checking Radiator Hoses and Cap Condition
Inspecting Hoses for Damage
Examine both upper and lower radiator hoses. Squeeze them. They should feel firm but flexible. Look for cracks, bulges, or soft spots, leaks at clamps, and loose or corroded hose clamps.
Replace any hose showing wear. Collapsed or swollen hoses restrict coolant flow and lead to overheating.
Testing Radiator Cap Function
The cap maintains system pressure, typically 13 to 18 psi, raising the boiling point of coolant. A weak or faulty cap can cause premature boiling, coolant loss, and overheating.
Pro tip: Mechanics use a radiator pressure tester to verify cap performance. Replace caps every 3 to 5 years or at signs of failure.
Identifying Signs of Low or Empty Coolant
Overheating and Steam
The most obvious sign of no coolant is the temperature gauge in the red or steam rising from under the hood. Shut off the engine immediately and let it cool.
Other Warning Indicators
Gurgling noises from the dashboard indicate air pockets in the heater core. Poor heater performance means insufficient coolant may not be circulating through the heater core. A sweet smell from the exhaust means coolant is burning in the combustion chamber. White smoke from the exhaust means coolant is entering cylinders, possibly from a head gasket leak.
Emergency signal: Milky oil on the dipstick or oil cap means coolant is mixing with oil. Stop driving and get help now.
Preventive Maintenance for Your Cooling System
Checking Coolant Monthly
Make coolant inspection part of your routine. Check every time you check oil or tire pressure, before long trips, and in extreme weather. A quick visual check takes less than a minute and can prevent major breakdowns.
Following the Replacement Schedule
Coolant degrades over time. Replace according to your vehicle schedule. IAT green coolant needs replacement every 2 years or 30,000 miles. OAT orange or red coolant lasts up to 5 years or 150,000 miles. HOAT yellow or purple coolant lasts 3 to 5 years or 60,000 to 100,000 miles.
Always flush the system before refilling to remove sludge and old inhibitors.
Proper Disposal of Used Coolant
Why Coolant Requires Special Disposal
Coolant is toxic. Ethylene glycol is deadly to pets and wildlife, even in small amounts. A spilled cup can kill a dog or cat.
Never pour coolant down drains or onto the ground. Clean spills with kitty litter or absorbent pads. Take used coolant to auto parts stores that accept it for free, recycling centers, or repair shops.
Environment tip: Propylene glycol-based coolants are less toxic and biodegradable. Consider them for eco-friendly maintenance.
When to Call a Professional Mechanic
Signs You Need Expert Help
Seek professional help if coolant disappears but no leak is visible, oil is mixing with coolant showing milky residue, the engine overheats repeatedly, bubbles appear in the reservoir while running, or the radiator shows internal corrosion or blockage.
Mechanics use pressure testers to find leaks, combustion gas detectors to check for head gasket failure, and infrared thermometers to spot radiator hot spots.
Quick Checklist: Confirm Radiator Has Coolant
- Park on level ground
- Engine cold (waited 30+ minutes)
- Upper radiator hose cool to touch
- Hood securely propped open
- Reservoir located and level checked
- Coolant between MIN and MAX (cold engine)
- Fluid bright and clear with no rust or oil
- Radiator cap removed safely if needed
- Coolant visible near top of radiator neck
- Correct coolant type confirmed
- Distilled water used for mixing
- Coolant added to reservoir or radiator
- Caps tightened securely
- Hoses inspected for damage
- System rechecked after warm-up and cool-down
Key Takeaways for Checking Radiator Coolant
Checking if your radiator has coolant is a simple, life-saving habit. Use the overflow reservoir for routine checks and inspect inside the radiator when necessary. Always wait for the engine to cool before opening any caps. Watch for contamination like milky fluid, rust, or oil. Maintain monthly checks and follow your vehicle replacement schedule to prevent engine damage. With proper maintenance, your cooling system will protect your engine for years to come.
Frequently Asked Questions About Checking Radiator Coolant
How do I know if my radiator has enough coolant?
Check the coolant reservoir first. The level should be between the MIN and MAX marks when the engine is cold. For a definitive check, remove the radiator cap when cool and look inside. Coolant should be visible within 1 to 2 inches of the filler neck top.
Can I check coolant immediately after driving?
No. Always wait 30 to 60 minutes after driving for the engine to cool completely. Checking hot coolant is dangerous and can cause severe burns from pressurized steam.
What color should healthy coolant look like?
Healthy coolant is brightly colored, such as green, red, orange, blue, or yellow, and appears clear or slightly translucent. Brown, murky, or colorless fluid indicates contamination or degradation.
Is it bad if my coolant reservoir is empty?
Yes. An empty reservoir when the engine is cold indicates the cooling system is low on coolant. This can lead to overheating and engine damage if not addressed promptly.
Can I use tap water to dilute concentrated coolant?
No. Use only distilled water. Tap water contains minerals that cause scaling and reduce heat transfer efficiency, leading to cooling system problems over time.
How often should I check my coolant level?
Check coolant monthly as part of your routine vehicle maintenance. Inspect before long trips and more frequently in extreme weather or if your vehicle has known cooling issues.



