

Is your air conditioner struggling to cool your home? One of the most common culprits is low HVAC coolant, also known as refrigerant. Unlike car engines that burn oil, HVAC systems are sealed units, so refrigerant should not deplete over time. If levels are low, there is a leak somewhere in the system. Simply adding more coolant without fixing the source wastes money and harms the environment.
Checking refrigerant is not a DIY task. It requires specialized tools and EPA certification. But knowing how it is done helps you spot problems early and avoid costly repairs. In this guide, you will learn the signs of low coolant, how professionals diagnose charge levels, and when to call for expert help.
Recognize Low Refrigerant Symptoms
Before any tool is used, visual and performance clues can signal refrigerant trouble. These signs tell you it is time for a professional inspection.
Warm Air from Vents
If your AC blows air that feels warm or only slightly cool, refrigerant may be too low to absorb indoor heat. This is especially noticeable during peak summer heat. The system runs continuously but never reaches your thermostat setting.
Ice on Coils or Lines
Low refrigerant pressure causes the evaporator coil to drop below freezing. Moisture from the air freezes on the coil or copper lines. Ice acts as insulation, reducing cooling efficiency and airflow. A fully iced coil can shut down the system completely.
Hissing or Bubbling Noises
A hissing sound from the refrigerant lines or indoor unit often means a leak. High pressure gas escaping through a small hole creates this noise. It is distinct from normal fan or compressor hum.
Rising Energy Bills
When refrigerant is low, the AC runs longer to cool your home. This increases electricity use significantly. If your bill jumps without changes in usage, check your cooling performance immediately.
Short-Cycling Compressor
Low refrigerant can trigger safety switches that shut off the compressor. It may turn on and off every few minutes, called short-cycling. This wears out the compressor quickly and reduces comfort throughout your home.
Weak Airflow
Even with clean filters, low refrigerant can reduce airflow. Ice buildup on the evaporator coil blocks air movement. Duct issues can also cause weak airflow, so professional diagnosis is essential.
Know Your Refrigerant Type
Not all coolant is the same. Using the wrong type damages your system and violates environmental laws. Always check the unit nameplate before any service is performed.
R-22 (Freon): Phased Out
R-22, often called Freon, was standard in systems before 2010. It harms the ozone layer and is no longer produced in the United States. If your unit uses R-22, repairs are expensive due to limited supply. Consider upgrading to a newer model for better efficiency.
R-410A (Puron): Current Standard
Most AC units made after 2010 use R-410A. It is ozone-safe but still contributes to global warming if released. It operates at higher pressure than R-22, so never use R-410A in an R-22 system.
R-32: Next-Gen Coolant
R-32 has one-third the global warming potential of R-410A and improves energy efficiency. It is gaining use in North America, especially in high-efficiency models. Always confirm compatibility with your specific system before service.
Never mix refrigerants. Doing so can destroy the compressor, void warranties, and release harmful gases into the air.
Tools Used to Check Refrigerant
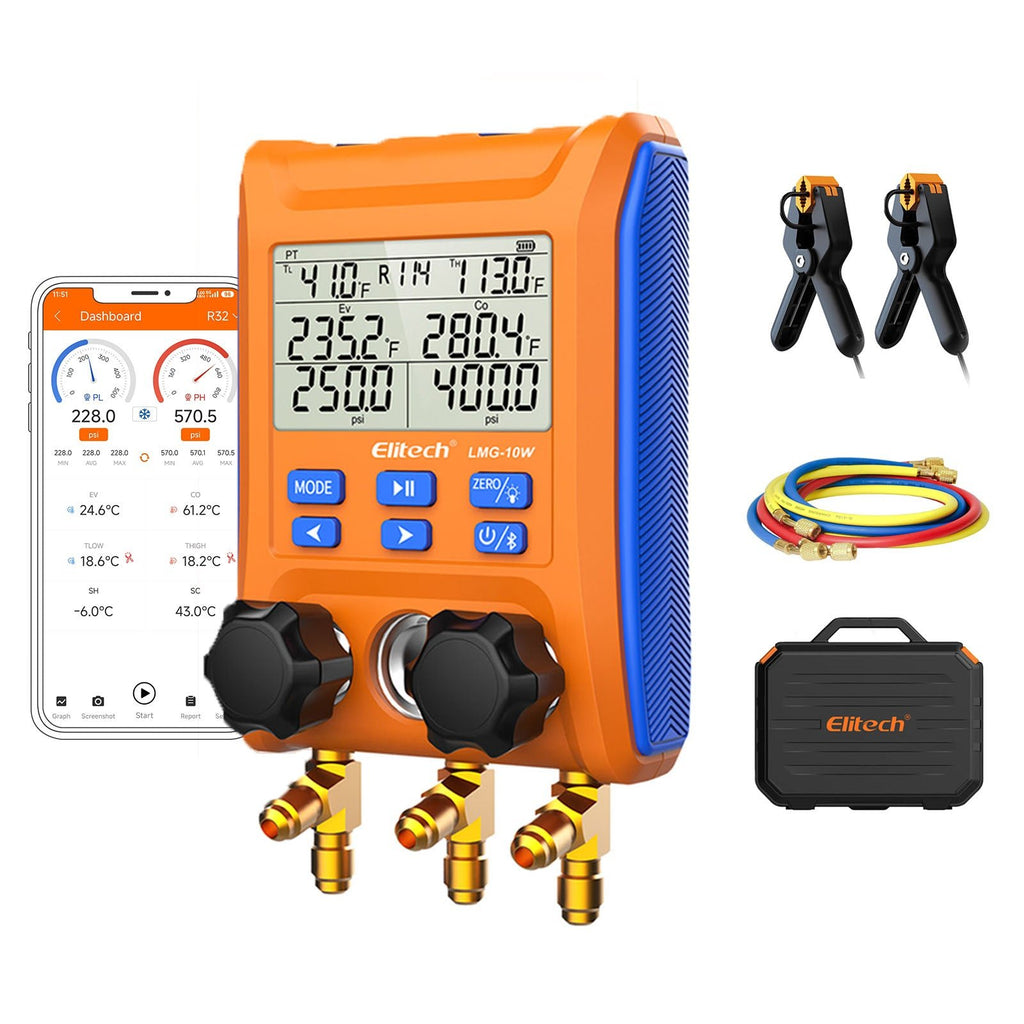
Only certified technicians should handle refrigerant. Understanding the tools helps you ask the right questions during service calls.
Dual-Gauge Manifold Set
This tool measures pressure on both sides of the system. The blue gauge connects to the low pressure suction line. The red gauge reads the high pressure discharge side. Each refrigerant has a specific pressure temperature relationship, so readings must be interpreted correctly for accurate diagnosis.
Digital Thermometer or Clamp Sensor
Temperature readings are critical for calculating superheat and subcooling. These are key indicators of proper charge. A clamp-on sensor gives accurate line temperatures without contact.
PT (Pressure-Temperature) Chart
This chart converts pressure readings into saturation temperatures. For example, R-410A at 120 psi equals about 40F. This helps technicians determine if the system is undercharged or overcharged.
Electronic Leak Detector
More reliable than soap bubbles, this handheld device senses refrigerant in the air and alerts with sound or light. It is essential for finding small leaks in hard-to-reach areas.
Protective Gear
Technicians wear insulated gloves and safety goggles. Refrigerant can cause frostbite on contact with skin and damage eyes. Always prioritize safety around pressurized systems.
Step-by-Step: How Technicians Check Coolant
The process takes 20 to 30 minutes and requires precision. Here is how professionals do it.
Prepare the System
Turn off the AC and wait if it was recently running. Remove caps from the service valves on the outdoor unit. Identify the low-side port on the larger copper line and the high-side port on the smaller line. Ensure the manifold valves are closed before connecting hoses.
Connect Manifold Gauges
Attach the blue hose to the low-side port first, then the red hose to the high-side. Use low-loss fittings to minimize refrigerant escape during connection. Wear gloves because gas can spray out when opening valves.
Run the System
Turn on the AC and let it run for 10 to 15 minutes. This stabilizes pressure and temperature throughout the system. Measure outdoor ambient temperature because it affects target pressure values significantly.
Measure Superheat (TXV Systems)
Used in most modern AC units with thermostatic expansion valves.
- Read low-side pressure, for example 118 psi for R-410A.
- Use a PT chart to find saturation temperature. 118 psi equals about 40F.
- Measure suction line temperature just before the compressor, for example 50F.
- Calculate superheat by subtracting saturation temperature from actual line temperature.
Ideal superheat ranges from 8 to 12F. High superheat above 15F indicates undercharging. Low superheat below 5F indicates overcharging or liquid slugging risk.
A sweating suction line with condensation on the insulated pipe usually means proper refrigerant flow.
Measure Subcooling (Piston Systems)
Used in older or fixed-orifice systems.
- Read high-side pressure, for example 350 psi for R-410A.
- Convert to condensing temperature. 350 psi equals about 120F.
- Measure liquid line temperature, for example 108F.
- Calculate subcooling by subtracting liquid line temperature from condensing temperature.
Ideal subcooling ranges from 8 to 14F. Low subcooling below 5F indicates undercharging. High subcooling above 20F indicates overcharging.
Interpret Gauge Readings Correctly
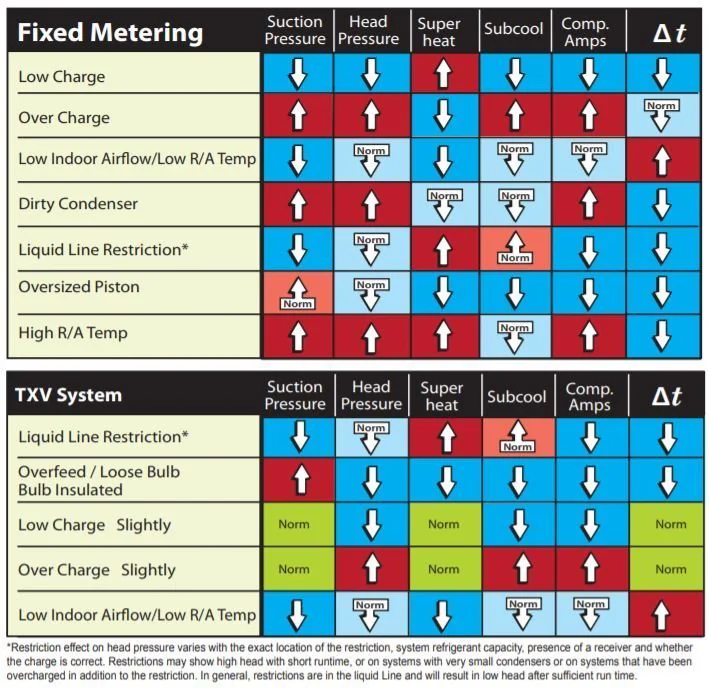
Pressure alone does not tell the full story. Combine pressure with temperature for accurate diagnosis.
| Condition | Low-Side PSI | High-Side PSI | Likely Cause | Action Required |
|---|---|---|---|---|
| Undercharged | Low | Low | Leak present | Repair leak, recharge |
| Overcharged | High | High | Too much coolant | Recover excess |
| Dirty Air Filter | Low | High | Restricted airflow | Clean or replace filter |
| Dirty Condenser Coil | High | High | Poor heat release | Clean coil thoroughly |
| Non-Condensable Gases | High | High | Air in system | Evacuate and recharge |
| Clogged Metering Device | Low | Low | Blocked TXV | Replace component |
Never test in the rain. Moisture can enter the system and cause ice blockages or compressor damage.
Find and Fix Leaks Before Recharging
Adding refrigerant without fixing the leak is a waste of money. Technicians use these methods to locate the source of the problem.
Soap Bubble Test
Apply soapy water to service valves, fittings, and coil connections. Bubbles form where gas escapes. This method is simple but not reliable for tiny leaks that are hard to find.
Electronic Leak Detection
The preferred method uses a sensor probe to scan joints and lines. It beeps or flashes when refrigerant is detected in the air. This method is fast, accurate, and works on all refrigerant types.
UV Dye Inspection
A fluorescent dye is injected into the system. After running the AC, a UV light reveals glowing spots at leak points. This method is great for hidden or slow leaks that bubble tests miss.
Best practice is to repair leaks with brazing or replacement parts. Never use sealants because they can clog the system and cause more damage.
Recharging: What Happens During Service
Only EPA-certified technicians can legally add or remove refrigerant. Here is what to expect during a professional recharge.
Steps to Recharge
- Confirm low charge using superheat or subcooling measurements.
- Connect refrigerant tank to the low-side port carefully.
- Add refrigerant slowly in vapor phase for R-410A systems.
- Monitor pressure, temperature, and superheat or subcooling continuously.
- Stop when target values are reached precisely.
- Close valves, disconnect, and cap ports tightly to prevent leaks.
Overcharging creates risks including high head pressure, compressor overheating, and complete system failure. Professional technicians know the correct amounts for your specific system.
Refrigerant Recovery
Before repairs or disposal, refrigerant must be removed using a recovery machine. Venting gas into the atmosphere is illegal and carries significant fines. Recovered coolant is stored in labeled cylinders for proper recycling.
Safety and Environmental Rules
HVAC refrigerants are regulated for good reason. Mishandling harms people and the planet significantly.
Personal Protection
Wear gloves and goggles at all times. Refrigerant causes frostbite on contact with skin. Work in well-ventilated areas because vapors can displace oxygen. Avoid skin contact and inhalation of any refrigerant gas.
Legal Compliance
EPA Section 608 certification is required to handle refrigerant legally. Venting refrigerant is illegal and carries substantial fines. All recovered refrigerant must be reclaimed or recycled through certified facilities.
Equipment Care
Store gauges with valves open to relieve hose pressure after each use. Use Teflon tape on threaded connections for a proper seal. Replace worn O-rings and Schrader cores regularly to prevent leaks.
Prevent Refrigerant Problems
Regular maintenance prevents leaks and keeps your system running efficiently all summer long.
Change Filters Monthly
A dirty filter restricts airflow, causing coil freezing and pressure drops throughout the system. Replace or clean filters every 30 days, especially in dusty environments or during peak cooling season.
Clean Coils Annually
Dirt on evaporator or condenser coils reduces heat transfer dramatically. Clean them once a year with a soft brush or fin comb designed for HVAC equipment.
Schedule Professional Tune-Ups
An annual inspection should include refrigerant charge check, leak testing, electrical connection inspection, and thermostat calibration. Professional maintenance catches small problems before they become expensive repairs.
Insulate and Seal Lines
Wrap refrigerant lines with insulation to prevent heat gain along the suction line. Seal ducts to improve overall efficiency and reduce strain on the compressor.
Verify Line Set Length
Factory charges assume 15 to 25 feet of line set. Longer runs need extra refrigerant added on-site per manufacturer specifications. Your technician should know the correct amount for your specific installation.
When to Call an HVAC Pro
You cannot legally or safely check refrigerant yourself. But you can spot the warning signs and call for help when needed.
Call a licensed technician immediately if you notice warm air from vents, ice on pipes or coils, hissing or bubbling sounds, higher energy bills, or frequent short-cycling. These symptoms indicate a problem that needs professional attention.
Choose an EPA-certified HVAC company with experience in leak detection and refrigerant management. Ask for superheat or subcooling measurements, not just pressure checks. A thorough technician will explain the diagnosis and show you the evidence.
Key Takeaways for Checking HVAC Coolant
HVAC coolant does not wear out naturally. Low levels always indicate a leak that must be repaired before recharging. Recognizing early symptoms like warm air, ice buildup, hissing sounds, or rising energy bills helps you address problems before they cause serious damage.
Accurate diagnosis requires training, tools, and safety gear. Only EPA-certified technicians should handle refrigerant legally and safely. By scheduling professional maintenance and addressing warning signs promptly, you protect your system, save energy, and avoid costly breakdowns throughout the year.
Frequently Asked Questions About Checking HVAC Coolant
How do I know if my HVAC system is low on coolant?
Signs of low coolant include warm air blowing from vents, ice buildup on coils or copper lines, hissing sounds near the indoor unit, unusually high energy bills, and short-cycling where the compressor turns on and off frequently. If you notice any of these symptoms, call a professional HVAC technician for diagnosis.
Can I check my HVAC coolant levels myself?
No. Checking refrigerant requires EPA certification, specialized tools like manifold gauges, and training to interpret pressure and temperature readings correctly. Additionally, handling refrigerant without proper certification is illegal under EPA regulations. Leave this task to licensed professionals.
How often should HVAC refrigerant be checked?
Refrigerant should be checked during annual professional maintenance visits. Since HVAC systems are closed-loop systems, refrigerant should not need regular refilling. If levels drop, it indicates a leak that requires repair rather than routine maintenance.
What happens if I run my AC with low refrigerant?
Running an AC with low refrigerant causes the system to work harder, increasing energy costs and wear on components. It can lead to frozen coils, reduced cooling capacity, compressor damage, and eventually complete system failure. Addressing low refrigerant promptly prevents costly repairs.
How much does it cost to recharge HVAC coolant?
The cost varies depending on refrigerant type, system size, and labor in your area. R-410A is more common and affordable than phased-out R-22. However, the real cost includes leak detection and repair, which are necessary before recharging. Expect to pay for diagnosis, leak repair, and refrigerant separately.
What is the difference between superheat and subcooling?
Superheat measures refrigerant temperature above its saturation point on the low-pressure side. It shows if the evaporator coil is properly fed with refrigerant. Subcooling measures temperature below saturation on the high-pressure side. It shows if the condenser is properly removing heat. Both measurements determine if the charge is correct.



