

Is your car leaving colorful puddles or running hotter than usual? A radiator leak could be silently draining your cooling system and threatening your engine. Coolant loss prevents your vehicle from regulating temperature within its normal range of 195°F to 220°F, and ignoring the problem can warp cylinder heads or destroy your engine entirely.
Learning how to check for radiator leak saves you hundreds in diagnostic fees and prevents roadside breakdowns. This guide walks you through visual inspections, sensory detection, pressure testing, and temporary fixes you can do at home. You’ll discover where leaks hide, how to confirm them with a pressure tester, and when to repair versus replace components.
Spot Early Warning Signs Before Things Get Serious
Your car often tells you when coolant is escaping. Catching these clues early turns a $20 hose clamp into a simple fix instead of a $1,000 radiator replacement.
Monitor Temperature Gauge Behavior
A temperature gauge that climbs into the red zone after just minutes of driving usually means low coolant from a leak. Healthy engines stabilize quickly within normal range. Erratic needle movement or sudden spikes often signal air pockets entering the system through a leak point.
Don’t dismiss gradual overheating, even if your car cools down after stopping. This pattern means coolant escapes under load and slowly depletes. Watch the gauge closely during uphill climbs or stop-and-go traffic, since these conditions stress an already compromised cooling system.
Track Coolant Reservoir Levels
Open your hood when the engine is cold and check the translucent coolant reservoir. Fluid should sit between the minimum and maximum lines. Consistently low levels or monthly top-offs point to an active leak somewhere in the system.
A slow internal leak like a cracked head gasket may not leave visible puddles but still drains coolant over time. Check the reservoir weekly and note any steady drops. A decline without external signs warrants a pressure test or professional inspection.
Detect the Sweet Coolant Smell
Coolant produces a distinctive syrupy, sweet odor that’s hard to miss. Where you notice this scent reveals the leak location:
- Inside the cabin: Likely a heater core leak
- Under the hood: Points to radiator or hose failure
This smell becomes stronger when running the heater. Since antifreeze is highly toxic and attracts animals, address any detected odor immediately and clean spills thoroughly.
Perform a Safe Visual Inspection

Never open the radiator cap or touch components while the engine is hot. Pressurized coolant can reach boiling temperatures and cause severe burns. Always wait until the engine is completely cool before inspecting.
Scan for Colored Puddles Under the Vehicle
Park your car on a level, light-colored surface like concrete or asphalt overnight. Check underneath the next morning for any fluid buildup.
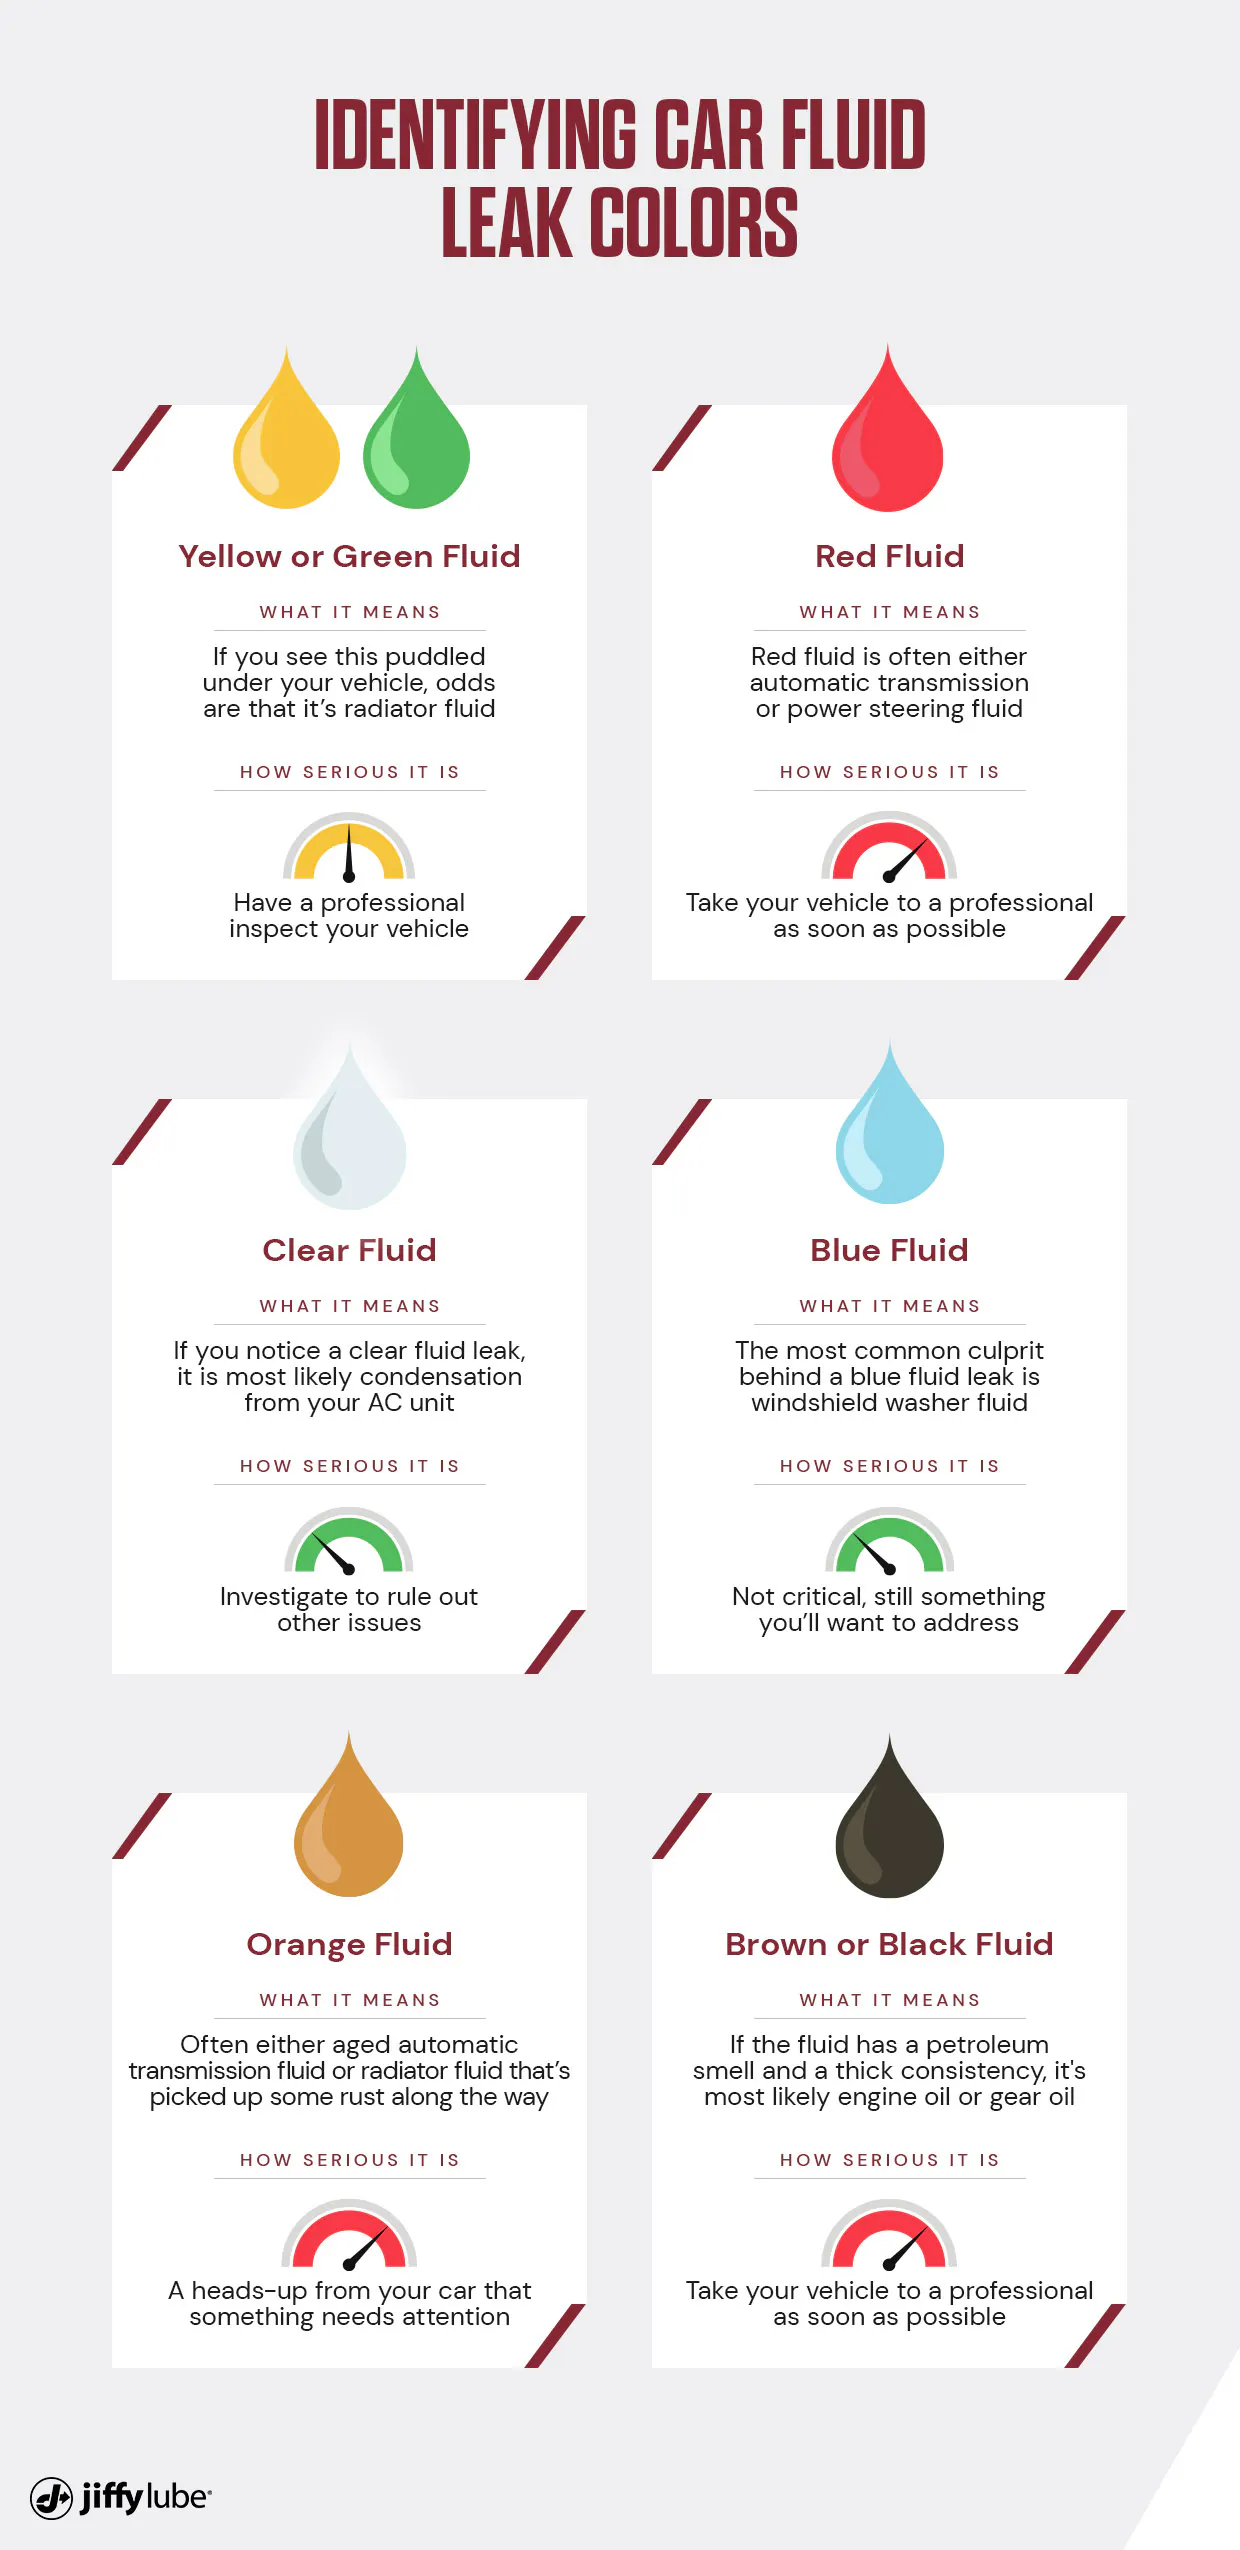
Color identification helps narrow down the source:
- Green, orange, pink, or lime: Almost certainly coolant
- Brown or black: Likely motor oil
- Clear or yellow: Possibly brake fluid or condensation
Puddles under the front center or engine block suggest radiator, hose, or water pump leaks. Drips beneath the dashboard indicate a heater core issue.
Inspect Radiator Hoses and Connections
With the engine cold, trace every visible hose connected to the radiator. Look for cracks, bulges, soft spots, or brittleness. Check connection points where hoses meet the radiator, since these are common leak sites. Shine a flashlight behind the radiator and near the firewall to find hidden wetness.
Examine the radiator itself for problems:
- Plastic side tanks can develop stress cracks from age and thermal cycling
- Aluminum fins may show white crust or green corrosion from past seepage
- Seams where tanks meet the core are vulnerable to splitting under vibration
Check the Radiator Cap Condition
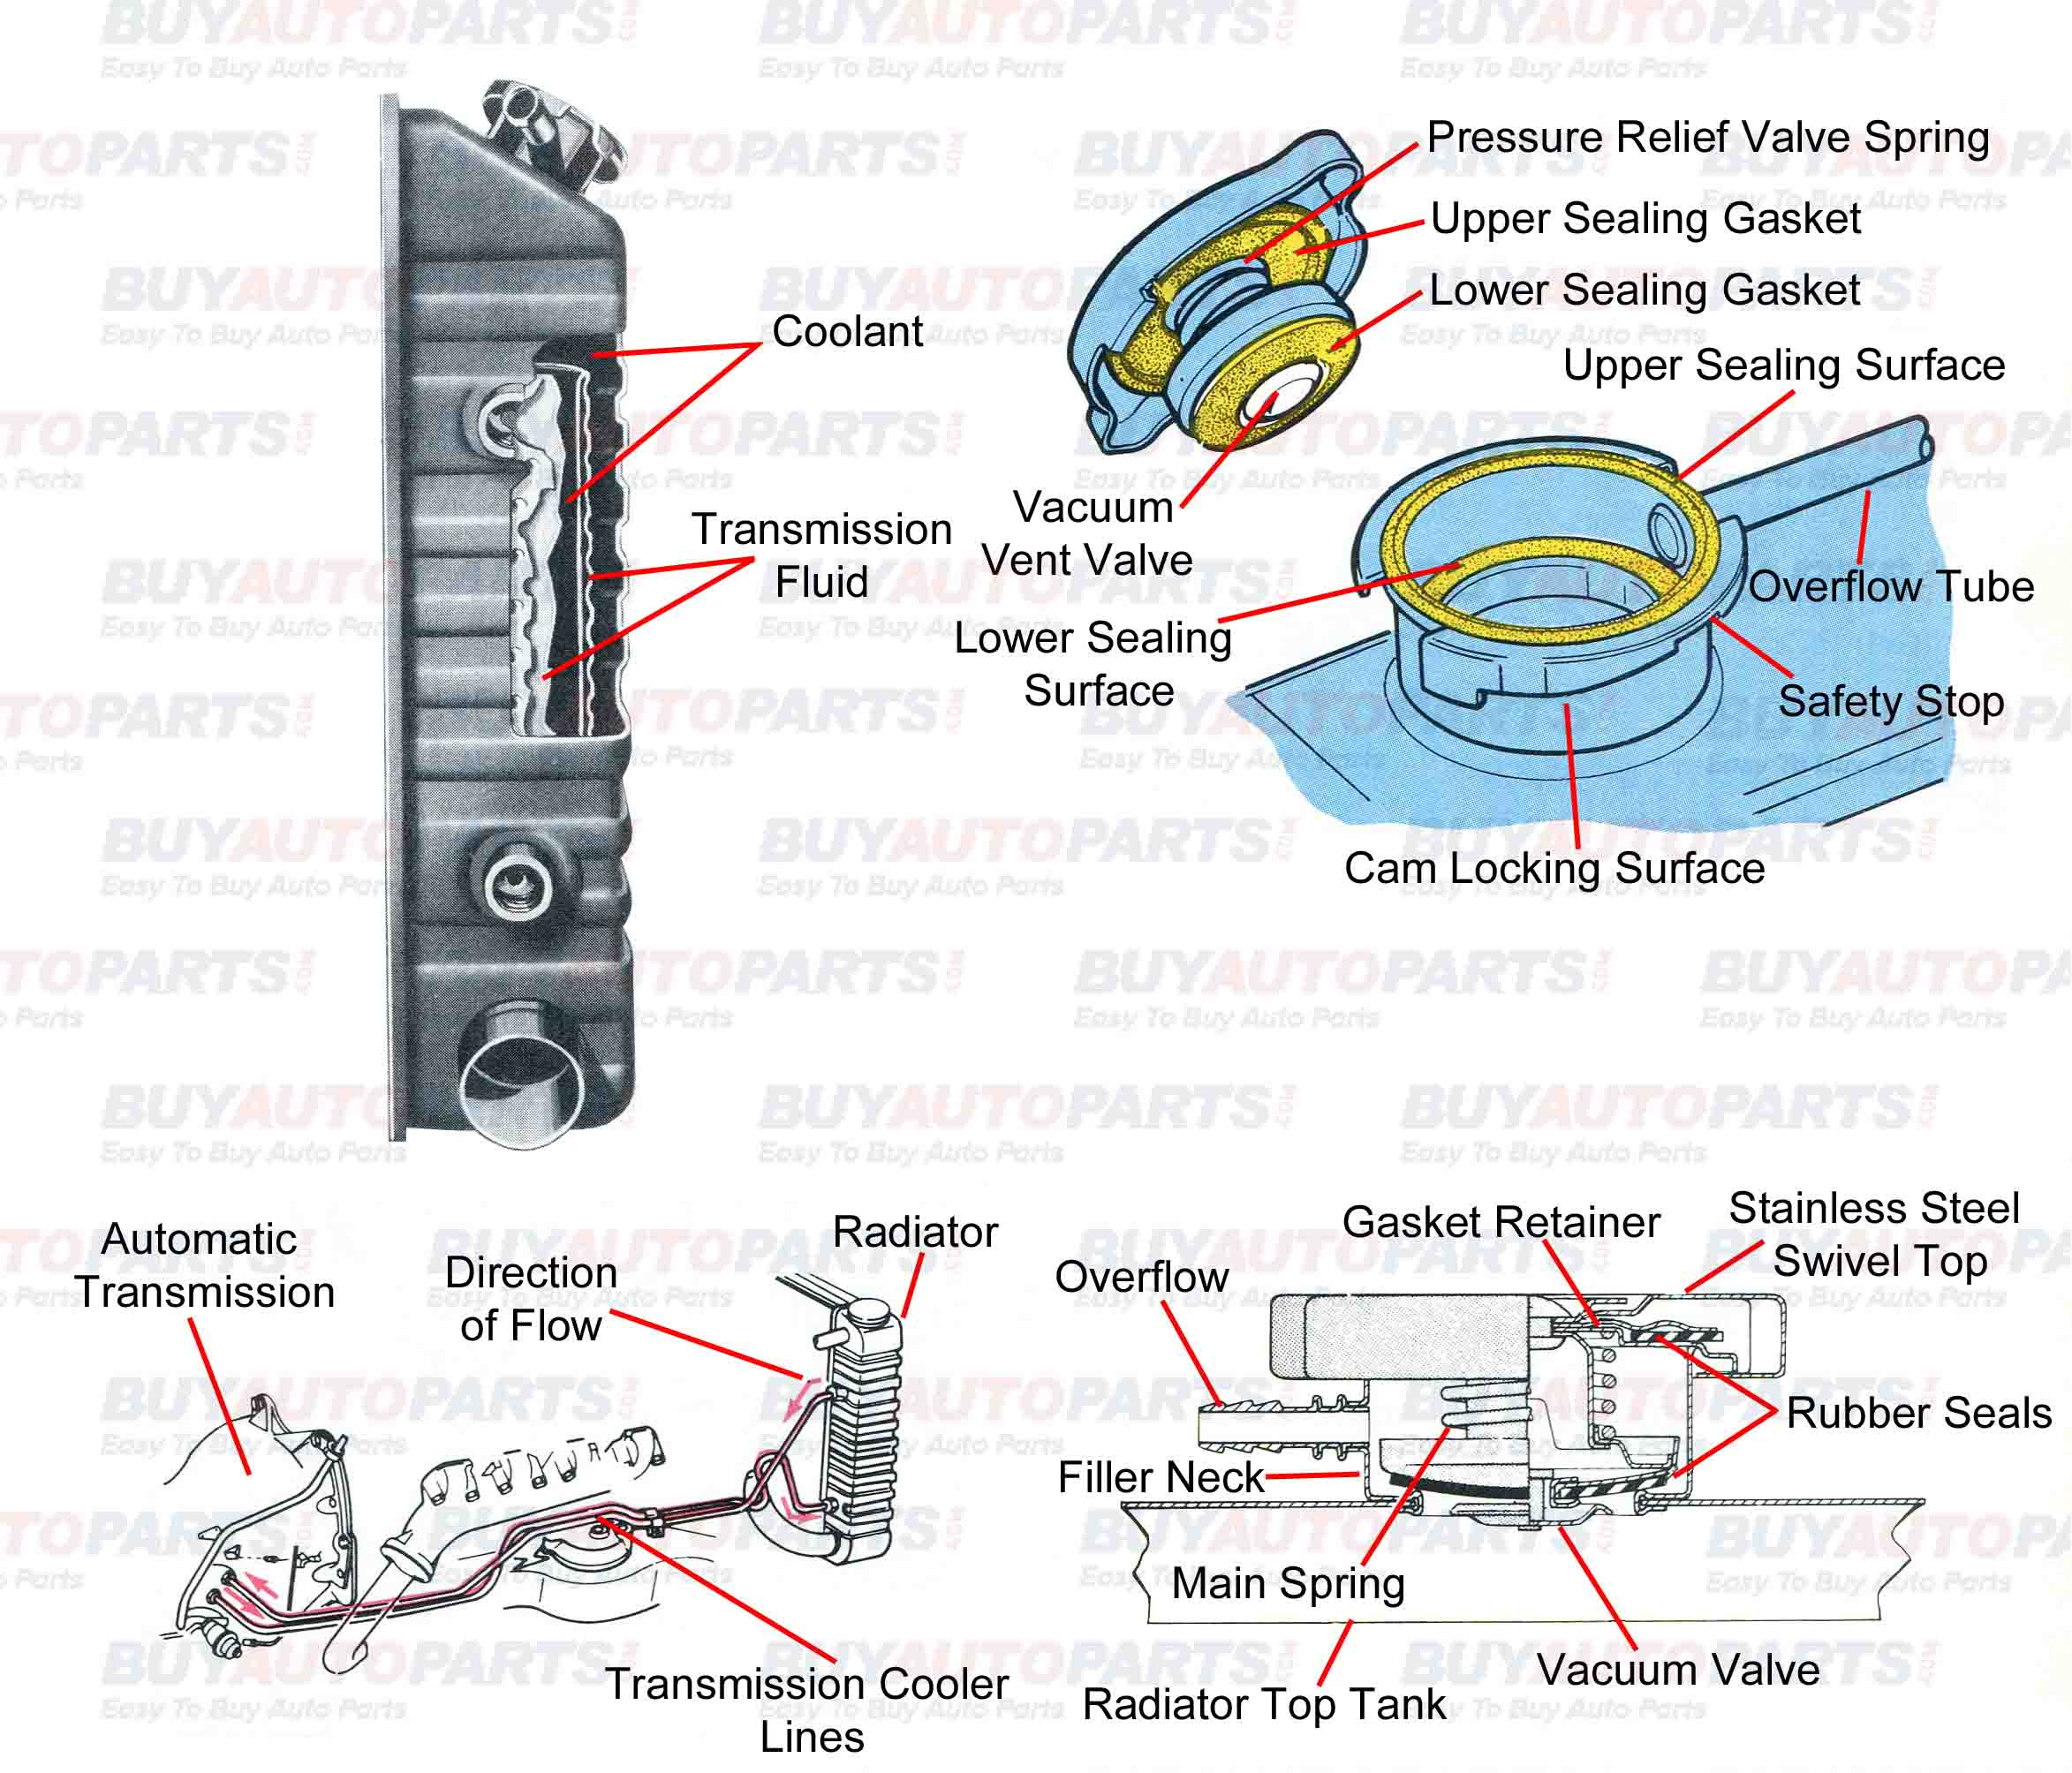
A faulty cap mimics a radiator leak by failing to hold pressure. Remove it carefully when cold and inspect the rubber seal for cracks, warping, or hardening. Test the spring mechanism for proper tension and examine the housing for corrosion.
Even if the cap looks fine, replace it every 3 to 5 years or during coolant flushes. It’s inexpensive insurance against pressure loss.
Run the Engine to Reveal Hidden Leaks
Some leaks only appear under operating temperature and pressure. A controlled test exposes problems that cold inspections miss.
Warm Up the Engine and Watch for Drips
After completing a cold visual check, start the engine and let it idle until reaching normal operating temperature, usually 5 to 10 minutes. Keep the hood open and watch for new signs of dripping or spraying.
Use a flashlight to peer behind components and inspect these critical areas:
- Bottom of the radiator
- Around hose clamps
- Near the water pump weep hole
- Along transmission cooling lines if routed through the radiator
Steam or mist coming from the engine bay means vaporized coolant. Pinpoint the source immediately before it causes further damage.
Identify Spray Patterns from Pressurized Leaks
Pressurized leaks leave fine mist trails or crusty residue lines on nearby surfaces. These patterns show where fluid was ejected before drying. Clean the area first with water to remove old grime, then run the engine again to see fresh evidence.
Spray near the top tank may indicate a hairline crack. Drips from the lower tank could mean corrosion or a failed drain petcock.
Conduct a Pressure Test for Definitive Results

When visual checks fail to locate the problem, a pressure test confirms internal or hidden leaks. This is the most reliable method for diagnosing slow seepage.
Use a Cooling System Pressure Tester
This hand-pump tool attaches where the radiator cap normally sits and pressurizes the system to simulate engine heat.
Follow these steps for accurate results:
- Ensure the engine is completely cold
- Remove the radiator cap
- Attach the pressure tester adapter securely
- Pump to 15 psi, the standard operating pressure for most vehicles
- Hold pressure for 10 to 15 minutes
If the gauge drops, there’s a leak somewhere. Now inspect all components while the system remains pressurized.
Locate Leaks Under Pressure
With the system pressurized, watch for bubbles or drips at seams, hoses, or the radiator body. Check heater core connections behind the firewall and inspect the water pump and thermostat housing. Look for internal leaks by checking oil for milky residue on the dipstick or exhaust for white smoke while running.
Pinhole leaks invisible during normal operation often bleed fluid under test pressure.
Identify Common Leak Sources Beyond the Radiator

Not all coolant loss comes from the radiator itself. Rule out other components before replacing expensive parts.
Pinpoint Radiator-Specific Failures
Several radiator problems cause coolant loss:
- Pinhole leaks from interior corrosion in aluminum tubes
- Cracked plastic tanks caused by age or thermal cycling
- Seam separation where plastic tanks meet the metal core
- Corroded fins from external rust or sludge buildup
These issues usually require replacement or professional re-coring for older copper and brass radiators.
Evaluate Hose and Clamp Integrity
Rubber hoses degrade over time, especially near hot exhaust manifolds. Replace any that feel soft or spongy, show cracks or bulges, or leak at connection points. Always use new clamps since reused ones lose tension and won’t seal properly. Stainless steel screw-type clamps offer better durability.
Diagnose Non-Radiator Causes
Don’t assume the radiator is guilty. Other frequent culprits include:
- Blown head gasket allowing coolant into combustion chambers or oil
- Faulty radiator cap failing to hold pressure
- Water pump leak dripping from the weep hole or housing
- Heater core failure causing sweet smells and foggy windows
Misdiagnosing these as radiator issues wastes time and money on unnecessary parts.
Apply Temporary Fixes in Emergency Situations
For minor leaks and emergency stops, temporary solutions can get you home, but they’re not long-term answers.
Try Radiator Leak Sealant for Minor Leaks
Pour a quality stop-leak product into the coolant reservoir or radiator. These work best for small pinholes or micro-cracks. Avoid using sealants if you have aluminum engines or plastic tanks, since some products clog narrow passages.
Follow instructions exactly by running the engine for the specified time, then flush the system soon after. This is a short-term fix only. Plan for permanent repair within weeks.
Patch Small Cracks with Radiator Epoxy
For small external cracks in plastic tanks, follow these steps:
- Drain coolant from the affected area
- Clean thoroughly with a wire brush and isopropyl alcohol
- Mix two-part epoxy designed for radiator repair
- Apply and let cure fully for 4 to 6 hours
This method works only on dry, accessible surfaces under low pressure. It won’t survive high-stress zones or internal leaks.
Replace or Repair Based on Leak Severity
Once you’ve confirmed the leak location, decide whether repair or replacement makes more sense.
Replace a Faulty Radiator Cap
If pressure testing reveals cap failure, replace it with an OEM-specified unit. It’s one of the cheapest and easiest fixes but critical for system integrity. After installation, retest pressure and monitor for improvement.
Swap Leaking Hoses and Clamps
Cut out old hoses and install exact replacements. Use new clamps and consider applying silicone sealant on hose ends to prevent seepage. Double-check routing and ensure no kinks or interference with moving parts like fan blades.
Install a New Radiator When Necessary
Replace the radiator if you find multiple pinholes, large cracks, a collapsed core, or severely corroded fins. Also replace it if integrated transmission lines are leaking and non-repairable.
Choose a direct-fit unit matching your year, make, engine, and transmission type. Reuse mounting hardware and rubber pads from the old unit when possible.
Verify Repairs and Prevent Future Leaks
After any fix, confirm it works and take steps to avoid repeat problems.
Refill and Bleed the Cooling System
Use the correct coolant type specified in your owner’s manual mixed 50/50 with distilled water. Never use tap water since minerals accelerate corrosion.
Bleed air from the system by running the engine with the radiator cap off until the thermostat opens and the upper hose gets hot. Squeeze the upper hose to release trapped air and top off as needed. Air pockets cause false overheating and must be removed.
Test Drive and Monitor Results
Take a short drive, then recheck coolant level after cooling. Watch temperature gauge behavior and inspect for new drips or smells. Check daily for the first week. A successful repair shows stable levels and no leaks.
Follow a Regular Maintenance Schedule
A well-maintained cooling system lasts up to 150,000 miles. Stick to this routine:
- Check coolant level monthly
- Inspect hoses and clamps annually
- Flush and replace coolant every 30,000 to 50,000 miles
- Replace the radiator cap every 3 to 5 years
Use manufacturer-recommended coolant since mixing types can cause gel formation and blockages.
Frequently Asked Questions About Radiator Leak Detection
How Can I Tell If My Radiator Is Leaking or If It’s a Head Gasket?
A radiator leak usually shows colored puddles under the car or steam from the engine bay. A blown head gasket typically causes white exhaust smoke, milky oil on the dipstick, or bubbles in the coolant reservoir. If you see these internal symptoms without external puddles, suspect the head gasket and get a professional compression test.
Is It Safe to Drive With a Small Radiator Leak?
Driving with a small leak is risky and not recommended. Even minor coolant loss can lead to sudden overheating, especially in traffic or hot weather. A $10 hose clamp replacement today prevents a $2,000 engine rebuild tomorrow. If you must drive short distances, watch the temperature gauge constantly and top off coolant before each trip.
How Much Does It Cost to Fix a Radiator Leak?
Repair costs vary widely based on the source. Hose clamps cost under $5, replacement hoses run $20 to $50, and a new radiator ranges from $200 to $600 for parts plus labor. Professional diagnostic fees typically run $100 to $150. Temporary sealants cost $10 to $20 but only buy time, not permanent solutions.
Can a Radiator Leak Fix Itself?
No, radiator leaks do not heal on their own. Coolant escaping from cracks, corrosion, or failed seals will only worsen as pressure and heat continue stressing the damaged area. Even small pinholes expand over time. Address leaks promptly to avoid escalating repair costs and potential engine damage.
How Long Does a Radiator Replacement Take?
A standard radiator replacement takes approximately 120 minutes for vehicles with accessible engine bays. Complex modern vehicles with crowded engine compartments may require 3 to 4 hours. Professional shops often complete the job faster due to experience and specialized tools. DIY beginners should budget a full afternoon for the task.
Key Takeaways for Checking Your Radiator Leak
Mastering how to check for radiator leak puts you in control of your vehicle’s health and your repair budget. Start with sensory checks like temperature gauges, sweet smells, and colored puddles. Move to visual inspections of hoses, connections, and the radiator body when the engine is cold. Run the engine to expose leaks that only appear under pressure, then confirm findings with a 15 psi pressure test.
Identify the source accurately before spending money on parts. A $10 cap or $20 hose often solves the problem without replacing the entire radiator. After any repair, bleed the system properly and monitor coolant levels for the first week.
Your next step is simple: park on a clean surface tonight, then inspect underneath in the morning. If you spot colored fluid, follow this guide to locate and fix the leak before it strands you on the roadside.



