

Your engine runs hot, really hot. Without proper cooling, temperatures can soar past 250°F, risking warped cylinder heads, blown head gaskets, or total engine failure. That is where coolant comes in. Also known as antifreeze, this vital fluid keeps your engine at optimal temperature, prevents freezing in winter, and protects against corrosion. But if the level drops too low, all that protection vanishes.
One of the easiest ways to prevent overheating and costly repairs is checking your car coolant level regularly. This quick, simple task takes less than 10 minutes and requires no special tools. Whether you are preparing for a road trip, noticing a warning light, or staying on top of routine maintenance, knowing how to check coolant properly can save you time, money, and stress.
Identify Your Cooling System Type
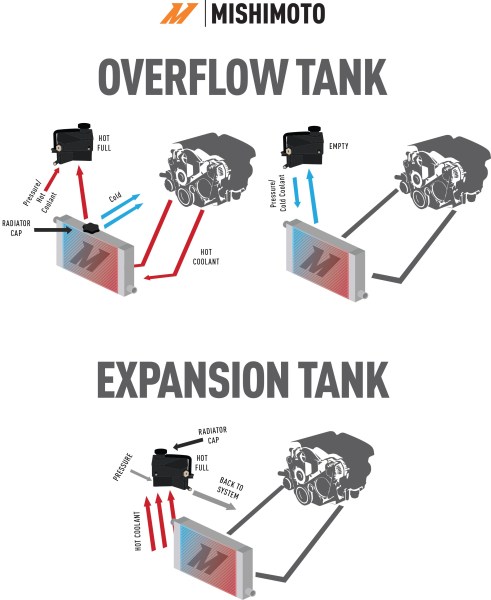
Before opening any caps, you need to understand what kind of cooling system your car uses. The procedure and location for checking coolant vary depending on the design.
Overflow-Tank vs. Surge-Tank Systems
Most modern vehicles use one of two primary system types. Understanding yours determines how you check the level.
Overflow-Tank System:
This design is found in many older and European models. It includes a small flip cap on the engine block, not the radiator. The translucent reservoir gives a rough idea of fluid level, but the true level requires removing the engine cap when the engine is cold.
Surge-Tank System:
This design is common in newer cars. It features a pressurized cap on a clear plastic reservoir. You can visually inspect the level without opening anything. The coolant should sit between MIN and MAX marks when cold.
Pro Tip: If you are unsure which system your vehicle uses, consult your owner is manual. It will show the exact location and system type.
Locate the Coolant Reservoir or Radiator Cap
Open the hood using the interior release lever, usually found near the driver is left foot. Look for a white or semi-transparent plastic tank labeled “Coolant” or marked with HIGH and LOW indicators.
If no reservoir is visible, your vehicle likely has a direct-fill system with a cap on the radiator. Never assume. Always verify with your manual.
Wait for a Cold Engine
Safety comes first. Checking coolant on a hot engine can lead to serious injury.
Why You Must Wait
The cooling system is pressurized when hot. Opening the cap releases superheated steam and boiling fluid. Temperatures can exceed 250°F, posing a severe burn risk.
Additionally, an accurate reading is only possible when the engine has cooled to ambient temperature. Coolant expands when hot, giving a false high reading if checked too soon.
How Long to Wait
Let the engine sit for at least 30 minutes after turning it off. For best results, check first thing in the morning before starting the car. Touch the radiator hose gently. If it is warm, wait longer.
Never open the coolant cap while the engine is running or hot.
Park on Level Ground
An uneven surface can distort the coolant level in the reservoir, leading to incorrect readings.
Why Level Matters
When parked on a slope, coolant pools to one side of the tank. This may make it appear low even when the system is actually within the proper range.
What to Do
Pull into a flat driveway or parking space. Turn off the engine and engage the parking brake. Allow the vehicle to settle before inspecting. This ensures a true reflection of the actual fluid volume.
Inspect Coolant Level Visually
Now you are ready to check the level safely and accurately.
For Surge-Tank Systems
These vehicles have a clear reservoir with MIN and MAX lines. Look at the side of the tank. The coolant should be above the MIN mark and just below the MAX mark when cold. If it is near or below MIN, topping off is needed.
No cap removal is required for this system type. Simply perform a visual check.
For Overflow-Tank Systems
These require an extra step. First, check the reservoir level. It should be partially filled. Then remove the flip cap on the engine block, but only when the engine is cold. Peer into the fill neck. The coolant should be visible at the top. If not, the system is low and needs a refill.
Note: The reservoir alone does not reflect real system volume in this design. You must check directly at the engine block.
Evaluate Coolant Condition and Color
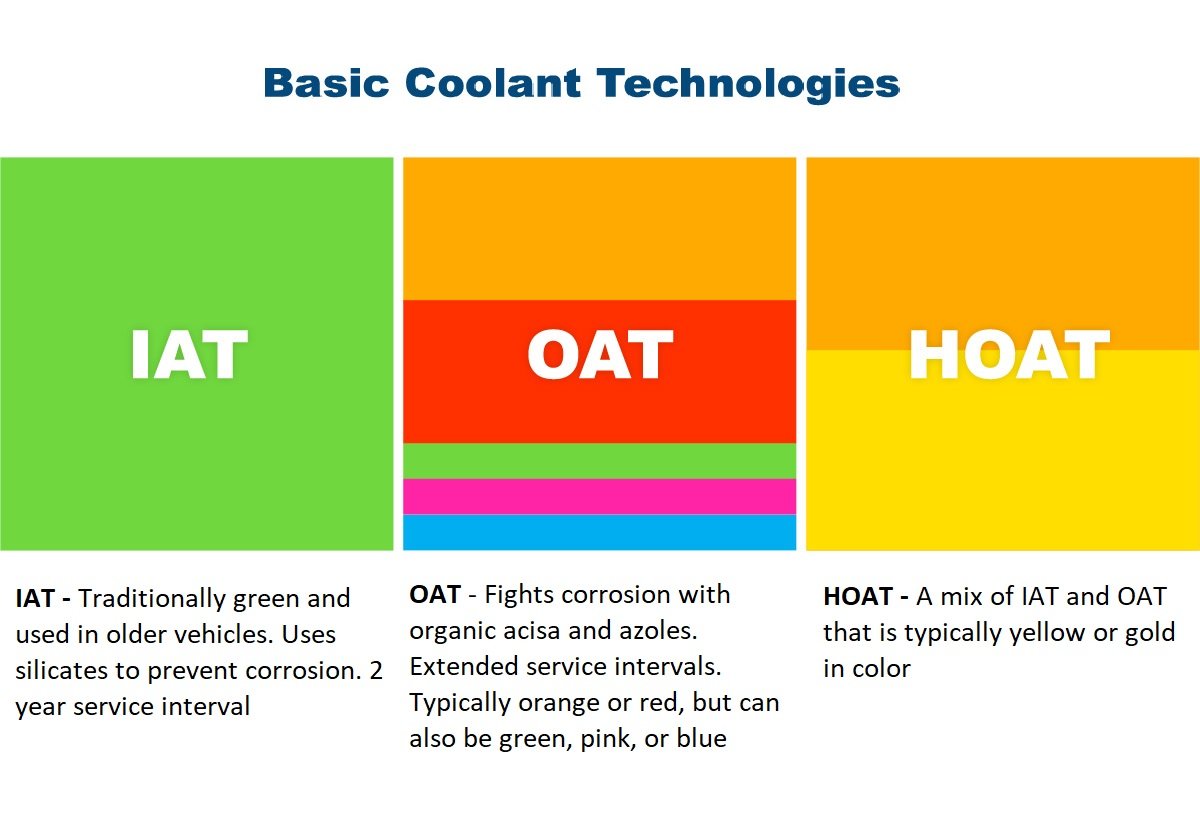
Level is not everything. The appearance of your coolant tells a story about system health.
What Normal Coolant Looks Like
Normal coolant is clear and bright. The color depends on the type. Green indicates traditional IAT coolant. Orange or red indicates OAT, which is long-life. Yellow or turquoise indicates HOAT, which is hybrid. There should be no particles, cloudiness, or separation.
Color alone does not indicate type or compatibility. Always check your vehicle specifications.
Warning Signs of Trouble
Several indicators suggest problems. Rusty or brown fluid means corrosion, old coolant, or internal rust. Milky or foamy appearance means oil contamination, possibly from a blown head gasket. Sludge or grit means degraded hoses or internal component wear. Colorless or murky fluid means dilution with water or chemical breakdown.
If you see oil in the coolant, stop driving immediately. Have the vehicle towed for inspection.
Check Hoses and Connections
A low level might mean a leak. Inspect key areas before refilling.
What to Look For
Look for cracks, bulges, or soft spots on radiator hoses. Check for wetness, stains, or dried residue around clamps and connections. Look for collapsed or brittle hoses that could burst under pressure.
How to Inspect
Squeeze the upper and lower radiator hoses. They should feel firm, not spongy. Trace each hose from radiator to engine, checking for wear. Use a flashlight if visibility is poor.
Replace damaged hoses before adding coolant to avoid immediate leakage.
Choose the Right Coolant Type
Using the wrong coolant can cause chemical reactions, gel formation, or corrosion.
Refer to Your Owner is Manual
The owner is manual is the only reliable source for correct coolant specifications. Look for terms like DEX-COOL for GM vehicles, G12 or G13 for Volkswagen and Audi, Toyota Type SIC-0, or Honda Type 2. Never guess based on color.
Common Coolant Types
| Type | Chemistry | Typical Interval | Color |
|---|---|---|---|
| IAT | Inorganic | 2 years or 30,000 miles | Green |
| OAT | Organic | 5 years or 150,000 miles | Orange, Red |
| HOAT | Hybrid | 5 years or 100,000+ miles | Yellow, Blue |
Never mix coolant types. Incompatible formulas can form sludge and block cooling passages.
Decide: Pre-Mixed or Concentrate
Coolant comes in two forms. Choose wisely based on your needs.
Pre-Mixed Coolant
This type is ready to pour with no mixing required. It is ideal for quick top-offs. It is slightly more expensive but more convenient.
Concentrate
This type must be diluted with distilled or deionized water in a 1:1 ratio. Tap water contains minerals that cause scale buildup. Improper mixing reduces freeze and boil protection.
Pro Tip: Always use distilled water even in pre-mix to ensure purity.
Add Coolant Safely
Now it is time to top off if needed.
Step-by-Step Refill
Remove the reservoir or engine cap, but only when the engine is cold. Place a clean funnel in the opening. Pour slowly until the level reaches the MAX line. Do not overfill because coolant expands when hot. Securely replace the cap and listen for a click or seal.
Leave space below the neck in direct-fill systems to allow expansion.
Emergency Fix: Add Distilled Water
If coolant is critically low and you are stranded, use distilled water only as a temporary fix. Drive straight to a repair shop. Replace with proper 50/50 mix as soon as possible.
Never use tap water long-term. It promotes rust and scaling.
Recognize When to Replace Coolant
Checking level is routine maintenance. Full replacement is scheduled maintenance.
When to Change Coolant
For older models using IAT coolant, change every 2 years or 30,000 miles. For modern vehicles using OAT or HOAT, change every 5 years or 100,000 to 150,000 miles. Always follow your owner is manual because intervals vary by make and model.
Signs Coolant Needs Flushing
Flush the system if you notice rust or sludge in the reservoir. Flush if you have persistent low level with no visible leak. Flush if overheating occurs after refill. Flush if the freeze-point test fails. Flush if the coolant appears milky, indicating oil contamination.
Perform a Coolant Flush
A complete flush removes old fluid and contaminants.
Basic Flush Steps
Place a drain pan under the radiator. Open the radiator drain plug and let the fluid empty. Inspect the drained coolant. Metal flakes or oil mean internal damage. Flush the system with clean water or a flush solution. Close the drain plug and refill with the correct coolant mix. Bleed air from the system by following manual instructions. Run the engine and recheck the level after cooling.
Dispose of old coolant responsibly. It is toxic to pets and wildlife. Take it to a recycling center.
Respond to Dashboard Warnings
Your car will tell you when coolant is an issue.
Common Warning Signs
Watch for the temperature gauge moving into the red. Watch for the coolant light, which looks like a thermometer symbol. Watch for steam from under the hood. Watch for a sweet smell, which is the glycol odor. Watch for bubbling in the reservoir while the engine is running.
Bubbles during operation may mean exhaust gases are in the coolant, which is a classic sign of a blown head gasket.
What to Do If Overheating
Turn off the A/C to reduce engine load. Turn on the heater to draw heat away from the engine. Pull over safely and shut off the engine. Wait 30 or more minutes before opening the hood. Do not drive until the vehicle is repaired because the risk of engine seizure is high.
Know When to See a Mechanic
Some issues go beyond DIY fixes.
Seek Professional Help If
Seek help if coolant mixes with engine oil. Seek help if coolant disappears with no visible leak. Seek help if bubbles persist in the reservoir. Seek help if the radiator is not circulating fluid. Seek help if the cooling system will not hold pressure. Seek help if you are unsure about coolant type or bleeding procedure.
Thermostat, water pump, and head gasket repairs require specialized tools and expertise.
Follow a Maintenance Schedule
Prevention beats expensive repairs.
How Often to Check Coolant
Check coolant every 6 months, ideally before summer and winter. Check coolant with every oil change, which is ideal. Check more often for high-mileage or older vehicles.
Best Practices
Keep a bottle of correct coolant in your trunk. Record replacement dates in your maintenance log. Replace the radiator cap if it is worn or leaking. Use distilled water only when mixing concentrate.
Key Takeaways for Checking Your Car Coolant Level
Checking your car coolant level is a simple, life-extending habit. By following these steps, you protect your engine from overheating and catastrophic failure. Wait for a cold engine before checking. Identify your system type and locate the correct reservoir or cap. Inspect both the level and the condition of the coolant. Use the right coolant type and proper mixing ratio. Make this routine check part of your maintenance schedule, and you will drive with confidence knowing your cooling system is in top shape.
Frequently Asked Questions About Checking Car Coolant Level
How often should I check my coolant level?
Check coolant at least every six months or during routine maintenance. Vehicles driven in extreme climates or under high-stress conditions may require more frequent inspections.
Can I use any type of coolant in my vehicle?
No. Coolant is vehicle-specific due to differing metallurgy and chemical compatibility. Always use the type specified in your owner is manual. Mixing incompatible coolants can cause severe system damage.
What should I do if I see bubbles in the coolant?
Bubbles in the reservoir while the engine is running may indicate exhaust gases entering the cooling system, often due to a blown head gasket. Have the vehicle inspected immediately by a professional.
How can I tell if my coolant is contaminated?
Contaminated coolant may appear milky or oily from oil intrusion. It may look rusty or brown from corrosion. It may appear sludgy or particle-filled from degraded components. It may appear colorless or murky from dilution or aging.
What if the coolant reservoir is empty but the radiator is full?
This could indicate a blocked overflow hose, faulty radiator cap, or air lock. Top up the reservoir and monitor for leaks. If the issue persists, have the system pressure-tested by a mechanic.
Can I top off coolant with water?
Only in emergencies, use distilled water, not tap water. Permanent use of water-only coolant increases risk of corrosion, boiling, and freezing. Replace with proper 50/50 mix as soon as possible.



