

Is your air conditioner blowing warm air or struggling to cool your home? One of the most common culprits is low refrigerant, often called AC coolant, but unlike engine oil, refrigerant does not get used up. If your system is low, it means there is a leak or underlying issue that needs attention. Simply adding more without diagnosis can cause compressor damage, higher energy bills, or environmental harm.
Checking AC refrigerant levels is not as simple as reading a gauge. It requires understanding pressure, temperature, airflow, and system design. While only an EPA-certified technician should handle refrigerant directly, this guide helps you recognize warning signs, understand how professionals diagnose issues, and know when to call for help. You will learn how to spot early symptoms of low coolant, perform basic DIY checks safely, and understand the professional tools and methods used to accurately measure refrigerant charge.
Recognize Warning Signs of Low AC Coolant
Warm Air Coming from Vents
If your AC runs but blows air that is only slightly cool or worse, warm, you likely have a refrigerant issue. Proper cooling depends on phase changes inside the evaporator coil, which only happen with adequate refrigerant. Low levels reduce heat absorption, so air does not cool effectively.
Ice Buildup on Lines or Coils
A frozen evaporator coil or icy suction line is a classic sign of low refrigerant. When pressure drops too low, moisture freezes on the coil. Never try to chip ice off. This can damage the fins. Turn off the system and let it thaw completely before inspection.
Hissing or Bubbling Noises
Audible hissing or gurgling near refrigerant lines may indicate a refrigerant leak under pressure. These sounds are more noticeable when the compressor kicks on. While some noise is normal, loud or persistent hissing warrants immediate inspection.
High Energy Bills
Low refrigerant forces your AC to run longer cycles to reach the set temperature. This increases runtime, energy use, and wear on components. A sudden spike in electricity costs, especially during peak cooling season, can point to an inefficient system.
Reduced Airflow
Ice buildup on the evaporator coil restricts airflow, making vents feel weak even with clean filters. This is often mistaken for blower motor problems, but combined with other symptoms, it strongly suggests refrigerant deficiency.
Suction Line Is Not Cold or Sweating
The large, insulated copper line should feel cold and damp when the system runs. A dry or warm line indicates poor refrigerant flow. In multi-unit systems, comparing line temperatures across units can reveal imbalances.
DIY Checks You Can Perform Without Tools
Test Condenser Airflow
Place your hand over the outdoor unit while it is running. The air should feel 10 to 15 degrees warmer than outside temperature. If it is barely warm, the system may be undercharged.
Inspect the Suction Line
Locate the larger copper pipe between indoor and outdoor units. It should be cold to the touch and sweating. If dry and only slightly cool around 70 degrees Fahrenheit, refrigerant is likely 25 percent or more low. Frost or ice confirms a serious issue.
Measure Temperature Drop Across Evaporator
After 15 or more minutes of operation, measure return air temperature away from vents and supply air temperature in a vent. Subtract to find the temperature difference. An 18 to 21 degree drop is normal. A 10 to 14 degree drop suggests 20 to 30 percent low refrigerant. Below 10 degrees indicates 40 to 50 percent low.
Professional Tools Used to Check Refrigerant Levels

Manifold Gauge Set
This is the primary tool for measuring refrigerant pressure. The blue hose connects to the low-pressure suction service valve. The red hose attaches to the high-pressure discharge service valve. The yellow hose links to a refrigerant tank or recovery unit. Each gauge displays pressure and corresponding saturation temperature for specific refrigerants like R-22 or R-410A. Never use the wrong gauge. R-410A operates at much higher pressures than R-22.
Digital Thermometers and Sensors
Accurate temperature readings are essential for calculating superheat and subcooling. Professionals use K-type bead sensors wrapped around refrigerant lines with insulation sleeves to block solar heating. Dual-probe thermometers measure return and supply air to calculate temperature difference.
Leak Detectors
Electronic or UV-based detectors identify refrigerant leaks. Electronic sniffers alert when trace gases are present. UV dye added to the system glows under black light at leak points. Leak detection is critical. Recharging without fixing leaks wastes refrigerant and money.
Protective Gear
Refrigerant can exit lines at minus 40 degrees Fahrenheit, causing instant frostbite. Technicians always wear insulated gloves, safety glasses, and long sleeves. DIYers should never open the system. Even connecting gauges improperly can release harmful gases.
Step-by-Step: How Professionals Check AC Coolant Level
Prepare the System
Before any test, ensure the system is ready. Turn off power at the disconnect switch. Set thermostat to cooling mode at the lowest setting. Wait 5 minutes after turning power back on. This allows the compressor relay to reset. Replace dirty air filters and clear condensate drain lines. Clean evaporator and condenser coils if dusty or blocked.
Critical. Outdoor temperature must be above 70 degrees Fahrenheit for accurate readings. Testing in cooler weather gives false low-pressure results.
Connect Manifold Gauges
Only trained technicians should perform this step. Ensure all valves on the manifold are closed. Attach the blue low-side hose to the suction valve first. Then connect the red high-side hose to the discharge valve. Wear insulated gloves throughout.
Pro tip. Use quick-connect fittings to minimize refrigerant loss and prevent air from entering the system.
Stabilize and Record Readings
Let the system run for 5 to 15 minutes to stabilize. Record low-side pressure from the blue gauge. Record high-side pressure from the red gauge. Measure suction line temperature and liquid line temperature. Note ambient outdoor temperature and indoor conditions. These values form the basis for superheat and subcooling calculations.
Interpret Pressure Readings
Gauges have color-coded scales for different refrigerants. R-22 systems typically show low side around 75 to 80 PSI and high side around 200 to 220 PSI. R-410A systems show low side around 110 to 120 PSI and high side around 200 to 275 PSI.
Warning. R-410A operates at 50 to 70 percent higher pressure than R-22. Using R-22 gauges on R-410A systems risks equipment failure.
Calculate Subcooling for Accurate Charge Check

What Is Subcooling
Subcooling measures how much the refrigerant is cooled below its saturation temperature in the liquid line. It is the best method for systems with thermostatic expansion valves.
The formula is simple. Subcooling equals saturated temperature from high-side pressure minus actual liquid line temperature. For example, if high-side pressure reads 239 psig, the saturated temperature is 81.5 degrees Fahrenheit. If the liquid line temperature measures 70 degrees Fahrenheit, the subcooling is 11.5 degrees Fahrenheit.
Compare this to the nameplate specification. Ideal charge is 1 to 2 degrees Fahrenheit above specification.
When to Use Subcooling
This method works best for systems with thermostatic expansion valves. It is preferred for R-410A and modern AC units. Subcooling below 8 degrees Fahrenheit suggests undercharge. Above 15 degrees Fahrenheit may indicate overcharge or restriction.
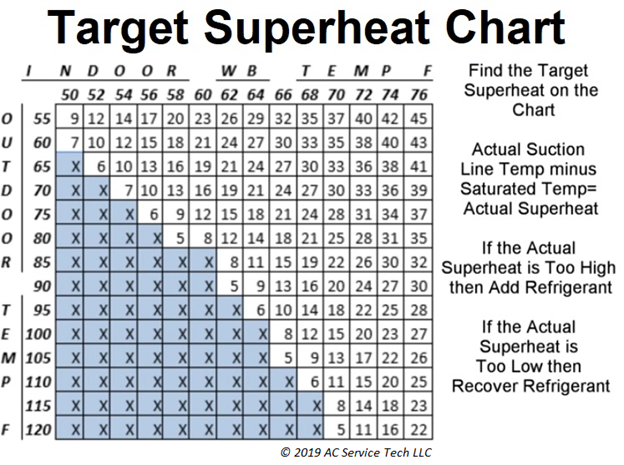
Evaluate Superheat for Fixed Orifice Systems
What Is Superheat
Superheat ensures only vapor, not liquid, enters the compressor. It is calculated using suction pressure and temperature.
The formula is actual suction line temperature minus saturated suction temperature from low-side pressure. Five to 15 degrees Fahrenheit is ideal. Below 5 degrees Fahrenheit risks liquid slugging, which can destroy the compressor. Above 20 degrees Fahrenheit likely indicates undercharge or restricted metering device.
When to Use Superheat
Use this method for systems with fixed orifice metering devices. It works well for older R-22 units. Note that TXV systems maintain constant superheat around 8 to 12 degrees Fahrenheit, so subcooling is preferred for accuracy.
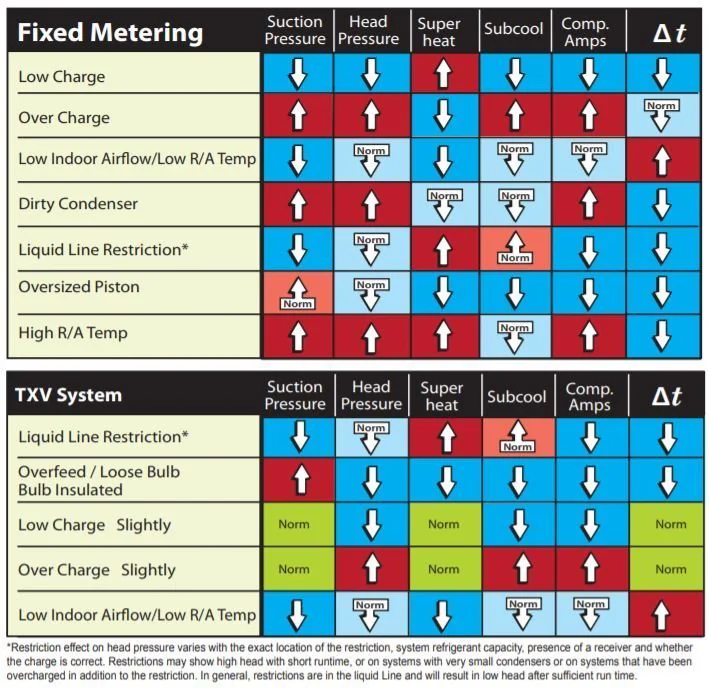
Diagnose Common Pressure Problems
Both High and Low Pressures High
Cause. Poor condenser airflow from dirty coil, blocked fins, or recirculation of hot air. Fix. Clean the outdoor unit, ensure 24-inch clearance, and shade from direct sun.
Both Pressures Low
Cause. Refrigerant leak or undercharge. Action. Check for oil stains, listen for hissing, and test with a leak detector. Never add refrigerant without finding the leak first.
Low-Side High, High-Side Low
Cause. Compressor inefficiency or failure. Signs. Weak cooling despite normal suction pressure. Next step. Test compressor amperage and consult a technician.
Fluctuating Pressures
Cause. Moisture in the system, non-condensable gases, or faulty TXV. Solution. Recover refrigerant, vacuum the system, and recharge properly.
No Pressure Change
Cause. Blockage from kinked line, clogged filter drier, or closed service valve. Check. Inspect lines for bends, ensure valves are open, and verify no debris in ports.
Estimate Refrigerant Deficiency
Find Total Charge
Check the nameplate on the outdoor unit for refrigerant type and total charge. This is the factory charge, not including line set additions.
Calculate Recharge Amount
Based on temperature difference or symptoms, estimate the percentage loss. For example, if total charge is 66 ounces and the system is 30 to 40 percent low, multiply 66 by 0.3 to 0.4. This equals 20 to 27 ounces to add.
Warning. Never add refrigerant without gauges. Overcharging is just as damaging as undercharging and can destroy the compressor.
Final Checks After Service
Seal and Verify
Once gauges are disconnected, close high-side valve first, then disconnect red hose. Disconnect blue hose and close its valve. Purge center hose into recovery unit, never the atmosphere. Apply bubble solution to Schrader valves. No bubbles means good seal. Replace valve caps and tighten securely.
Monitor System Performance
After recharging, confirm temperature difference is 18 to 21 degrees Fahrenheit. Ensure suction line is cold and sweating. Check that pressures stabilize within range. Log readings for future reference.
System is balanced when subcooling is 1 to 2 degrees Fahrenheit above spec, temperature difference is ideal, and no leaks are detected.
Preventive Maintenance to Avoid Low Coolant Issues
Change Air Filters Monthly
Clogged filters reduce airflow, cause coil freezing, and mimic low-charge symptoms. Replace every 1 to 3 months during cooling season.
Clean Coils Annually
Dirt on evaporator or condenser coils reduces heat transfer. Clean gently with a coil brush or hire a professional.
Inspect Insulation
Ensure the suction line is fully insulated. Damaged insulation causes condensation and energy loss.
Schedule Annual HVAC Tune-Ups
A certified technician should check refrigerant levels, test for leaks, measure airflow and temperature difference, clean components, and verify system performance. Preventive service catches small issues before they become costly repairs.
Frequently Asked Questions About Checking AC Coolant Level
How Do I Know If My AC Is Low on Coolant?
Watch for warm air from vents, ice buildup on coils or lines, hissing noises, unusually high energy bills, reduced airflow, or a suction line that is not cold and sweating. These symptoms indicate potential refrigerant deficiency.
Can I Check AC Coolant Level Without Professional Tools?
You can perform basic observational checks. Feel the suction line for coldness and sweating. Measure temperature difference between return and supply air. Test condenser airflow by feeling the air expelled from the outdoor unit. These methods give rough estimates but are not precise enough for accurate charging.
How Often Should Refrigerant Be Checked?
Refrigerant should not need regular recharging in a sealed system. Check levels annually as part of routine maintenance. Recharge only if a leak is confirmed and repaired. Frequent top-offs mean ongoing leakage that must be fixed.
What Happens If AC Coolant Is Too Low?
Low refrigerant reduces cooling capacity, causes ice formation on coils, makes the compressor work harder, increases energy consumption, and can lead to compressor overheating and failure. Even a 10 percent undercharge can reduce efficiency by 20 percent.
Can I Add Refrigerant Myself?
Only EPA-certified technicians should handle refrigerant. Adding refrigerant without proper diagnosis risks overcharging, which damages the compressor. It also wastes money if a leak is present. Always hire a certified professional for refrigerant work.
What Is the Difference Between Subcooling and Superheat?
Subcooling measures refrigerant cooling in the liquid line and is best for TXV systems. Superheat measures vapor temperature at the compressor and is best for fixed orifice systems. Both calculations require pressure and temperature readings using professional tools.
Key Takeaways for Checking AC Coolant Level
Checking AC coolant level requires understanding warning signs like warm air, ice buildup, and unusual noises. Basic DIY checks include feeling the suction line, measuring temperature difference, and testing condenser airflow. Professional diagnosis uses manifold gauges, temperature sensors, and calculations like subcooling and superheat to determine accurate refrigerant charge.
Never add refrigerant without finding the root cause of low levels. A leak must be repaired before recharging. Only EPA-certified technicians should handle refrigerant due to safety and environmental regulations. Schedule annual maintenance to catch issues early and keep your system running efficiently.



