
Changing your vehicle’s coolant fluid is one of the most important maintenance tasks you can perform. Over time, engine coolant breaks down, loses its protective properties, and accumulates sludge and corrosion byproducts that can lead to overheating, water pump failure, radiator blockages, or even catastrophic engine damage. Knowing how to change coolant fluid properly ensures your engine stays cool, protected, and running efficiently for years to come.
This guide walks you through every step of a complete coolant change, from inspecting the current fluid condition and choosing the right coolant type, to flushing the system, bleeding air pockets, and disposing of old coolant safely. Whether you’re a DIYer looking to save money or want to understand what a mechanic should do, these steps will help you avoid common mistakes and ensure long-lasting results.
Check Coolant Condition First
Before replacing coolant, inspect its current state to determine if a change is actually needed.
Signs Your Coolant Needs Replacement
Healthy coolant should appear bright green, orange, pink, or blue depending on the type. If the fluid looks brown, rusty, murky, or contains visible particles, replacement is urgent. Other warning signs include frequent low coolant levels requiring top-offs, sweet-smelling odors inside the cabin, poor heater performance, or engine overheating symptoms. Using coolant test strips or a refractometer can confirm whether freeze point protection and pH balance still meet manufacturer specifications.
When to Proceed With a Change
If your vehicle has exceeded the recommended service interval (typically 24,000 to 36,000 miles or 2 to 3 years for standard coolants), or if testing reveals inadequate protection, proceed with a full system flush and replacement.
Know the Right Coolant Type
Using the wrong coolant can cause gelling, seal damage, and accelerated corrosion inside your cooling system.
Coolant Types and Their Uses
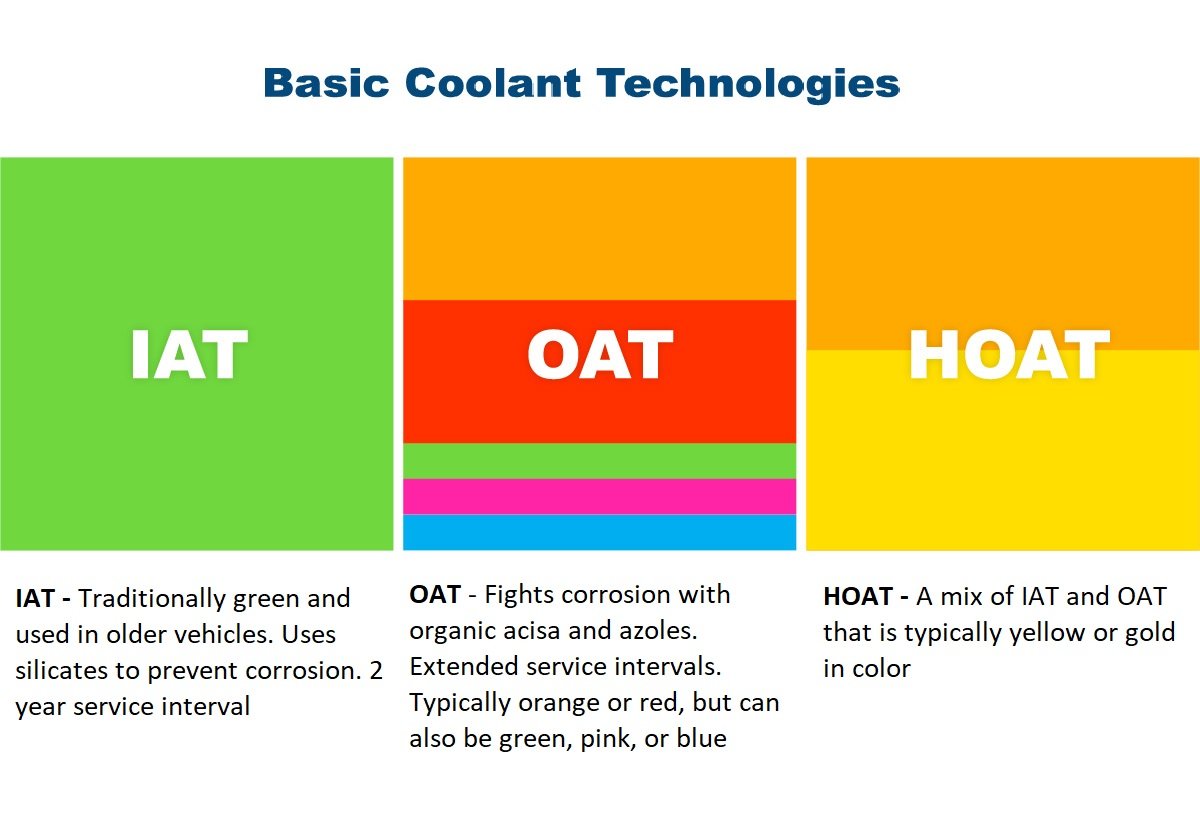
Different vehicle manufacturers specify different coolant formulations based on their additive technology. IAT (Inorganic Acid Technology) coolants are green and typically used in pre-1996 vehicles with 2-3 year service lives. OAT (Organic Acid Technology) coolants appear orange or red and are used in GM vehicles (including Dex-Cool) with service lives up to 150,000 miles. HOAT (Hybrid Organic Acid Technology) comes in yellow or blue and is standard for Ford, Chrysler, and many European vehicles with 100,000-150,000 mile intervals. Si-OAT (Silicate-Free OAT) appears purple or pink and is specified for Honda, Toyota, and Nissan vehicles at 5 years or 100,000 miles.
Finding Your Correct Coolant
Always match the coolant type to what your manufacturer specifies. Check your owner’s manual, read the label on the coolant reservoir cap, or use online tools like the Nulon Lube Guide. Never mix different coolant types, as incompatible formulations can create gel-like sludge that clogs narrow passages. Premixed coolants (50/50) eliminate mixing errors and are ideal for beginners.
Gather Tools and Safety Gear
Having the right equipment ensures a safe and efficient coolant change.
Required Tools
You will need a socket wrench set and pliers for removing hose clamps and drain plugs. A torque wrench is essential for reinstalling drain bolts to specification without stripping aluminum threads. A drain pan with at least 10-liter capacity catches the old fluid, and a funnel with a mesh filter helps prevent debris from entering the system during refills. A garden hose assists with flushing, while coolant test strips verify mixture ratios.
Safety Considerations
Always work on a cold engine. Opening a hot radiator cap can cause severe steam burns. Wear chemical-resistant gloves and safety goggles to protect against skin and eye contact with coolant. Coolant is highly toxic and sweet-tasting, posing serious risks to children and pets, so keep them away from your workspace. Collect all used fluid in sealed, labeled containers and dispose of it properly at auto parts stores, recycling centers, or hazardous waste facilities.
Drain Old Coolant Completely
Proper drainage ensures old, degraded fluid doesn’t contaminate your fresh coolant.
Locating Drain Points
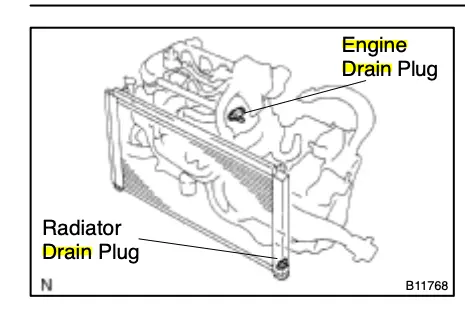
Most vehicles have a radiator drain plug on the lower passenger side of the radiator. Many also include an engine block drain bolt near the cylinder head or timing cover that releases coolant trapped in the engine and heater core. Some models use a petcock valve instead of a removable plug.
Step-by-Step Drain Process
Remove the radiator cap to allow air to enter the system, then position your drain pan beneath the radiator. Open the radiator drain plug and let fluid drain fully. If accessible, remove the engine block drain bolt to capture remaining coolant. Allow both sections to drain for 10-15 minutes. Skipping the engine block drain can leave up to 40% of old coolant in the system, significantly reducing the effectiveness of your new fluid.
Reinstalling Drains Properly
Clean drain plug threads and inspect for damage before reinstalling. Replace the washer if worn, apply high-temperature thread sealant, and torque to specification (verify in your owner’s manual). Do not over-tighten, as aluminum threads strip easily.
Flush the Cooling System
Flushing removes accumulated rust, scale, and chemical residue that simple draining cannot eliminate.
Chemical Flush Method
Reinstall all drain plugs, then fill the radiator with a quality flush solution mixed with water according to product instructions. Replace the cap, start the engine, and set the heater to maximum heat to open the heater core valve. Run the engine for 20-45 minutes for standard flushes or 45-90 minutes for heavy-duty cleaning of oil-contaminated systems. Monitor temperature and shut off if overheating occurs. Allow the engine to cool, then drain the flush solution completely.
Water Flush Method
Disconnect a heater hose and attach a coolant flush kit. Connect a garden hose to the kit and turn on water until the outflow runs clear, typically 5-15 minutes. Reconnect the hose and close the system. Repeat with distilled water until discharge remains clear.
Refill with Fresh Coolant
Proper filling technique prevents air lock and ensures correct fluid levels.
Determining System Capacity
Check your owner’s manual for the exact cooling system capacity. For example, a 1999 Acura Integra holds approximately 4.4 liters. Most vehicles range between 5-12 liters depending on engine size.
Mixing and Filling
Use a 50% coolant to 50% distilled water ratio unless using premixed coolant, which eliminates mixing errors. Never use tap water, as minerals cause scaling and corrosion. Begin pouring coolant into the radiator filler neck, filling to the base of the neck rather than the top. Leave the radiator cap loosely seated during initial filling to allow air to escape. Top up the coolant reservoir to the minimum mark.
Bleed Air from System
Trapped air pockets cause overheating, inaccurate temperature readings, and poor cabin heating.
Why Bleeding Matters
Air blocks coolant flow through the system, creating hot spots and preventing proper heat transfer. Without thorough bleeding, you may experience overheating even with fresh coolant.
Bleeding Procedure
Set the heater to maximum heat and fan speed. Start the engine and let it idle with the radiator cap removed or loosely seated. Observe bubbling as air escapes. Squeeze the upper and lower radiator hoses to dislodge trapped air. Top up coolant continuously as the level drops. Allow the engine to reach operating temperature, which means the fan cycles at least twice. Once bubbling stops and the level stabilizes, securely tighten the radiator cap. This process can take up to 30 minutes, so be patient.
Final Checks and Test Drive
Verify your work before returning to normal driving.
Post-Service Inspection
Check all drain plugs, hoses, clamps, and connections for leaks. Confirm the temperature gauge shows normal readings and that hot air flows from the heater at idle. Listen for gurgling sounds that might indicate remaining air pockets.
Test Drive Verification
Drive the vehicle under normal conditions for 10-15 minutes. Allow the engine to cool completely, preferably overnight. Recheck the coolant level in the reservoir and top up to the cold mark if needed. A stable level after cooling confirms proper bleeding and absence of leaks.
Avoid Common Coolant Mistakes
Prevent costly errors with these best practices.
Common Errors and Solutions
Using the wrong coolant type damages your system. Always verify manufacturer specifications before purchasing. Mixing different coolant types causes gelling and clogging. Flush thoroughly before switching types if necessary. Using tap water introduces minerals that create scale deposits. Always use distilled or demineralized water. Over-tightening drain plugs strips aluminum threads. Use a torque wrench and follow specifications. Skipping air bleeding leads to overheating. Allow sufficient time for the process. Failing to check for leaks causes coolant loss and potential damage. Inspect all connections after refilling. Improper disposal harms the environment. Recycle used coolant at designated collection points.
Frequently Asked Questions About Changing Coolant Fluid
How often should I change my coolant fluid?
Under normal driving conditions, standard coolant requires replacement every 24,000 to 36,000 miles or 2 to 3 years. Long-life coolants (OAT, HOAT, Si-OAT) can last 5 years or up to 150,000 miles. Severe conditions like frequent towing, stop-and-go traffic, or extreme temperatures may require more frequent changes.
Can I change coolant myself at home?
Yes, with basic mechanical skills and proper tools, most vehicle owners can perform a coolant change at home. The process requires 1.5-3 hours and costs approximately $30-80 for coolant and supplies. Professional services charge $100-200 but use machine-assisted exchanges for more thorough fluid removal.
What happens if I use the wrong coolant type?
Using incompatible coolant types can cause chemical reactions that create gel-like sludge. This sludge clogs radiator passages, heater cores, and small cooling channels, leading to overheating and reduced heat transfer. Some mixtures also accelerate corrosion and damage rubber seals and hoses.
Do I need to flush the system when changing coolant?
Flushing is highly recommended for complete coolant changes. Draining alone removes only 60-70% of old fluid, leaving contaminated coolant that mixes with fresh fluid and reduces its effectiveness. Flushing removes rust, scale, and chemical byproducts that accumulate over time.
Why is air bleeding necessary after changing coolant?
Air pockets form naturally during the filling process and can block coolant flow through the radiator and heater core. This causes hot spots, inaccurate temperature readings, and poor cabin heating. Bleeding releases this trapped air so coolant circulates properly throughout the entire system.
Is it safe to drive immediately after changing coolant?
You should perform a test drive after the service to verify proper operation, but allow the engine to reach operating temperature gradually. Monitor the temperature gauge during driving and ensure heater output is normal. If overheating occurs or the temperature gauge spikes, stop immediately and recheck the bleeding procedure.
Key Takeaways for Changing Coolant Fluid Successfully
Changing your coolant fluid is a high-impact, cost-effective way to protect your engine from overheating, corrosion, and costly repairs. The process involves inspecting current fluid condition, selecting the correct coolant type for your vehicle, draining from both the radiator and engine block, flushing to remove contaminants, refilling with proper mixture ratios, and thoroughly bleeding air from the system. Taking time to perform each step correctly prevents common mistakes like using incompatible coolants, skipping air bleeds, or improper disposal of hazardous waste. Whether you perform this maintenance yourself or trust a professional, regular coolant changes every 2-5 years (depending on coolant type) ensure long-term reliability and prevent catastrophic engine failures. Your engine will run cooler, last longer, and perform better when you maintain clean, properly formulated coolant throughout the cooling system.



