

You just replaced your thermostat, radiator, or flushed the coolant. Now your engine runs hot, the heater blows cold, or the temperature gauge acts erratic. Chances are, air is trapped in the cooling system. Burping (or bleeding) the coolant system removes these dangerous air pockets that disrupt circulation, cause overheating, and damage critical components like the water pump. Without proper burping, even a perfectly repaired cooling system can fail. This guide delivers a step-by-step, vehicle-agnostic method backed by professional techniques and real-world troubleshooting. You will learn how to eliminate stubborn air, avoid common mistakes, and verify a complete purge.
Use a Vacuum Fill System
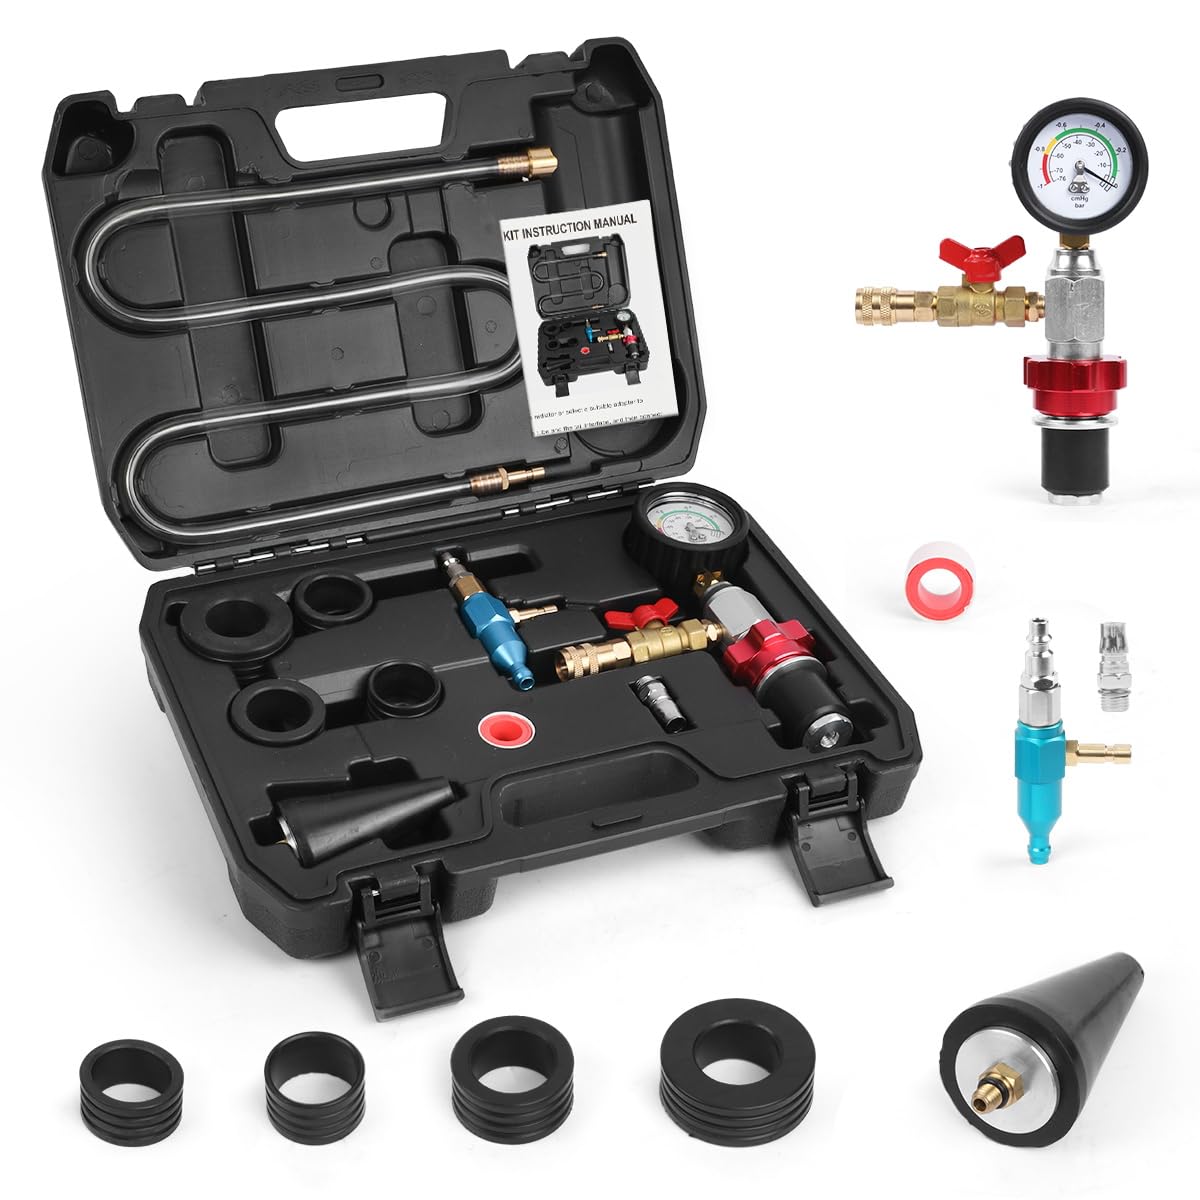
The most reliable way to remove air from any cooling system involves using a vacuum pump to pull air out before coolant enters. This method ensures an air-free fill from the start, preventing micro-bubbles that plague manual methods. It also verifies system integrity by holding vacuum and checking for leaks before introducing any coolant. This approach is especially crucial for modern engines with complex coolant paths and plastic components that trap air easily.
Why Vacuum Bleeding Works Best
Vacuum filling pulls air out before coolant goes in, ensuring an air-free fill from the start. Unlike manual methods, it prevents micro-bubbles and verifies system integrity. It is especially crucial for modern engines with complex coolant paths and plastic components that trap air easily. Professional shops favor this method for head gasket, water pump, and radiator replacements because it eliminates repeated topping off and post-start burping.
Steps to Vacuum Bleed
- Seal the system using a vacuum adapter on the radiator neck or surge tank.
- Connect a hand or electric vacuum pump and pull 25 to 28 inHg of vacuum.
- Hold vacuum for 3 to 5 minutes. If it drops, check for leaks at loose clamps or open bleed screws.
- While maintaining vacuum, open the coolant inlet valve and let pre-mixed 50/50 coolant flow in via gravity.
- Once full, close the fill valve, release vacuum slowly, and cap the system.
This method eliminates post-start burping and repeated topping off. It is ideal after head gasket, water pump, or radiator replacement.
Try the Elevated Funnel Method

When no vacuum kit is available, the elevated funnel method provides the best manual alternative. This technique uses gravity to keep coolant flowing upward, allowing trapped air to escape naturally as the engine warms. It requires a no-spill radiator funnel that seals to the radiator neck, creating a continuous column of coolant that forces air out through the highest points in the system.
Set Up a No-Spill Funnel
Use a no-spill radiator funnel (such as Lisle 24600) that seals to the radiator neck. Mount the funnel so its base is above the thermostat housing and heater core. Pour coolant into the funnel until it is half full, leaving room for expansion. This setup allows gravity to work in your favor during the burping process.
Why It Works: Gravity keeps coolant flowing upward, allowing trapped air to escape naturally as the engine warms.
Warm Engine With Heater On Max
- Start engine with HVAC set to maximum heat and fan speed.
- Let engine idle until it reaches 180 to 190°F.
- Watch for bubbles rising into the funnel. This is air escaping.
- Cover funnel with a rag to prevent hot coolant spray.
Never leave the vehicle unattended during this process. Some engines, like Subaru EJ and GM LS platforms, burp violently and can spray hot coolant.
Apply Controlled Agitation
For stubborn air pockets that refuse to rise, controlled agitation can force them out through pressure pulses and increased water pump speed. This technique works best after the initial burping period when the engine reaches operating temperature. The goal is to create pressure waves that break up air clusters in the heater core and cylinder heads without atomizing them into harder-to-purge micro-bubbles.
Squeeze Upper Radiator Hose
While engine warms, squeeze the upper radiator hose repeatedly. Compress for 2 to 3 seconds, then release. Repeat every 30 seconds. This creates pressure waves that break up air clusters in the heater core and cylinder heads. The compression and release action mimics a manual water pump, pushing coolant through areas where air becomes trapped.
Rev to 3,000 to 4,000 RPM
With engine at operating temperature, rev in 30-second bursts to 3,000 to 4,000 RPM. This increases water pump speed, pushing coolant through trapped zones. Use an assistant for drive-by-wire throttles. Gently press the pedal manually for mechanical throttle bodies.
Avoid aggressive revving. Rapid RPM cycling can atomize air into micro-bubbles, similar to shaking a soda can, making them harder to purge.
Seal and Verify the System
Final steps lock in results and prevent re-trapping air during the cooling process. Proper capping technique matters as much as the burping procedure itself. Rushing this step can undo all your previous work.
Top Off While Running
Once bubbling stops and level stabilizes, add coolant to keep funnel full. With engine still running, plug the funnel opening temporarily. Carefully remove funnel and install radiator or surge tank cap immediately. This prevents air from being drawn back into the system during cap installation.
Leave Uncapped Overnight
Option: Leave cap off overnight after shutdown. As system cools, it contracts and draws coolant back down, releasing final air. Next morning, top off to the brim and seal. This overnight settling method allows any remaining air to rise and escape before final sealing.
Final Check: After cold soak, coolant level should remain stable with no bubbles in surge tank.
Fill the Overflow Tank Correctly
Proper overflow tank setup ensures long-term stability and prevents overflow issues during heat cycles. The expansion tank serves as the reservoir for thermal expansion and contraction, making correct filling critical.
Connect and Fill Expansion Tank
Overflow tank must be sealed and connected to the radiator or surge tank. Fill to just below the overflow tube inlet. Do not overfill. Typical capacity is 16 oz or larger, depending on system volume.
Place a Catch Pan Under Overflow Tube
During initial heat cycles, excess coolant may discharge. A drip pan or catch can prevents mess and coolant loss. Reclaim and reuse if the coolant is clean.
Monitor Level After Driving
Check overflow tank when engine is cold after a full drive cycle. It should sit between Cold and Hot marks. Low level indicates air is still trapped or a leak exists. Repeat burping if necessary.
Fix No Heat After Burping
Even with correct coolant level, some vehicles experience no heat after burping. This section addresses the most common causes and their solutions.
Air Trapped in Heater Core
Air trapped in the heater core remains the most frequent cause of cold air post-service. Solution: Repeat burping with HVAC on max heat. Combine hose squeezing, gentle revving, and funnel method for best results.
Pinched Heater Hose
On a 2007 GMC 4.8L, one heater hose was crushed between manifold cover and firewall. This resulted in zero flow through heater core, causing overheating and no heat. Fix: Inspect routing. Ensure hoses are not kinked near brackets, covers, or firewall.
Thermostat Housing Leak
Installing thermostat without RTV sealant can allow tiny air leaks. Air gets sucked in under vacuum, creating recurring bubbles. Prevention: Apply non-corrosive blue RTV around thermostat housing mating surface if gasket does not fully seal. Permatex Ultra Grey or equivalent high-temp, coolant-resistant sealant works best.
Stuck Blend Door (HVAC Damper)
Even with perfect coolant flow, a failed blend door actuator blocks hot air. Test: Listen for clicking when changing temperature settings. Check for disconnected wires or blown fuses after radiator work.
Thermostat Not Opening
If temperature gauge stays low or upper hose stays cool, the thermostat may be defective or installed backward. Confirm flow increases and upper hose warms after warm-up.
Follow Vehicle-Specific Tips
Different engines have unique quirks that affect burping success. Tailor your method to your specific engine for best results.
Subaru EJ Engines (WRX, STi)
Subaru EJ engines are notorious for stubborn air pockets due to high-mounted thermostat and complex routing. Must-use: No-spill funnel mounted above engine. Run through 2 to 3 cooling fan cycles. Rev gently to 3,000 RPM while squeezing upper hose.
GM LS-Based and 4.8L/5.3L Trucks
These engines use surge tank instead of radiator cap. During burping, fill surge tank to 1/2 inch above Cold Full line with cap loose. Cycle engine from idle to 3,000 RPM until thermostat opens. Confirm overflow tank is functional and properly filled.
Use Hilly Terrain to Your Advantage
Drive in first gear at 2,500 RPM up and down hills. Vehicle motion helps dislodge air from rear of engine and heater core. This trick is especially effective for trucks and SUVs with rear heaters.
Gather the Right Tools
Avoid frustration by using proper equipment designed for coolant system burping. The right tools make the job faster and more reliable.
Essential Burping Tools
No-spill Funnel Kit enables sealed, elevated fill and bubble observation. Vacuum Pump and Adapter removes air before filling, best for major repairs. Coolant Catch Pan prevents spills and contamination during drain and fill. Gloves and Eye Protection are required because coolant is toxic and hot under pressure. Blue RTV Sealant seals thermostat housing if gasket leaks.
A $15 no-spill funnel pays for itself in saved coolant and time.
Verify Performance After Burping
Confirm the job was successful before declaring victory. Proper verification ensures the burping procedure was complete and effective.
Drive and Monitor Key Indicators
- Take vehicle for a 5 to 10 mile drive under normal conditions.
- Watch for stable temperature gauge, full heat output at all fan speeds, no coolant leaks, and no bubbling in surge tank when hot.
Recheck Coolant Level When Cold
After cold soak (8+ hours), inspect both radiator or surge tank (should be full to the neck) and overflow tank (between Cold and Hot marks). Top off only if needed. Overfilling causes pressure and overflow.
Success Signs: Consistent heat, stable temp, no bubbles, and no level drop after cold soak.
Prevent Water Pump Damage
Air causes cavitation, the silent killer of water pumps. Understanding this damage mechanism emphasizes why proper burping matters for long-term component life.
How Air Damages Water Pumps
Trapped air reduces coolant lubricity and cooling at the pump seal. This causes cavitation: rapid formation and collapse of bubbles that erode impeller and housing. The result is whining noise, leaks, and premature failure.
Avoid Cavitation With Proper Burping
Always burp thoroughly after any coolant system work. Never run engine without coolant flow or with visible bubbles for extended periods. Document the process. Some manufacturers deny warranty claims for pump failure due to improper bleeding.
A properly bled system ensures coolant lubricates the pump from startup.
Key Takeaways for Burping Your Coolant System
Burping the coolant system properly prevents overheating, heater failure, and expensive water pump damage. Use a vacuum fill system for best results, or employ the elevated funnel method with heater on max heat when vacuum equipment is unavailable. Apply controlled agitation through hose squeezing and gentle revving to force stubborn air pockets out. Leave the system uncapped overnight for final air release, then verify performance through a test drive and cold-soak check. Following these steps ensures complete air removal and protects your engine for years of reliable operation.
Frequently Asked Questions About Burping Coolant Systems
How do I know if air is still trapped in my cooling system?
Signs include temperature gauge fluctuations, heater blowing cold air at idle, bubbling in the surge tank when hot, and coolant level dropping after driving. If the upper radiator hose stays cool while the engine warms, air is likely blocking circulation.
Can I burp a coolant system without a special funnel?
Yes. While a no-spill funnel makes the process cleaner and more effective, you can use any funnel positioned above the highest point in the cooling system. The key is maintaining elevated fill so gravity assists air evacuation.
Why does my heater work at idle but not while driving?
This typically indicates air trapped in the heater core. At idle, coolant flow is minimal. Driving increases flow pressure, which pushes air out of the heater core. Repeat the burping procedure with HVAC set to max heat to resolve this.
How long should I run the engine after burping?
Run the engine until it reaches operating temperature (180 to 190°F), then continue for an additional 5 to 10 minutes while monitoring for bubbles. Some stubborn systems require multiple heat cycles over several days.
Is it normal for coolant to bubble during burping?
Yes, bubbling indicates air escaping from the system. Continue burping until bubbling stops and coolant level stabilizes. Violent bubbling is common on certain engines (Subaru EJ, GM LS). Protect yourself with gloves and eye protection.
Why does my coolant level drop after a few days of driving?
This usually means air is still escaping from the system or a small leak exists. Check for visible leaks at hoses, clamps, and the thermostat housing. If no leaks are found, repeat the burping procedure.



