

You are driving on a hot summer day when your temperature gauge starts creeping into the red. You pull over, pop the hood, and find the radiator completely cool to the touch. What is going on? The culprit might be something small and easy to overlook: the coolant cap. Despite its small size, this simple-looking part plays a critical role in keeping your engine from overheating and failing.
The coolant cap, also known as a radiator or pressure cap, is far more than just a cover. It is a precision-engineered valve system that controls pressure and vacuum in your vehicle is cooling system. By maintaining optimal pressure, it raises the boiling point of coolant, prevents vapor lock, and ensures continuous circulation. When it fails, even slightly, the entire cooling system can break down, leading to overheating, hose collapse, or worse, catastrophic engine damage.
In this guide, you will learn exactly how a coolant cap works, how to spot failure signs, test its performance, and avoid costly repairs. Whether you are a DIYer or just want to understand your car better, knowing what this little cap does could save you hundreds or even thousands of dollars down the road.
Maintains Cooling System Pressure
The coolant cap is most important job is sealing the system and building controlled pressure to prevent coolant from boiling too soon. Without pressure, coolant would turn to steam at much lower temperatures, especially under heavy engine loads.
Raises Coolant Boiling Point
Every time pressure increases by 1 psi, the boiling point of water goes up by about 3°F (1.67°C). A standard 15 psi coolant cap boosts the boiling point from 212°F (100°C) to roughly 257°F (125°C). With modern 50/50 antifreeze mixtures, which already start around 225°F (107°C), pressurization pushes their effective boiling point to 265 to 275°F (129 to 135°C).
This higher threshold means coolant stays liquid longer, absorbing more heat from the engine and transferring it efficiently through the radiator. If the cap fails to hold pressure, coolant can boil prematurely, creating steam pockets that block flow and cause localized overheating, even if the radiator feels cool.
Prevents Vapor Lock and Overheating
When coolant turns to vapor, it stops flowing properly. Steam pockets form, especially around the cylinder heads, reducing heat transfer and increasing the risk of head gasket failure, cracked blocks, or warped cylinder heads.
A functioning coolant cap keeps the system sealed, maintaining enough pressure to keep coolant in liquid form. This ensures smooth circulation and consistent engine temperatures, even during towing, stop-and-go traffic, or high ambient heat.
Dual-Valve System Explained
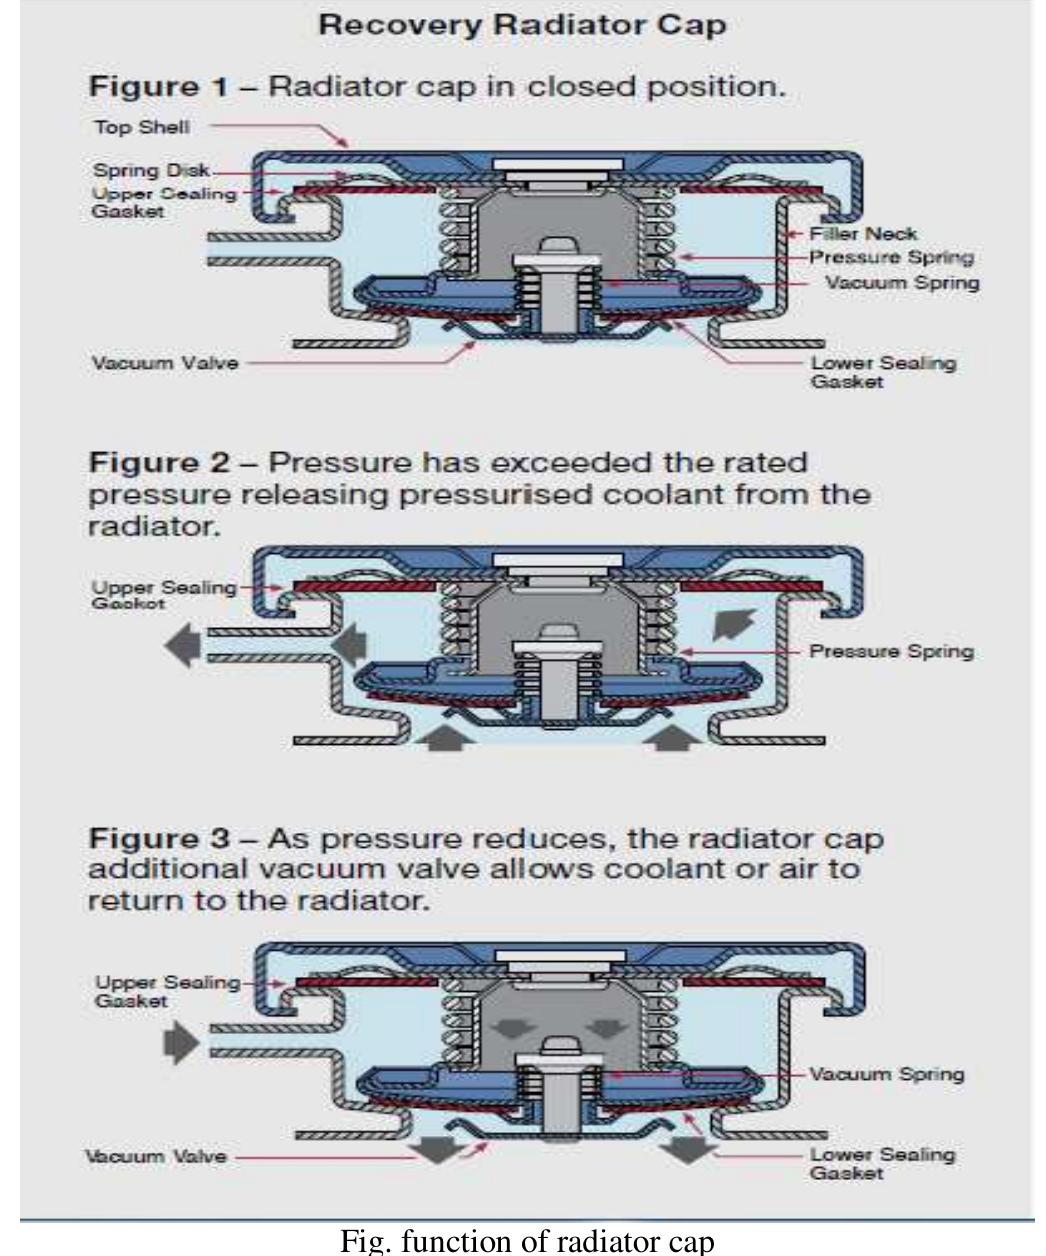
Inside every coolant cap are two critical valves working in opposite phases: one for pressure, one for vacuum. Together, they create a self-regulating loop that protects the cooling system through heating and cooling cycles.
Pressure Relief Valve Operation
As the engine warms up, coolant expands and pressure builds. The pressure relief valve, held shut by a calibrated spring, opens only when the system reaches its rated pressure, typically 13 to 18 psi for most passenger vehicles.
Once that threshold is hit, the valve lifts slightly off its seat. Excess coolant and vapor escape through an overflow hose. Fluid is directed into the expansion (recovery) tank. This prevents dangerous over-pressurization that could burst hoses, damage the radiator core, or blow out water pump seals.
Vacuum Relief Valve Function
After you shut off the engine, coolant cools and contracts. This creates a vacuum inside the radiator. If not relieved, this suction can collapse the upper radiator hose or prevent proper coolant return.
That is where the vacuum relief valve comes in. As internal pressure drops below atmospheric levels, the valve opens inward. Coolant is drawn back from the recovery tank into the radiator. Air is kept out, preventing airlocks. This automatic refill ensures the system remains full and primed for the next start, without needing manual bleeding.
Internal Components Breakdown
Despite its compact size, the coolant cap contains several precision parts designed to withstand high heat, pressure, and chemical exposure.
Sealing Gaskets
Two rubber or silicone gaskets ensure airtight closure. The lower gasket seals against the radiator or reservoir neck. The upper gasket prevents side leakage around the cap body. Over time, these can harden, crack, or swell due to age and coolant chemistry. Any visible damage means replacement is needed, even if the cap still screws on.
Spring-Loaded Valve Assembly
Two separate springs control the dual-valve system. The pressure spring is stronger and calibrated to exact psi ratings. The vacuum spring is lighter and responds to negative pressure. Made from corrosion-resistant alloys, these springs fatigue over time. Rust, deformation, or loss of tension leads to early valve opening or failure to reseal.
Valve Discs and Seating Surfaces
The pressure valve disc lifts under high pressure and must reseat perfectly. Pitting, warping, or debris on the metal or rubber seal surface compromises performance. Similarly, the vacuum valve, often a small ball or diaphragm, must open freely and close tightly. Clogging from old coolant sludge is a common failure point.
Cam Lock or Bayonet Mount
Most caps use a quarter-turn locking mechanism. It aligns lugs with slots on the filler neck and applies even clamping force for a uniform seal. It includes a safety detent to prevent accidental opening under pressure. Some models use threaded designs, but bayonet styles are faster and more secure in high-vibration environments.
Coolant Cap Location Types
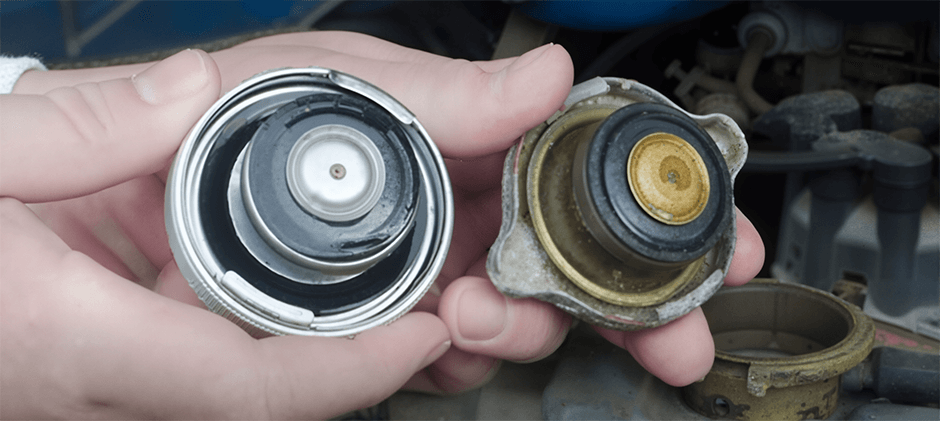
Where the cap is located depends on your vehicle is cooling system design, and affects how pressure is managed.
Radiator-Mounted Caps
Found on older or traditional systems, the cap sits directly on the upper radiator tank. The radiator is the pressurized component. The overflow hose sends excess coolant to a non-pressurized expansion tank. These setups require the cap to manage full system pressure and are more prone to leaks if the cap fails.
Reservoir-Mounted Caps
Common in modern vehicles, the cap is on the coolant expansion tank. The entire system, including radiator, hoses, and reservoir, is pressurized. This eliminates open overflow and improves seal reliability.
Choosing the Right Pressure Rating
Using the wrong cap can cause serious damage. Always match the OEM-specified pressure rating.
Standard Pressure Ranges
| Vehicle Type | Typical Pressure | Notes |
|---|---|---|
| Standard Cars | 13 to 15 psi | Most common OEM spec |
| Performance Engines | 16 to 22 psi | For high-load or track use |
| Diesel Trucks | 18 to 32 psi | Handles extreme heat output |
| Classic Cars | 4 to 8 psi | Low-pressure systems with fragile hoses |
| Small Engines | 10 to 13 psi | Balance of safety and efficiency |
Risks of Wrong Pressure
Using a cap with too high pressure, such as 18 psi on a 13 psi system, over-pressurizes hoses and gaskets. It can rupture heater cores or water pump seals. Using a cap with too low pressure, such as 12 psi on a 15 psi system, releases pressure too early. This reduces the boiling point and increases the risk of overheating and coolant loss.
Safety: Never Remove a Hot Cap
Removing the coolant cap from a hot engine is one of the most dangerous mistakes a driver can make.
Why It Is Dangerous
Coolant can exceed 250°F (121°C). System pressure may be up to 18 psi. Opening it releases scalding steam and boiling fluid under pressure. This can cause severe burns, even through clothing.
Safe Removal Steps
- Wait 30 to 60 minutes after engine shutdown.
- Place a thick cloth over the cap.
- Turn slowly to the first detent to release pressure.
- Wait until no hissing or bubbling occurs.
- Only then fully remove the cap.
Diagnosing Coolant Cap Failure
A failing cap often mimics major engine problems. Catching it early saves time and money.
Common Symptoms
Engine overheating but the radiator stays cool indicates vapor lock due to loss of system pressure. Coolant boils but does not circulate. A collapsed upper radiator hose points to a stuck vacuum valve. As the engine cools, vacuum is not relieved, sucking the hose flat. Coolant leaks around the cap are caused by worn gaskets, wrong pressure rating, or cracked housing. Frequent coolant top-offs suggest the cap is not resealing or the relief valve leaks under pressure. White crust on the neck is mineral deposits from evaporated coolant, a sign of small repeated leaks.
Testing and Replacement Guide
Do not guess. Test. A bad cap is cheap to replace but expensive to ignore.
Visual Inspection Checklist
Check gaskets for cracks, swelling, or missing sections. Inspect springs for rust, compression, or sticking. Look at the housing for cracks or deformation. Verify valves move freely and are clean. Replace immediately if any component shows wear.
Pressure Test Procedure
Use a radiator pressure tester to confirm performance. Remove the cap from a cold engine. Attach it to the tester with the correct adapter. Pump to rated pressure, such as 15 psi. Watch the gauge for 2 minutes. Check if it holds pressure within plus or minus 1 psi. Check if the relief valve opens exactly at rated psi.
When to Replace
Replace every 3 to 5 years as preventive maintenance, even if no symptoms appear. Replace immediately if the cap shows damage, the engine has overheated, the cooling system was flushed or refilled, or the water pump or radiator was replaced.
Real-World Failure Insights
Common Causes of Failure
Spring fatigue prevents the cap from holding pressure. Gasket deterioration causes leaks and air ingress. Valve contamination leads to sticking or incomplete seal. Using the incorrect cap causes system over or under-pressurization. Age and heat cycles result in loss of elasticity and seal integrity.
Mechanic Survey Findings
About 12% of unexplained overheating cases resolve by replacing the cap. Low-quality aftermarket caps frequently fail within 1 to 2 years. Misapplication, using the wrong pressure, is a top cause of recurring leaks.
Economic and Safety Impact
Cost Comparison
Coolant cap replacement costs $15 to $70. Head gasket repair costs $1,000 to $2,500. Engine rebuild costs $3,000 or more. The coolant cap is one of the most cost-effective preventive maintenance parts in any vehicle.
Safety Risks of Neglect
Severe burns occur from improper cap removal. Sudden engine failure happens due to overheating. Fire hazard exists in extreme cases, such as oil ignition from hot components.
Modern Design Trends
Even with advanced cooling systems, the core function remains unchanged, but materials and reliability have improved.
Key Innovations
Dual-seal gaskets provide better leak prevention. Stainless steel springs resist rust and fatigue. Enhanced polymers resist ethanol-blended coolants. Some high-end vehicles integrate coolant level sensors in smart reservoirs. Some vehicles now feature temperature-sensing caps in development for predictive diagnostics.
Despite advances, the dual-valve, spring-loaded design remains the industry standard.
Frequently Asked Questions About Coolant Caps
What happens if the coolant cap fails?
When the coolant cap fails, the system loses pressure control. Coolant boils at lower temperatures, creating steam pockets that block circulation. This leads to engine overheating, possible head gasket damage, and collapsed radiator hoses. A failed vacuum valve can also suck the upper hose flat as the engine cools.
How do I know if my coolant cap is the right pressure rating?
The pressure rating is stamped on the top or side of the cap, usually in psi or kPa. You can also check your owner is manual or service manual for the OEM specification. Never guess or use a cap with a different rating than specified.
Can I test my coolant cap at home?
Yes. You need a radiator pressure tester kit. Remove the cap when the engine is cold. Attach the tester and pump to the rated pressure. Watch the gauge. If it drops or leaks, the cap is faulty. Many auto parts stores offer free testing.
How often should I replace my coolant cap?
Replace the coolant cap every 3 to 5 years as preventive maintenance. Replace immediately if you see visible damage, experience overheating, or have any cooling system work done.
Is it safe to remove the coolant cap while the engine is hot?
No. Never remove the cap while the engine is hot or running. The system can be under pressure up to 18 psi and coolant can exceed 250°F. Removing it can cause severe burns from steam and boiling fluid. Always wait at least 30 to 60 minutes after shutdown.
Key Takeaways for Understanding Your Coolant Cap
The coolant cap is a small part with a big job. It is not just a cover. It is a critical safety valve that protects your engine from overheating, vapor lock, and catastrophic failure. By understanding how a coolant cap works, testing it regularly, and replacing it every few years, you ensure reliable performance, extend engine life, and avoid costly repairs.
Always use the correct pressure-rated cap from a trusted brand. Check the rating before buying. Test the cap if your engine overheats but the radiator stays cool. Your engine depends on it.



