

A non-working coolant temperature gauge isn’t just an inconvenience. It means you’re driving without knowing your engine’s actual temperature, which can lead to catastrophic overheating or mask serious cooling system problems. The worst part? Most drivers don’t realize there’s an issue until smoke is pouring from under the hood.
If your coolant temp gauge not working, the culprit is usually one of three things: the temperature sensor, wiring and connectors, or the thermostat. This guide walks you through the exact diagnostic process professional mechanics use, so you can identify and fix the problem fast.
Perform the Grounding Test First
The grounding test is the fastest way to isolate where the problem lies. This simple check tells you whether the gauge itself is functional or if the issue is downstream in the sensor and wiring.
Why This Test Matters
Grounding the signal wire bypasses the sensor entirely. If the gauge moves when grounded, the problem is in the sensor or wiring. If nothing happens, the fault is in the gauge, instrument cluster, or its power supply.
How to Ground the Signal Wire
Follow these steps to perform the test correctly:
- Turn the ignition to ON but do not start the engine.
- Locate the coolant temperature sensor on the engine block near the thermostat housing.
- Disconnect the wiring harness from the sensor.
- Identify the signal wire (it may be red/yellow on some models or a single wire on older vehicles).
- Use a jumper wire to connect the signal wire directly to chassis ground or the negative battery terminal.
- Watch the dashboard gauge and note what happens.
What the Results Mean
The test results tell you exactly where to focus your troubleshooting:
- Gauge climbs to HOT: The gauge is working properly. The problem lies in the sensor or wiring.
- No movement at all: The fault is in the gauge, cluster, or its power and ground circuit.
Pro Tip: On a 1971 Ford Torino, grounding the sender wire made the needle rise immediately, confirming a dead sensor rather than a bad gauge.
Test the Coolant Temperature Sensor

If your gauge responded during the grounding test, the sensor is the most likely culprit. This component fails more often than any other part in the temperature system.
Check Resistance with a Multimeter
Testing the sensor takes just a few minutes with basic tools:
- Remove the sensor using the appropriate socket (commonly 17 mm on many models).
- Clean the sensor tip gently. Oil or grime can affect readings.
- Set your digital multimeter to resistance mode up to 20 kΩ.
- Place the probes on the sensor’s electrical terminal and its metal body.
Expected Readings by Temperature
Understanding what the readings mean helps you determine if replacement is needed:
- Room temperature around 70°F: Approximately 2.85 kΩ on most vehicles
- Cold engine: 3 to 5 kΩ
- Hot engine: 200 to 500 Ω
- 0 Ω reading: Internal short, sensor is failed
- Infinite resistance: Open circuit, sensor is failed
Either the zero reading or infinite resistance means you need to replace the sensor.
Replace with Proper Sealant
When installing the new sensor, follow these steps to prevent leaks:
- Apply PTFE thread sealant to the threads. Do not use tape.
- Torque to approximately 20 Nm or about 15 ft-lbs. Tighten until snug, then turn slightly more.
- Reconnect the wiring harness and test after the engine warms up.
Note: Sensor replacement cost is typically $20 to $50, making it one of the cheapest and fastest fixes.
Inspect Wiring and Connectors
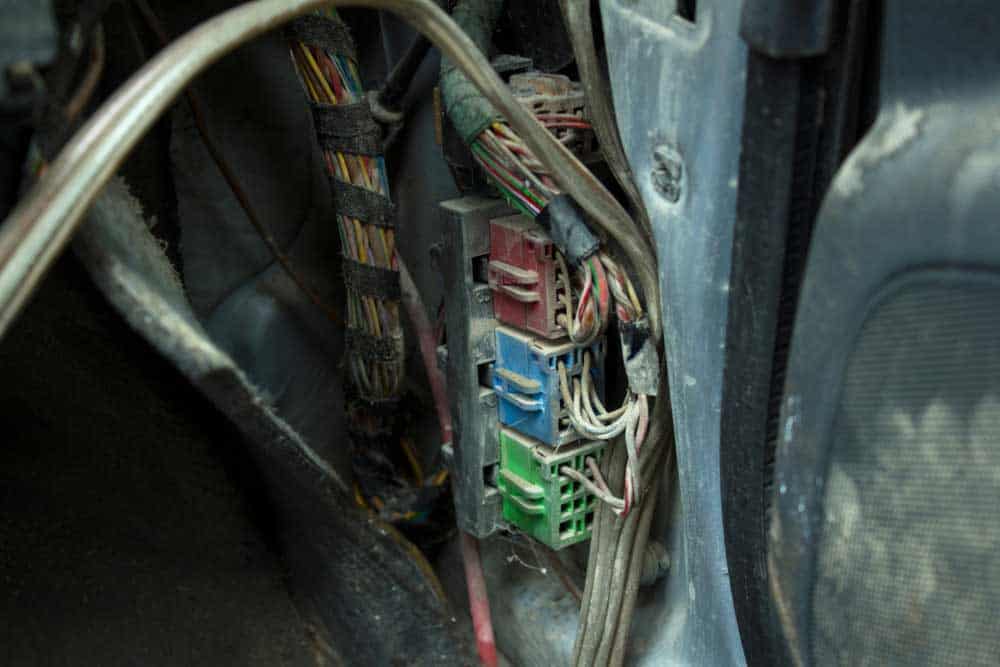
When the gauge doesn’t respond to grounding, the wiring and connectors are often to blame. These components take a beating from heat, vibration, and environmental exposure.
Common Wiring Problems to Look For
Check these specific issues during your inspection:
- Melted insulation near the exhaust or after an engine fire
- Green corrosion or oxidation in connectors, especially on GM trucks exposed to road splash
- Loose or recessed pins in the harness
- Broken ground wire (often green on many vehicle systems)
- Frayed or cut wires from vibration or improper routing
Test Continuity Between Components
A continuity test verifies the signal path is complete:
- Disconnect both ends of the wiring harness (sensor and instrument cluster).
- Set your multimeter to continuity mode.
- Probe from the sensor signal pin to the corresponding cluster input.
- A beep indicates the wire is intact. No beep means a broken wire.
Fix Corroded or Damaged Connectors
Repairing connectors prevents future failures:
- Clean terminals with a small wire brush or electrical contact cleaner.
- Apply dielectric grease before reconnecting to prevent moisture and future corrosion.
- Replace damaged wire sections using heat-shrink butt connectors.
Real Case: A 1971 Ford Torino had melted connectors after an engine fire. Repairing the harness restored full gauge operation.
Diagnose Thermostat Issues on GM Vehicles
On 2014-2017 Chevrolet Silverado and GMC Sierra trucks, the thermostat is frequently the real culprit even when the sensor tests fine. This is a known weak point in these models.
Why Thermostat Failure Affects the Gauge
A stuck-open thermostat prevents the engine from reaching normal operating temperature. The ECM sees this as a perpetually cold engine and sends incorrect data to the instrument cluster, leaving your gauge stuck at cold.
Linked Symptoms You Might See
When the thermostat fails, watch for these additional problems:
- Gauge reads zero or stays at cold even after warm-up
- Cooling fans run constantly, even after engine shutdown
- Air conditioning won’t cool properly
- Check Engine Light may flash code P0128 (Coolant Thermostat Below Regulating Temperature)
Real User Fixes from Forums
Multiple Silverado owners reported the same pattern:
- lucasnix88 (2014 Silverado Z-71): Replaced the sensor first with no improvement. Then replaced the thermostat and performed a battery reset. Everything was fixed.
- bmcaleer355: Same experience. Sensor replacement didn’t help, but thermostat replacement did.
- Juanito (2025): After thermostat replacement, the gauge normalized, fans stopped running after shutdown, and the CEL disappeared completely.
Expert Advice: Replace both the thermostat and sensor together since both are inexpensive wear items. This prevents comebacks and saves labor time.
Reset the PCM After Repairs
Even after fixing the hardware, the system may not behave normally until you reset the engine control module. This step is frequently overlooked but critical for full restoration.
How to Perform a Hard Reset
Follow these steps to clear the PCM:
- Disconnect the negative battery terminal.
- Wait 15 to 30 minutes to allow the PCM capacitors to drain completely.
- Reconnect the battery terminal.
- Start the engine and let it warm up fully, about 5 to 10 minutes.
Why This Step Is Critical
The reset clears stored error codes and resets adaptive cooling and fuel strategies. It also restores AC compressor enable logic. This explains why some users report that simply turning the car off and restarting fixes intermittent issues temporarily.
User Note: A 2014 Buick Enclave owner fixed a dead gauge and AC problem just by performing a soft reboot of the PCM.
Check for Connector Corrosion on GM Trucks
Corrosion in PCM or engine harness connectors can mimic complete sensor failure. This is especially common on trucks exposed to road salt and moisture.
Where to Look for Corrosion
Focus your inspection on these areas:
- PCM connectors under the hood (directly exposed to road splash)
- Engine wiring near the throttle body or firewall
- Ground points on the engine block or chassis
Cleaning and Protecting Connectors
Proper maintenance prevents future problems:
- Unplug connectors near the engine and PCM.
- Inspect for green copper oxidation or buildup.
- Clean pins with contact cleaner and a small brush.
- Apply silicone-based dielectric grease before reassembly.
- Reconnect securely and verify proper fit.
Tip: Consider protecting vulnerable connectors with rubber boots or relocating them if possible.
Understand Linked System Failures
A bad temperature signal doesn’t just affect your gauge. It impacts multiple vehicle systems that depend on accurate engine temperature data.
Cooling Fans Run Constantly
When the sensor reports false cold, the ECM defaults to fan-on mode as a safety measure. Fans running after engine shutdown indicate abnormal thermal management behavior triggered by incorrect temperature data.
AC Not Cooling
The ECM disables the AC compressor if engine temperature is too low or too high. A false cold reading prevents AC engagement entirely. Fix the temperature issue, and the AC often returns automatically without any other repairs.
Poor Fuel Economy or Rough Idle
A faulty sensor reporting cold all the time causes the engine to run rich. This results in increased fuel consumption, black exhaust smoke, and potential misfires or rough idle conditions.
Check Engine Light On
Common diagnostic codes appear when temperature monitoring fails:
- P0117: Low input (short to ground)
- P0118: High input (open circuit)
- P0128: Thermostat too cold
A scan tool reveals these codes, but the symptoms alone often tell the story.
Prevent Future Failures
Once you’ve restored proper function, take steps to avoid repeat problems down the road.
Apply Dielectric Grease Regularly
Coat all electrical connections on sensors and harnesses with dielectric grease. This prevents moisture, salt, and oxidation damage. This is especially important in winter climates and coastal areas where corrosion is most aggressive.
Inspect Ground Connections
Poor grounding causes erratic or no gauge readings. Clean the engine-to-chassis ground strap and tighten it securely. Use sandpaper to remove paint or rust under mounting points for the best connection.
Replace Sensor and Thermostat Together
Both components are inexpensive and degrade over similar timelines. If one has failed, the other is likely near end-of-life. Replacing both at once saves labor costs and prevents future breakdowns.
Final Verification Steps
After completing repairs and the PCM reset, confirm the entire system is functioning properly before calling the job done.
Run a Complete System Check
Follow this verification process:
- Start the engine and let it warm up for 5 to 10 minutes.
- Watch the gauge rise smoothly to the midway point (normal operating temperature).
- Listen for fans cycling on and off as temperature stabilizes.
- Turn on the AC and confirm cold air output.
- Scan for diagnostic codes if possible to ensure none return.
If Problems Return
Sometimes issues recur after initial repair:
- Recheck all connections for tightness and corrosion.
- Test the new sensor resistance to verify the aftermarket unit isn’t defective.
- Consider a used instrument cluster if the gauge still won’t respond.
Key Takeaways for Fixing Your Coolant Temp Gauge
A coolant temp gauge not working is rarely a cluster issue. The vast majority of failures stem from the sensor, thermostat, or wiring, particularly on GM trucks where thermostat problems are extremely common. With a basic multimeter and about 30 minutes of diagnostic time, you can identify and fix the problem yourself without expensive shop visits.
The grounding test is your starting point. It immediately tells you whether to focus on the sensor or the gauge itself. From there, systematic testing of each component narrows down the exact cause. Don’t forget the PCM reset after repairs, as this step is essential for restoring proper system function and clearing stored error codes.
Protecting connectors with dielectric grease and replacing worn components proactively will keep your temperature gauge working reliably for years to come.
Frequently Asked Questions About Coolant Temp Gauge Not Working
Why does my coolant temperature gauge stay at cold even after the engine warms up?
This usually indicates a failed thermostat (common on 2014-2017 GM trucks) or a faulty temperature sensor. The stuck-open thermostat prevents the engine from reaching operating temperature, fooling the system into thinking the engine is cold.
Can I drive my car if the coolant temp gauge isn’t working?
Driving with a non-working temperature gauge is risky. You won’t know if your engine is overheating until it’s too late. If you must drive, monitor the engine for unusual smells, steam, or performance issues and pull over immediately if any appear.
How much does it cost to replace a coolant temperature sensor?
Replacement sensors typically cost between $20 and $50 depending on your vehicle make and model. Labor if done at a shop adds another $50 to $100, but the repair is simple enough for most DIYers to handle in under an hour.
Will a bad coolant temp sensor cause the check engine light to come on?
Yes. A faulty sensor often triggers diagnostic codes like P0117 (low input) or P0118 (high input). These codes indicate the ECM is receiving invalid temperature data and will illuminate the check engine light.
Why does disconnecting the battery fix my temperature gauge issue?
Disconnecting the battery resets the PCM/ECM, clearing stored error codes and adaptive strategies. This can resolve software glitches or temporary faults. If the problem returns, the underlying hardware issue still needs to be addressed.
What’s the difference between a coolant temperature sensor and a sending unit?
These terms are often used interchangeably, but some vehicles have separate sensors for the gauge and the ECM. The gauge sending unit provides resistance to the instrument cluster, while the ECM sensor feeds data to the engine control system. Both can cause gauge problems if they fail.



