

You start your engine, let it warm up, and check the coolant reservoir. No hiss, no pressure release, just a silent cap that twists off too easily. Even though the engine reaches normal temperature, the cooling system refuses to pressurize. This is a red flag that demands attention. A properly functioning coolant system typically operates under 13-18 psi, which raises the boiling point of coolant and ensures efficient circulation throughout the engine.
This guide delivers actionable steps to diagnose and fix why your coolant system not pressurizing. You will learn to identify the most common causes, perform targeted tests, and restore proper pressure to prevent overheating and engine damage.
Replace Faulty Radiator Cap
A failed radiator or coolant reservoir cap is the most common reason the system fails to pressurize. Even if the cap looks intact, internal spring fatigue or degraded seals can prevent proper sealing. When the engine runs hot but the cap removes with no resistance or audible release, the cap should be your first suspect.
Look for these signs indicating a bad cap:
- Cap releases with only a faint hiss or none at all
- Coolant level stays stable yet pressure never builds
- Upper radiator hose is hot but system feels unpressurized
Many users report immediate improvement after replacing the cap, even when previous caps appeared undamaged. In one case, a new OEM cap resolved the issue after extensive troubleshooting. Aftermarket caps may fit but fail to maintain proper pressure. Always use an OEM-specified part rated for your vehicle, typically 15 psi or as labeled on the cap.
Pro Tip: Test the old cap with a pressure tester. Most auto parts stores offer free rental tools to verify if it holds its rated pressure.
Bleed Air from Cooling System

Air pockets, especially after coolant work, prevent full pressurization by blocking flow and creating vapor locks. Air trapped near the thermostat or heater core disrupts circulation, leading to erratic temperature readings and poor heater output even with hot hoses.
Common causes include:
- Rapid refilling without allowing air to escape
- Failure to elevate the engine during refill
- Skipping bleed procedures after water pump or thermostat replacement
To purge air effectively, follow these steps:
- Use a radiator bleeder funnel attached to the expansion tank. Fill it with coolant and let the system circulate while air rises into the funnel.
- Jack up the front of the vehicle to position the coolant reservoir at the highest point, helping air escape naturally.
- Run the engine with the heater on max and cap off (only when cold) to encourage air expulsion. Never leave unattended.
- If equipped, open bleed screws on the thermostat housing or engine block until coolant flows without bubbles.
A BMW owner found no improvement after initial bleeding but succeeded only after elevating the front end and using a funnel. Similarly, a Dodge Ram user suspected incomplete bleeding after replacing the heater core.
Warning: Never remove the cap when the engine is hot. Perform open-cap bleeding only during controlled warm-up cycles.
Diagnose Heater Core and Blend Door Issues
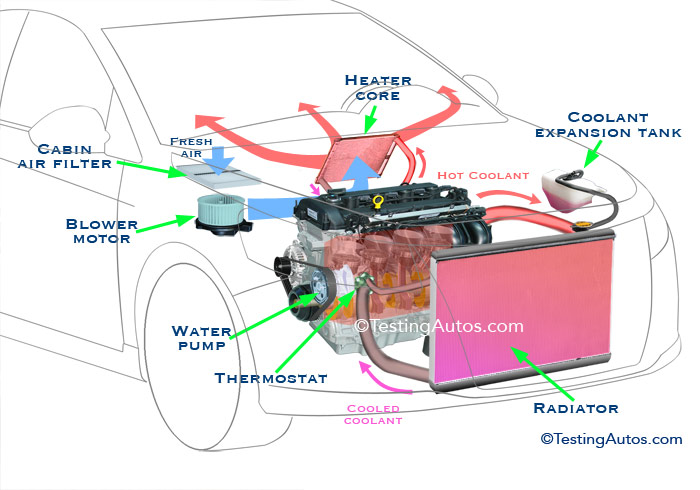
No cabin heat is often mistaken for a coolant pressure problem. However, if both heater hoses are hot, the issue likely isn’t in the cooling system. Instead, a stuck blend door in the HVAC system may be blocking warm air from entering the cabin.
Here’s how to distinguish between the two:
- Both heater hoses hot means coolant is flowing. Check HVAC controls.
- One hose hot, one cold indicates flow restriction due to air lock or clog.
Blend door actuators fail over time, especially in older vehicles. If the A/C blows cold but no heat comes out despite hot hoses, the actuator may be stuck in the cold-air position.
To test this theory:
- Start the engine and turn the heater to maximum.
- Wait 10 minutes, then feel both heater core hoses under the hood.
- If both are equally hot, use a scan tool to check blend door position or listen for motor movement when adjusting temperature.
User Insight: One Grand Marquis owner discovered their blend door actuator had failed mechanically. Replacing it restored heat immediately, even though coolant pressure was still low.
Inspect for Clogged System Components
Restricted flow from internal buildup reduces pressure development and impairs heat transfer. Old coolant breaks down into sludge over time, especially in neglected systems, clogging narrow passages in the radiator, heater core, or engine block.
Key indicators include:
- Upper radiator hose hot, lower hose cool suggests restricted radiator flow
- One heater hose hot, one cold indicates blocked heater core
- Coolant appears brown, murky, or has gel-like residue
To diagnose clogs:
- Backflush the radiator by disconnecting hoses and flushing with water in reverse direction
- Flush heater core lines using a garden hose to push water through both hoses
- Inspect coolant condition by shining a flashlight into the reservoir. If you see debris or goo, flush the entire system.
A Dodge Ram owner reported gooey deposits after replacing the water pump, confirming degraded coolant contributed to poor circulation.
Pro Tip: After flushing, refill with the correct coolant type and bleed thoroughly. Use a closed-loop flush machine if available for deeper cleaning.
Verify Thermostat Operation
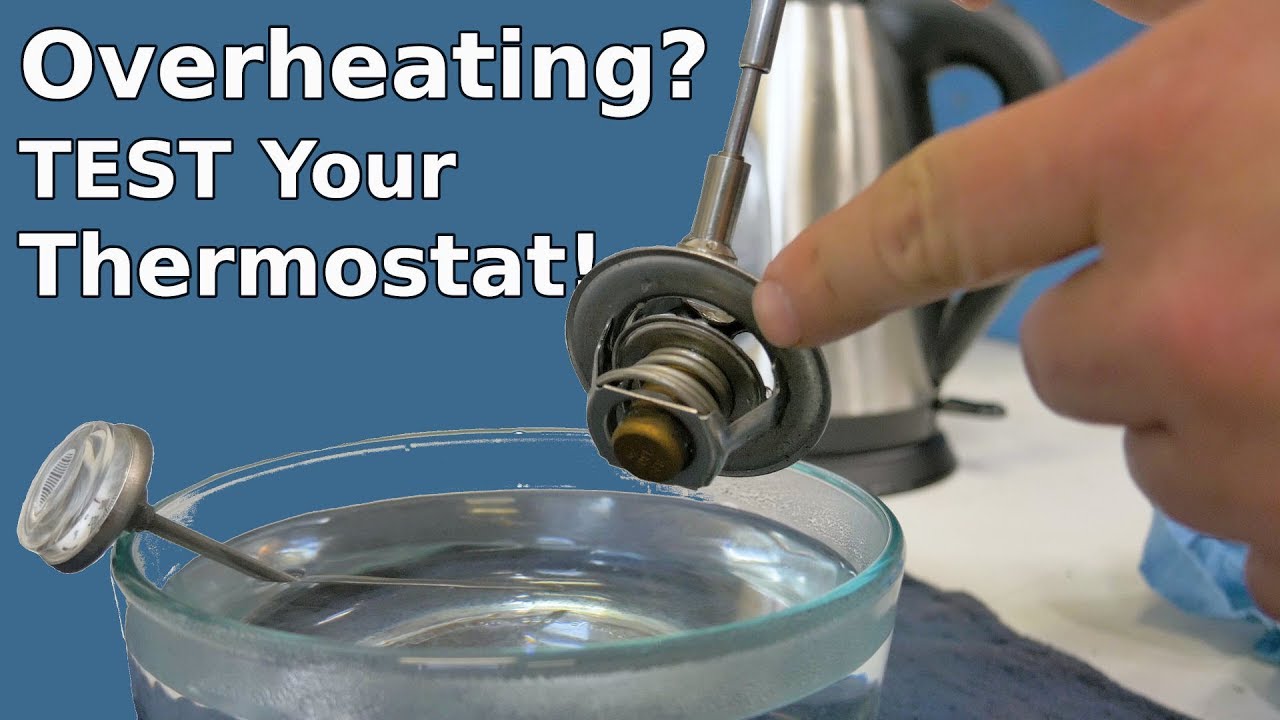
A malfunctioning or incorrectly installed thermostat can prevent pressurization by limiting coolant flow. If stuck closed, the engine overheats. If stuck open, the system runs cool and never builds pressure.
Critical checks include:
- Thermostat opens at correct temperature (usually 180-195°F). Remove and test in hot water with a thermometer.
- Installed correctly: spring-loaded end faces into the engine, not toward the housing.
- Housing damage: a cracked or warped housing can prevent proper sealing.
In a 2003 Grand Marquis case, thermostat replacement was done during intake manifold work, raising suspicion of incorrect installation. Meanwhile, a BMW owner tested two thermostats, and both opened when hot, ruling out this cause.
Visual Cue: After engine warm-up, the upper radiator hose should become very hot as the thermostat opens. If it stays soft and cool, flow is blocked.
Expert Note: Some thermostats have bleed holes to reduce air locks. If missing, air can become trapped, delaying opening and pressurization.
Rule Out Water Pump Problems
While a failed water pump usually causes overheating, a partially degraded impeller may allow limited flow without building pressure. Corrosion or erosion of vanes reduces pumping efficiency, especially at higher RPMs.
Signs of pump failure include:
- Coolant leak from weep hole (small hole at bottom of pump)
- Whining or grinding noise from front of engine
- Inconsistent hose temperatures despite warm engine
However, if the upper radiator hose is hot and the lower hose is warm, circulation is occurring, making complete pump failure unlikely.
One BMW user had a new water pump installed but still experienced no pressure, suggesting the issue was elsewhere. In another case, a corroded impeller was found after disassembly despite no overheating.
Diagnostic Shortcut: Use an infrared thermometer to compare inlet and outlet temps on heater core or radiator. A small temperature delta (less than 10°F) suggests reduced flow from pump inefficiency.
Test for Internal Leaks or Head Gasket Failure
Internal coolant leaks like a blown head gasket can disrupt pressurization by allowing combustion gases to enter the cooling system. However, this typically causes overpressure, not lack of pressure. Still, gas intrusion can create false symptoms.
Key red flags include:
- Bubbles in the coolant reservoir while engine is running
- Milky oil or coolant contamination
- White exhaust smoke when cold
- Overheating or fluctuating temperature gauge
In the BMW case, the owner ruled out head gasket because there was no oil in coolant, no white smoke, and the engine ran smoothly. Most users with no-pressure issues showed no signs of internal failure.
To test for internal leaks:
- Use a chemical block tester (combustion leak tester). Blue fluid turns green if hydrocarbons are present in coolant.
- Pressure test the system. If pressure rises rapidly without heat increase, combustion gas may be entering.
Important: Lack of pressurization is not a classic sign of head gasket failure. More often, such failures cause coolant expulsion and rapid pressure spikes.
Perform Cooling System Pressure Test
The definitive way to confirm why your coolant system isn’t pressurizing is a pressure test. This checks the entire system’s ability to seal and hold pressure.
Follow these steps:
- Ensure engine is cold.
- Attach a hand-pump pressure tester to the radiator or reservoir neck.
- Pump to the cap’s rated pressure (e.g., 15 psi).
- Wait 10-15 minutes and observe for pressure drop.
Interpret results:
- Pressure drops quickly indicates a leak (cap, hose, gasket, or internal).
- No pressure builds suggests major leak or failed cap.
- Holds pressure means system is sealed. Issue may be air or sensor-related.
A forum user recommended this test to catch internal leaks. Another warned that fixing pressure might reveal hidden leaks elsewhere.
Bonus: Watch for bubbles in the reservoir during the test. This could indicate head gasket failure.
Key Takeaways for Fixing Coolant System Not Pressurizing
A coolant system that won’t pressurize is most often due to a bad radiator cap or trapped air, not major engine damage. Start simple by replacing the cap with an OEM part, bleeding the system thoroughly, and verifying heater hose temperatures. Use a pressure tester to confirm integrity, and do not ignore electrical issues like a faulty temperature sensor.
By following this structured approach, you will restore proper pressurization, prevent overheating, and ensure reliable engine operation. Always document your results: cap removal effort, hose heat, and heater performance. These details serve as your best tools for long-term cooling system health.
Frequently Asked Questions About Coolant System Not Pressurizing
Why does my coolant cap come off easily with no pressure?
This most commonly indicates a faulty radiator cap. The cap’s internal seal or spring has degraded, allowing pressure to escape. Replace it with an OEM-specified cap rated for your vehicle’s pressure requirements.
Can a clogged heater core cause no pressurization?
A clogged heater core restricts flow but typically does not prevent pressurization entirely. If one heater hose is hot and the other cold, the heater core may be partially blocked. Flush the system to restore flow.
How do I know if air is trapped in my cooling system?
Signs include erratic temperature gauge readings, poor heater output, and the cap requiring little effort to remove when the engine is warm. Use a radiator funnel and elevate the front of the vehicle to bleed trapped air properly.
Is no cabin heat related to pressurization problems?
Not necessarily. If both heater hoses are hot, coolant is flowing correctly. The issue likely lies in the HVAC blend door actuator or mode door, which controls warm air distribution into the cabin.
Can a bad temperature sensor mimic pressurization failure?
Yes. A faulty coolant temperature sensor may display overheating readings while the engine runs normally. Use an infrared thermometer on the upper radiator hose to verify actual temperature before assuming cooling system failure.
Should I replace the thermostat if my system won’t pressurize?
Only if the thermostat is stuck open or closed, or if it was recently installed incorrectly. Test the thermostat by removing it and placing it in hot water to verify it opens at the correct temperature (typically 180-195°F).



