

You turn off your engine, let it cool, and notice something is wrong. The radiator is low on coolant, but the overflow tank is full. No leaks. No puddles. Yet every time you drive, coolant gets pushed out but never returns. This is not just a mystery. It is a ticking clock. When coolant is not going into the radiator during cooldown, your engine risks overheating, air pockets, and even head gasket failure.
This guide cuts through the noise. You will learn exactly why coolant fails to return, how to diagnose the real cause, and what steps to take now to protect your engine. No fluff. No guessing. Just proven fixes from real cases and expert diagnostics.
Check for Air Leaks First
The most common reason coolant will not return is an air leak. The cooling system relies on a sealed vacuum to suck fluid back from the reservoir. Any breach lets air in instead of coolant, breaking the cycle.
Inspect the Overflow Hose
A cracked, kinked, or soft overflow hose can look fine when hot but collapse or leak under vacuum.
What to do:
- Remove the hose and flex it. Look for soft spots, brittleness, or small pinholes.
- Shine a flashlight through it. Even a tiny hole will let in air.
- Replace if older than three years or shows any wear.
Pro Tip: Squeeze the hose while the engine cools. If you hear a hiss, air is entering.
Test Reservoir and Connection Points
The reservoir itself can crack, especially at the neck, without leaking coolant. These micro-cracks only draw air during cooldown.
Check these areas:
- The hose clamp at the tank. Is it tight? Corroded?
- The reservoir neck for warping or hairline fractures.
- Whether the hose reaches the bottom of the tank. If not, it sucks air.
Fix: Replace the reservoir or clamp if damaged. Ensure full submersion of the hose end.
Examine Radiator Neck and Cap Seal
Even a speck of debris on the radiator neck can prevent a proper seal. Corrosion from old coolant or stop-leak products can also cause sealing failures.
Steps to inspect:
- With engine cold, remove the cap.
- Inspect the filler neck for pitting, rust, or black gunk.
- Clean with electrical contact cleaner or mild vinegar. Never sand or grind the surface.
- Check the cap rubber gasket. Is it cracked? Hardened?
A poor seal here means no vacuum, which means no return flow.
Test the Radiator Cap Function
The radiator cap is not just a lid. It is a two-way valve system critical to coolant recovery.
How the Cap Works
The cap contains two valves:
- Pressure valve: Opens when engine heats up, releasing excess coolant to the reservoir.
- Vacuum valve: Opens during cooldown, pulling coolant back into the radiator.
If the vacuum valve is clogged or stuck, coolant stays trapped in the tank.
Common Cap Failures
- Clogged vacuum valve: Stop-leak products like Bar is Leaks leave deposits that block the secondary valve.
- Wrong pressure rating: Too low causes early coolant dump. Too high puts stress on hoses.
- Not fully latched: Some caps click into place. If the safety tab is not engaged, no seal forms.
How to Test the Cap
- Remove the cap when the engine is cold.
- Inspect the valve assembly inside. Look for grime or corrosion.
- Use a cap pressure tester to check if it holds pressure and releases vacuum properly.
Best practice: Replace the cap every three to five years, even if it looks good.
Expert Note: The secondary valve can get plugged if coolant is dirty.
Clear Overflow System Blockages
Even a small obstruction can stop coolant return. Flow must be unimpeded in both directions.
Check for Hose Kinks or Collapse
- Trace the overflow hose from radiator to reservoir.
- Look for sharp bends, pinches, or areas flattened by brackets.
- Some plastic hoses collapse under vacuum. Replace with reinforced rubber.
Inspect the Radiator Inlet Spout
The metal tube inside the radiator neck connects to the overflow hose. It can clog with rust or sediment.
To check:
- Remove the hose.
- Shine a light into the spout.
- Blow air through it. If blocked, use a wire or compressed air to clear.
Verify Internal Reservoir Hose Length
Some reservoirs have an internal dip tube. If it is broken or too short, the system sucks air instead of coolant.
Fix: Replace the reservoir or extend the tube so it reaches the bottom.
Rule Out Head Gasket or Cracked Head
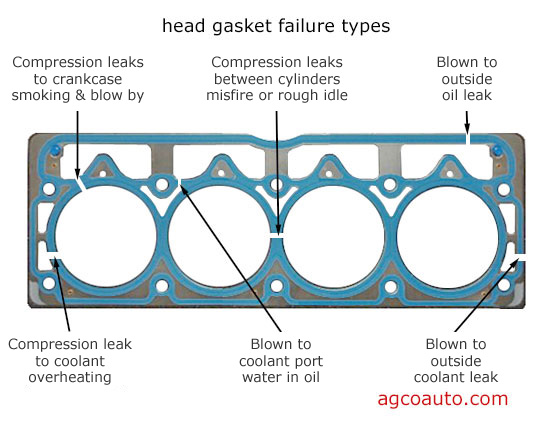
If no leaks, no blockages, and the cap checks out, look inside. A blown head gasket or cracked cylinder head can push combustion gases into the cooling system, disrupting vacuum.
Key Warning Signs
- Coolant disappears with no visible leak
- Sweet-smelling exhaust (antifreeze burning)
- White smoke from tailpipe
- Bubbles in radiator when engine runs (with cap off)
- Engine overheats at idle after highway driving
How to Test for Internal Failure
1. Visual Bubble Check
- Remove the cap when the engine is cold.
- Start engine and let it warm up.
- Watch the radiator neck. Bubbles mean combustion gases are entering the coolant.
2. Pressure Tester Spike Test
- Attach a cooling system pressure tester.
- Pump to 15 psi.
- Start engine and rev to 2,500 RPM.
- If pressure spikes sharply with each rev, head gasket failure is likely.
3. Block Test (Combustion Gas Detection)
- Use a chemical tester that changes color in the presence of exhaust gases.
- This is the most accurate method for early detection.
Do not ignore this. A failed head gasket will destroy your engine if left unchecked.
Fix Air Traps After Coolant Flush
Recently flushed your coolant? Air pockets can mimic serious failures.
Why Air Stops Coolant Return
Air trapped in the radiator or heater core prevents vacuum formation. The system cannot pull coolant back because it is full of air, not liquid.
How to Bleed the System
- Remove the radiator cap when the engine is off and cold.
- Start the engine and let it idle.
- Rev to 2,000 RPM for 30 seconds. This helps push air out.
- Let cool and repeat until the thermostat opens (upper hose gets hot).
- Top off radiator directly as the level drops.
Avoid Mixing Coolant Types
Switching from red HOAT to green IAT (or vice versa) can cause gel formation or corrosion. This leads to clogged passages, failed vacuum valves, and poor flow.
Fix: Flush completely and refill with the correct OEM-spec coolant.
Follow the Diagnostic Flowchart
Use this step-by-step checklist to pinpoint the cause fast.
Step 1: Cold Engine Inspection
- Remove the cap. Coolant should be at the top of the neck.
- Hissing? Air or pressure is trapped. Possible head gasket.
- Low level? Top off the radiator, not just the reservoir.
Step 2: Hot System Check
- Run engine to operating temperature.
- Upper radiator hose should be hot and firm.
- Coolant should move into the reservoir.
Step 3: Cool-Down Observation
- Shut off the engine.
- Watch the reservoir. Does the level drop?
- Open the hood after 30 minutes. Listen for a swoosh at startup. That is air entering.
Step 4: Pressure Test
- Pressurize to 15 psi.
- Monitor for 20 minutes.
- Drop means leak (external or internal).
- Spikes when revving mean head gasket.
Step 5: Vacuum Check
- After pressure test, release and watch for vacuum pull.
- No suction? Check the cap, hose, or reservoir.
Replace Critical Components
Once you have diagnosed the issue, replace the faulty parts using quality components.
Radiator Cap: OEM or High-Grade Only
- Match the pressure rating exactly (usually 13 to 18 psi).
- Avoid cheap aftermarket caps. They fail early.
Overflow Hose: Reinforced Vacuum-Resistant
- Use silicone or EPDM rubber hose rated for vacuum.
- Replace clamps with stainless steel worm-drive or constant-tension.
Coolant Reservoir: OEM-Spec
- Cracks are often invisible. Replace if over five years old.
- Ensure the hose reaches the bottom of the tank.
Prevent Future Failures
A one-time fix is not enough. Prevent recurrence with smart maintenance.
Use the Right Coolant
- Check the owner is manual for HOAT, OAT, or IAT specification.
- Never mix coolant types.
- Replace every five years or 100,000 miles.
Avoid Stop-Leak Products
- They clog small passages, including the cap vacuum valve.
- They are a temporary fix that causes long-term damage.
Inspect Annually
- Check overflow hose, clamps, and reservoir.
- Test cap function.
- Bleed the system after any coolant work.
Replace Cap Every Three to Five Years
- It is cheap insurance against overheating.
Know the Red Flags
| Symptom | Likely Cause | Action |
|---|---|---|
| Reservoir full, radiator low | Air leak or failed vacuum | Inspect hose, cap, seal |
| Swooshing noise at startup | Air entering radiator | Check for leaks, bleed system |
| Coolant loss, no leak | Head gasket failure | Perform block test |
| Hissing when opening cold cap | Overpressure or trapped gas | Test for combustion gases |
| Hose collapses | Poor quality or aged | Replace with vacuum-rated hose |
| Black gunk on neck | Stop-leak residue | Clean gently, replace cap |
Final Repair Checklist
- Inspected overflow hose for cracks and kinks
- Verified reservoir hose reaches bottom
- Checked radiator neck for debris or corrosion
- Tested radiator cap for vacuum function
- Performed pressure test (no drop or spikes)
- Looked for bubbles in radiator (head gasket check)
- Bled system after refill (if recently serviced)
- Used correct coolant type (no mixing)
If all checks pass but coolant still will not return, suspect internal engine damage. Do not drive it. Get a block test.
Frequently Asked Questions About Coolant Not Going Into Radiator
Why does coolant go into the overflow tank but not return?
This happens when the cooling system loses its vacuum seal. Air enters through a cracked hose, bad cap, or micro-crack in the reservoir. Instead of pulling coolant back, the system pulls in air.
Can a bad radiator cap cause this problem?
Yes. The radiator cap has a vacuum valve that must open during cooldown to pull coolant back from the reservoir. If that valve is clogged or the cap does not seal properly, coolant will not return.
How do I know if my head gasket is blown?
Look for bubbles in the radiator when the engine runs, sweet-smelling exhaust, white smoke from the tailpipe, or pressure spikes on a gauge when revving the engine. A block test can confirm the diagnosis.
Will stop-leak products fix this?
No. Stop-leak products are a temporary fix that often makes things worse. They can clog the small passages in the cap and radiator neck, preventing proper vacuum function.
How often should I replace the radiator cap?
Replace the radiator cap every three to five years as preventive maintenance. It is one of the most common causes of coolant return failure.
Can air trapped after a coolant flush cause this issue?
Yes. Air pockets in the radiator or heater core prevent vacuum formation. Bleed the system by running the engine with the radiator cap off until the thermostat opens.
Key Takeaways for Fixing Coolant Return Issues
Coolant not going into the radiator is never normal. It is a symptom of a broken vacuum seal, whether from a cheap hose, a clogged cap, or a failing head gasket. Always start with the simplest fixes first: inspect the overflow hose, test the radiator cap, and check for air leaks. Use OEM or high-quality replacement parts to ensure the system holds vacuum properly. If all external components check out and the problem persists, test for head gasket failure immediately. Ignoring this issue risks warped heads, cracked blocks, and engine replacement. Test, fix, and bleed the system now. Your engine depends on it.



