

A running toilet or an overflowing tank wastes water and risks floor damage, often caused by a simple misalignment inside the tank. Learning how to adjust overflow in toilet tank components correctly stops the constant flow and prevents costly flooding issues.
This guide walks you through measuring heights, cutting tubes to code, and aligning your fill valve for a safe, efficient flush. You will gain the specific steps needed to fix running water and ensure your plumbing meets safety standards.
Why Your Toilet Overflow Tube Prevents Flooding
The overflow tube acts as a critical safety valve within your toilet tank to stop water from spilling onto your bathroom floor. If your fill valve fails to shut off after a flush, this vertical pipe channels excess water directly into the bowl and down the drain. Without this component, a stuck valve would cause the tank to overflow its rim and create a mess. Proper function relies entirely on correct installation and height settings relative to other parts.
How the Overflow Pipe Protects Your Home
Plumbing codes mandate that every toilet has overflow protection sized to handle the maximum water supply rate. This ensures that even if water pours in at full pressure, the pipe can move it away faster than it enters. The system diverts potential floods safely into the sewage line rather than letting them escape the tank.
Meeting Plumbing Code Standards for Safety
Regulations require specific sizing so the overflow pipe prevents tank flooding under normal operating conditions. A properly installed tube ensures your home complies with these safety rules while protecting your property from water damage. Ignoring these standards can lead to unsafe conditions and potential code violations during inspections.
Setting the Correct Overflow Tube Height
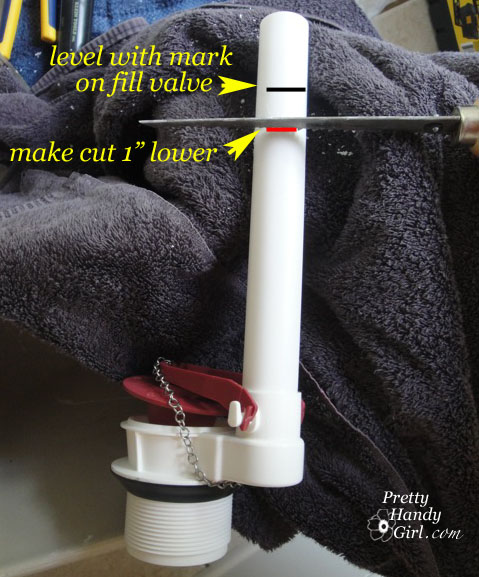
Positioning the overflow tube at the right height is the most important step when learning how to adjust overflow in toilet tank systems. An incorrect height can cause premature draining or interfere with the flushing mechanism entirely.
Position Tube 1 Inch Below Lever Opening
Fluidmaster and most plumbing guidelines state the top of the overflow pipe must sit at least 1 inch below the tank lever opening. This opening is usually located where the flush handle arm connects to the internal mechanism. Setting it too high risks interference with the lever, while setting it too low reduces your flush power.
Cutting the Overflow Pipe to Size
Most plastic overflow tubes come generic and require cutting to fit your specific tank model perfectly. You can use a hacksaw or a PVC pipe cutter to trim the tube to the exact length needed for your setup. Always measure twice before making any cuts to ensure you do not shorten it too much.
Pro Tip: Dry fit the tube in the tank and mark your cut line with a permanent marker before removing it for trimming.
Aligning Fill Valve Critical Level Marks
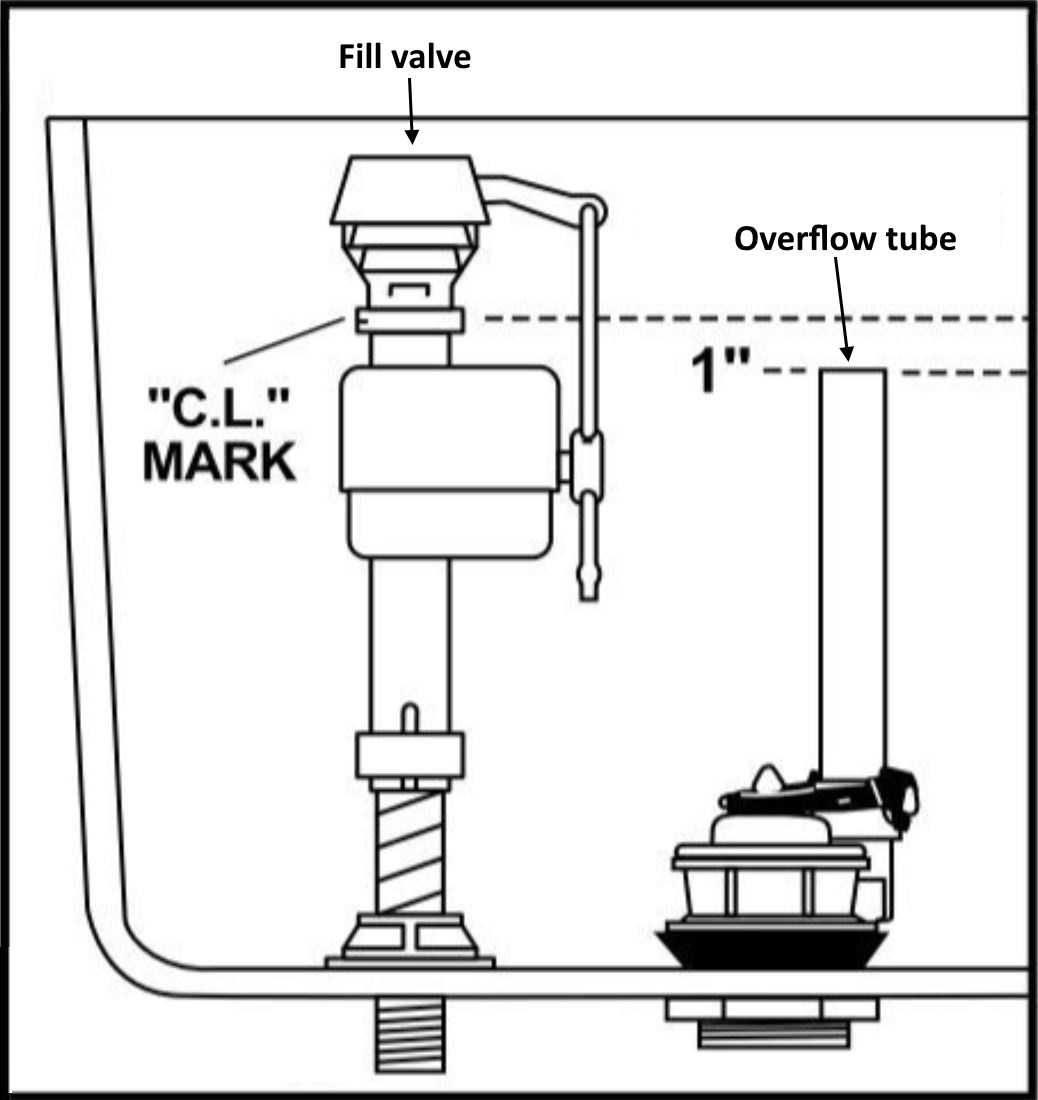
The fill valve controls water entry, and its vertical position relative to the overflow tube is vital for preventing contamination. Misalignment here can allow dirty tank water to siphon back into your clean home water supply.
Critical Level Mark Must Be 1 Inch Above Overflow
Look for the letters CL on the side of your fill valve, which stands for Critical Level. This mark indicates the lowest safe point for the valve and must be positioned at least 1 inch above the top of the overflow pipe. This air gap is a mandatory safety feature that stops backflow from occurring.
Top of Fill Valve Can Extend Above Tank Rim
Many people worry when the top of their fill valve sticks up higher than the ceramic tank rim. This is completely normal and acceptable in most modern toilet applications as long as the CL mark remains high enough. The tank lid is designed to fit over these components without needing to shorten the valve itself.
Step-by-Step Guide to Adjust Overflow in Toilet Tank
Follow this sequential process to safely inspect and adjust your internal toilet components. These steps will help you diagnose issues and apply the correct fixes for a quiet, efficient tank.
Turn Off Water and Drain the Tank Completely
- Locate the water supply valve near the base of the toilet and turn it clockwise to shut off the flow.
- Flush the toilet once to empty most of the water from the tank.
- Use a sponge to soak up any remaining water so you can work on a dry interior.
Inspect and Measure Current Heights
- Check where the top of the overflow tube sits relative to the flush lever opening.
- Use a ruler to verify the tube is at least 1 inch below the lever arm pivot point.
- Locate the CL mark on the fill valve and measure its distance from the overflow tube top.
Trim Overflow Tube If Needed
- Remove the overflow tube by snapping or twisting it out of the flush valve assembly.
- Mark the correct height on the tube ensuring it stays 1 inch below the lever opening.
- Cut the tube with a fine-tooth saw and reinstall it securely in the flush valve.
Adjust Fill Valve Height and Lock
- Loosen the adjustment nut or collar on the shaft of the fill valve assembly.
- Slide the valve up or down until the CL mark is 1 inch above the overflow tube.
- Tighten the lock nut firmly and turn the water supply back on to test the system.
Test the System for Proper Function
- Allow the tank to refill completely and watch where the water level stops.
- Ensure the water shuts off at least 1 inch below the top of the overflow tube.
- If water flows into the overflow after filling, lower the float or adjust the valve further.
Common Mistakes When Adjusting Toilet Overflow
Avoid these frequent errors to ensure your repair lasts and keeps your plumbing safe. Many homeowners make simple mistakes that lead to continuous running or code violations.
Ignoring the Critical Level Mark
Lowering the fill valve so the CL mark sits even with or below the overflow tube creates a serious backflow risk. This violates plumbing codes and allows contaminated water to potentially enter your drinking water supply. Never compromise on this specific measurement for any reason.
Leaving Refill Tube Dangling in Tank
The small refill tube from the fill valve must insert into the overflow tube, not hang loosely in the tank water. If this tube dips below the water line inside the tank, it can siphon water and cause the toilet to run constantly. Secure it with a clip so the end stays above the water level.
Setting Water Level Too High
Even with a correctly sized overflow tube, setting the fill valve too high causes water to spill in continuously. Always adjust the float or valve so the water stops clearly below the overflow rim. This prevents waste and stops the annoying sound of running water.
Visual Cues for Proper Toilet Setup
Use these visual checks to confirm your adjustments are correct before closing the tank lid. These signs indicate a healthy, code-compliant toilet ready for daily use.
Water Stops Before Overflow Top
When the tank refills after a flush, the water line should halt visibly below the overflow tube opening. If you see water trickling into the tube after the fill cycle ends, your water level is too high. Adjust the float downward until the water stays below the rim.
No Splashing or Gurgling After Fill
A properly adjusted tank should be silent once it reaches the full water level. Gurgling noises often mean the refill tube is inserted too deep or the water level is causing turbulence. Listen for quiet operation as a sign of success.
Refill Tube Secured and Not Submerged
Verify the refill tube attaches securely to the overflow tube using a clip or zip tie. The end of this small hose must remain above the water line inside the overflow tube to prevent siphoning. A quick visual check ensures this vital detail is correct.
When to Replace Instead of Adjust

Sometimes adjustment cannot fix the problem, and you must replace damaged or outdated parts. Recognizing these signs saves time and prevents repeated failures.
Cracked or Warped Overflow Tube
Plastic components can degrade over time, leading to cracks or warping that prevent a proper seal. If the tube does not sit straight or leaks at the base, replace the entire flush valve assembly. A damaged tube cannot be fixed by cutting or adjusting.
Old Fill Valve Without CL Mark
If your current fill valve lacks a Critical Level (CL) marking, it likely does not meet current plumbing codes. Upgrade to a modern, brand-name fill valve that includes clear height indicators and adjustable features. This ensures safety and reliability for years to come.
Frequent Running or Overflowing
If your toilet continues to run constantly despite careful adjustment, internal seals may be worn out. The diaphragm in the fill valve or the flapper in the flush valve might need replacement. Replace these internal parts or the whole unit to stop the waste.
Prevent Future Overflow Issues
Regular maintenance keeps your toilet running smoothly and prevents minor issues from becoming major floods. Implement these habits to extend the life of your plumbing components.
Test Monthly for Proper Operation
Flush your toilet once a month and watch the refill cycle closely. Ensure the water stops at the correct level and no water flows into the overflow tube during the cycle. Early detection of drift prevents water waste and high utility bills.
Clean Refill Tube and Overflow Annually
Mineral buildup can restrict flow or cause parts to stick over time. Detach the refill tube and flush both tubes with vinegar or a descaling solution once a year. This simple cleaning keeps water flowing freely and prevents clogs.
Upgrade to Modern Components
Consider replacing older parts with modern components that feature clear CL markings and adjustable heights. Brands like Fluidmaster offer easy-to-trim overflow tubes and reliable fill valves. Upgrading ensures your system meets the latest safety and efficiency standards.
Frequently Asked Questions About Toilet Overflow Adjustment
How do I know if my overflow tube is too high?
If the top of the tube touches or interferes with the flush lever arm, it is too high. It must sit at least 1 inch below the lever opening to function correctly and allow the handle to move freely.
Can the fill valve stick up above the tank rim?
Yes, it is normal for the top of the fill valve to extend above the tank rim. As long as the Critical Level mark is 1 inch above the overflow tube, the height is safe and the lid will still fit.
What happens if the CL mark is below the overflow tube?
If the Critical Level mark is below the overflow tube, dirty tank water can siphon back into your clean water supply. This creates a health hazard and violates plumbing codes, so you must raise the valve immediately.
Why does water keep running into the overflow tube?
This usually means the water level is set too high or the fill valve is not shutting off completely. Adjust the float or fill valve height so the water stops 1 inch below the top of the overflow tube.
Do I need special tools to cut the overflow tube?
You do not need special tools, but a hacksaw or PVC pipe cutter works best for a clean cut. Measure the required height carefully and mark the tube before cutting to ensure an accurate fit.
Key Takeaways for Adjusting Overflow in Toilet Tank
Fixing a running toilet starts with knowing how to adjust overflow in toilet tank components to meet safety codes. You must ensure the overflow tube sits 1 inch below the lever opening and the fill valve CL mark stays 1 inch above the tube. These two measurements prevent flooding, stop water waste, and protect your home’s water supply from contamination.
Take action today by checking your tank heights and making necessary adjustments or replacements. A few minutes of maintenance can save gallons of water and prevent expensive water damage in your bathroom.



