
A running toilet or water pooling on your bathroom floor signals a serious issue that wastes water and risks property damage. If you need to learn how to fix toilet tank overflow, you must first identify whether the tank is spilling over or the bowl is backing up due to a clog. Most homeowners can resolve these specific problems in under an hour using basic tools and simple adjustments.
This guide details the exact steps to diagnose your specific overflow type and repair faulty components like fill valves or flappers. You will learn critical safety standards regarding the Critical Level mark and proper water height to ensure your repair lasts. By following these instructions, you will stop the leak immediately and prevent future flooding issues.
Diagnose Your Specific Overflow Type

You must identify the source of the water before attempting any repairs to ensure you apply the correct solution. The repair process differs significantly depending on whether water is escaping the tank itself or backing up from the drain.
Identify Water Spilling From the Tank
Water pooling around the toilet base often means the fill valve fails to shut off, causing the tank to overfill. Once the water rises above the overflow tube, it flows down into the bowl and spills onto the floor if the drain cannot keep up. Common causes include a float set too high, a stuck fill valve, or debris blocking the valve mechanism.
Recognize Bowl Backup After Flushing
If water rises in the bowl immediately after flushing or runs continuously without filling the tank, you likely have a clogged trap or a flapper stuck open. This scenario often involves water bypassing the tank storage phase entirely due to a seal failure or blockage in the curved trap pipe. Unlike tank overflows, this issue usually presents with continuous flow even when the tank appears empty.
Shut Off Water and Prepare the Tank
Turn Off the Supply Valve
Locate the shutoff valve on the wall or floor behind the toilet base and turn it clockwise until it stops. This action halts all water flow to the tank, allowing you to work safely without creating a larger mess. If the valve feels stiff or leaks during this process, you should plan to replace it immediately.
Drain Remaining Water From Tank
Flush the toilet once to remove the majority of the water from the tank. Use a small cup or sponge to soak up any remaining water at the bottom to create a dry workspace. A dry tank allows you to inspect internal components clearly and prevents accidental spills during disassembly.
Pro Tip: Place a towel over the flush valve opening to catch dripping water and protect delicate parts from scratches.
Adjust Float Height to Stop Overfilling
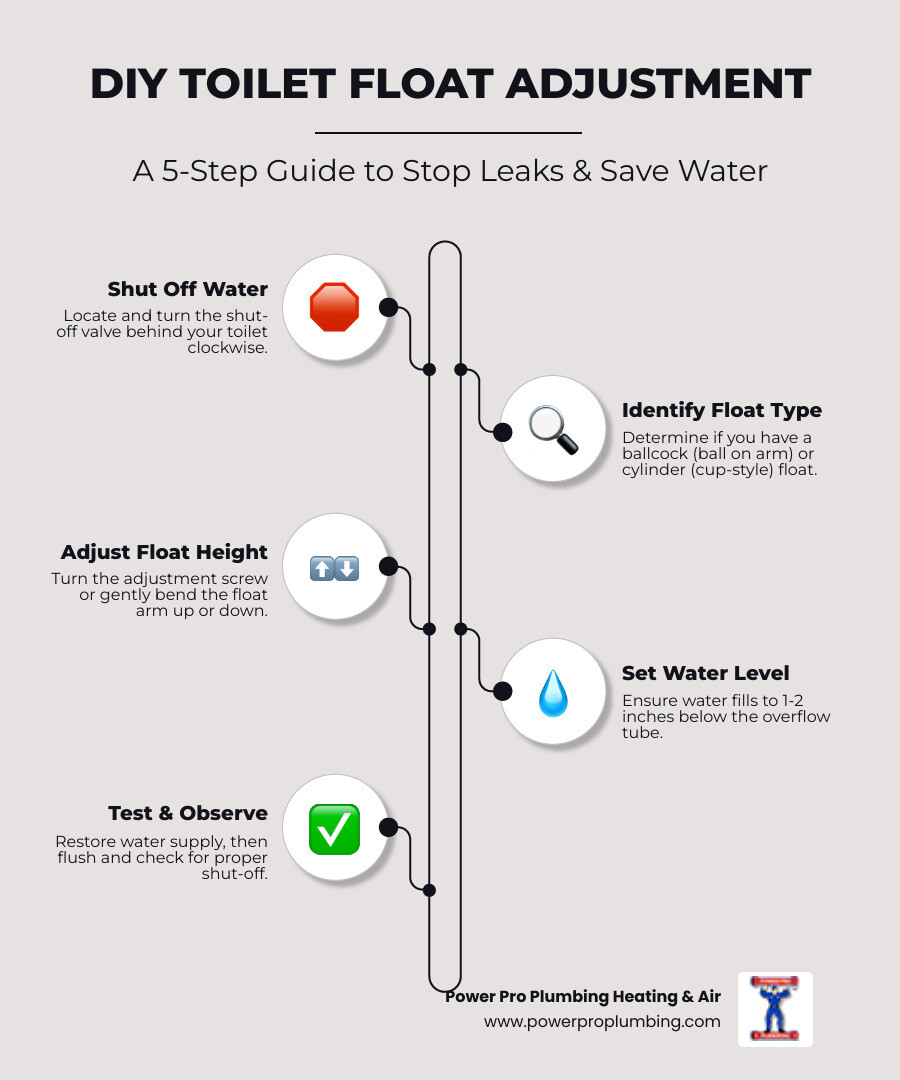
An improperly set float is the leading cause of tank overflows because it fails to signal the fill valve to stop. You need to adjust this component so the water stops rising exactly one inch below the top of the overflow tube.
Set Water Level Correctly
For newer toilets, locate the adjustment screw or slide clip on the fill valve shaft to change the float position. Turn the screw clockwise to lower the water level or slide the clip down the shaft until the float sits lower in the tank. Older models with a metal float arm require you to gently bend the arm downward to achieve the same result.
Test Fill Valve Operation
Turn the water supply back on slowly and watch the tank fill to ensure it stops at the correct level. If the water continues to run past the one-inch mark below the overflow tube, the fill valve mechanism is likely faulty. Never allow the water to rise above the overflow tube during testing as this can cause backflow contamination.
Replace Faulty Fill Valve Components
Remove Old Fill Valve Assembly
Shut off the water and drain the tank again before disconnecting the supply line from the bottom of the valve. Unscrew the lock nut located under the tank and lift out the old fill valve assembly completely. This step is necessary if adjusting the float does not stop the continuous water flow.
Install New Valve With Safety Standards
Insert the new valve into the tank, tighten the mounting nut securely, and reconnect the water supply line. Set the new float so the water stops one inch below the overflow tube top. Ensure the Critical Level mark on the new valve sits at least one inch above the overflow tube to prevent contaminated water from siphoning into your home supply.
Clear Clogs and Replace Worn Flappers
Plunge or Auger Blocked Traps
If the bowl overflows after flushing, use a plunger to create a tight seal over the drain hole and push down gently before pulling up sharply. Repeat this motion ten to fifteen times to dislodge the blockage, or use a toilet auger for stubborn clogs that resist plunging. Avoid chemical drain cleaners as they can damage rubber seals and other internal tank components.
Inspect and Swap Damaged Flappers
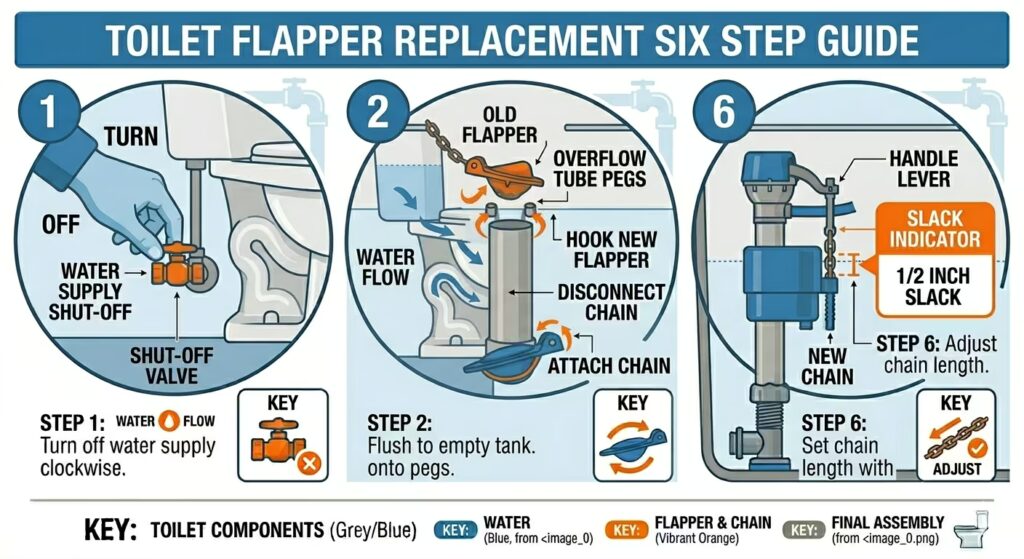
A worn flapper allows water to leak continuously from the tank into the bowl, causing the fill valve to run nonstop. Check your flapper for cracks, warping, or slime buildup, and ensure the chain has enough slack to allow a full seal. Replace the flapper every two to three years to maintain efficiency and prevent unexpected leaks.
Verify Overflow Pipe Height Standards

Cut Pipe to Proper Length
The overflow pipe must be tall enough to allow correct water levels but short enough to prevent flooding if the fill valve fails. The top of the overflow tube should sit one inch below the tank lever opening, so you may need to trim it with a hacksaw if it is too tall. If the pipe is too short, you must replace the entire flush valve assembly rather than attempting to extend it.
Understand Height Importance
Correct pipe height ensures that excess water flows safely into the bowl instead of onto your bathroom floor. This measurement also supports proper siphon action during the flush cycle, ensuring your toilet clears waste effectively every time.
Test Full System Functionality

Perform Complete Cycle Check
Turn the water supply back on slowly and let the tank fill completely before flushing to observe the entire cycle. Watch closely to confirm the tank fills to one inch below the overflow tube and stops running automatically. Listen for hissing sounds that indicate a slow leak past the flapper or gurgling that suggests a vent issue.
Check for Hidden Leaks
Add a few drops of food coloring to the tank water and wait twenty minutes without flushing to detect silent leaks. If the color appears in the bowl during this time, the flapper is not sealing properly and needs realignment or replacement. This simple test confirms your repair was successful before you consider the job done.
Prevent Future Overflow Issues
Establish Annual Maintenance Routine
Clean the fill valve and float with vinegar once a year to remove mineral buildup that causes sticking. Inspect the flapper for signs of wear or warping and flush the trap with hot water to prevent clogs from forming. Regular maintenance extends the life of your components and keeps your water bill low.
Replace Parts Proactively
Do not wait for parts to fail completely before replacing them, especially flappers which degrade every two to three years. Upgrade your supply line to a braided stainless steel version for added durability and peace of mind. Replacing these inexpensive parts proactively saves you from emergency repairs and potential water damage.
Troubleshoot Persistent Problems
Address Leaks After Shut Off
If water trickles into the tank even after shutting off the supply, debris may be stuck in the valve seat or the diaphragm is worn. Disassemble the fill valve to rinse the inlet screen and internal components, or replace the valve if cleaning does not resolve the leak.
Fix Low Water Levels
If the tank fills but stops well below the one-inch mark, raise the float gradually or check for a kinked supply line. Clean the fill valve inlet filter to remove any debris restricting water flow and causing low levels.
Reconnect Bowl Refill Tube
Ensure the small rubber refill tube from the fill valve is snapped securely onto the overflow pipe. If this tube is disconnected or submerged in water, it can cause siphoning issues that prevent the bowl from refilling correctly after a flush.
Final Checks and Safety Reminders
Confirm Backflow Protection Compliance
Verify that the Critical Level mark on your fill valve remains at least one inch above the overflow tube top. This positioning is a mandatory health and safety requirement that prevents contaminated tank water from entering your drinking water supply.
Monitor System for Twenty Four Hours
Flush the toilet several times over the next day and listen for unusual sounds or check for dampness around the base. If problems persist despite your best efforts, consult a licensed plumber to diagnose hidden issues like cracked tanks or mainline clogs.
Frequently Asked Questions About Toilet Tank Overflow
Why is water spilling out of the top of my toilet tank?
Water spills from the top when the fill valve fails to shut off, causing the tank to overfill and overflow through the tube. You must adjust the float height or replace the fill valve to stop the continuous water flow.
How high should the water level be in my toilet tank?
The water level should stop exactly one inch below the top of the overflow tube to prevent running and ensure proper flushing power. Adjusting the float arm or screw allows you to set this level accurately.
What does the CL mark on my fill valve mean?
The Critical Level (CL) mark indicates the point that must stay one inch above the overflow tube to prevent backflow contamination. This is a mandatory plumbing code requirement for all toilet installations.
How often should I replace my toilet flapper?
You should replace the toilet flapper every two to three years or immediately if you notice cracks, warping, or leaking. Regular replacement prevents water waste and avoids unexpected overflow emergencies.
Can I use chemical drain cleaners for a clogged toilet?
No, you should never use chemical drain cleaners in a toilet as they can damage rubber seals and tank components. Use a plunger or a toilet auger to safely clear blockages without causing internal damage.
Key Takeaways for Fixing Your Toilet Tank Overflow
Fixing a toilet tank overflow requires identifying whether the issue stems from a high float, a bad flapper, or a clogged trap. By adjusting your water level to one inch below the overflow tube and ensuring the CL mark is positioned correctly, you can stop leaks and save water. Regular maintenance and timely part replacements will keep your toilet running smoothly for years.
Start by shutting off your water supply and diagnosing the specific type of overflow you are experiencing today. With the right adjustments and perhaps a new flapper or fill valve, you can resolve this issue quickly and efficiently.



