
A toilet tank overflow tube leaking wastes gallons of water daily and drives up utility bills significantly. This common plumbing issue often sounds like a constant running noise or shows as water trickling into the bowl endlessly.
You can fix this problem yourself by identifying the root cause among the fill valve, flapper, or water level settings. This guide provides clear steps to diagnose the leak, replace worn parts, and prevent future damage without calling a plumber.
Diagnose the Source of Your Toilet Leak
Correctly identifying where the water escapes saves time and prevents unnecessary part replacements. A toilet tank overflow tube leaking can mimic other issues, so you must distinguish between internal overflow and external pooling.
Check for Internal Overflow Signs
Remove the tank lid and observe the water behavior immediately after a flush. If water flows continuously into the top of the overflow tube and drains into the bowl, the issue is internal. Listen closely to hear if the fill valve keeps running after the tank should be full, which indicates a failure to shut off.
Identify External Leak Locations
Water pooling on the floor near the toilet base suggests an external leak rather than an overflow issue. Dry the area around the tank-to-bowl bolts, flush valve nut, and supply line connection completely. Flush the toilet and watch closely to see where new moisture appears first.
Test Fill Valve Response
Turn off the water supply and flush the toilet to empty the tank completely. Turn the supply back on and watch the water rise to see if it stops at the correct level. If the water rises above the overflow tube and keeps flowing, the fill valve is faulty or misadjusted.
Fix a Running Fill Valve

The fill valve regulates water entry into the tank, and its failure causes continuous flow into the overflow tube. Replacing or adjusting this component resolves the majority of toilet tank overflow tube leaking cases.
Adjust the Water Level Setting
Most modern fill valves feature an adjustment screw or clip to control the water height precisely.
* Locate the adjustment mechanism on the top or side of the fill valve assembly.
* Turn the screw clockwise to lower the water level or counterclockwise to raise it.
* Flush the toilet and observe to ensure water stops one inch below the top of the overflow tube.
Replace with a Fluidmaster 400A Unit
The Fluidmaster 400A is the recommended replacement for reliable performance and easy installation.
1. Shut off the water supply and drain the tank completely using a sponge.
2. Disconnect the supply line from the bottom of the existing fill valve.
3. Unscrew the lock nut under the tank that holds the valve in place.
4. Remove the old valve and install the new one, securing it with the provided nut.
5. Reconnect the supply line and attach the refill hose to the overflow tube.
6. Turn on the water and adjust the float to achieve the correct water height.
Replace a Worn Flapper Seal
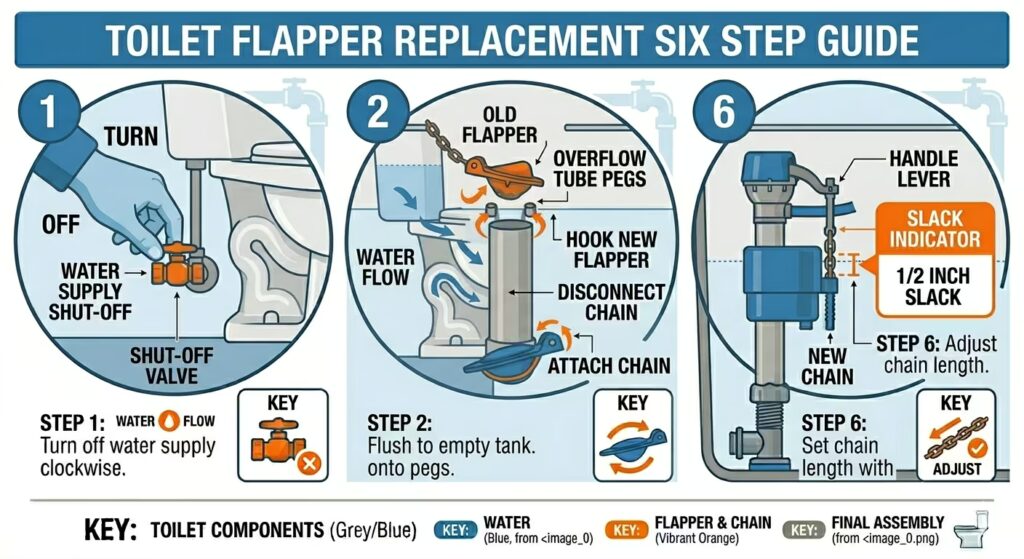
A failing flapper allows water to leak from the tank into the bowl, forcing the fill valve to run constantly to replenish the loss. This constant cycle often leads to a toilet tank overflow tube leaking situation.
Inspect Flapper Condition
Lift the flapper and examine the rubber surface for cracks, warping, or deterioration. Check your hands for black residue after touching the rubber, which signals material breakdown and the need for immediate replacement. Look for mineral buildup on the flush valve seat that might prevent a tight seal.
Install a New Flapper
- Turn off the water supply and drain the tank until the flapper is exposed.
- Unhook the flapper chain from the flush lever arm carefully.
- Remove the old flapper from the ears on the overflow tube.
- Attach the new flapper, ensuring it matches your specific flush valve model.
- Reconnect the chain with slight slack to allow full lifting and tight closing.
- Turn the water back on and test the flush mechanism.
Set the Correct Water Level
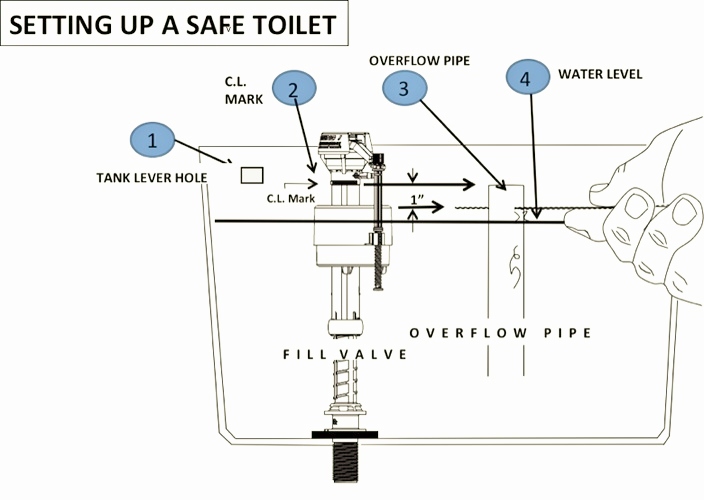
Proper water calibration is essential because even working parts cannot stop a toilet tank overflow tube leaking if the level is too high. The water must stop exactly one inch below the top rim of the overflow tube.
Use the Fill Valve Mark
Most fill valves have a visible water line mark on the overflow tube or float guide. Align the float mechanism so the water surface stops precisely at this indicated line. Water rising above this mark will spill directly into the tube and waste resources.
Measure Manually if Needed
Use a ruler to measure the distance if your valve lacks a clear indicator mark.
* Flush the toilet and let the tank refill completely to its natural stopping point.
* Measure the vertical distance from the water surface to the top of the overflow tube.
* Adjust the float mechanism until this gap measures exactly one inch.
Replace the Overflow Tube and Flush Valve
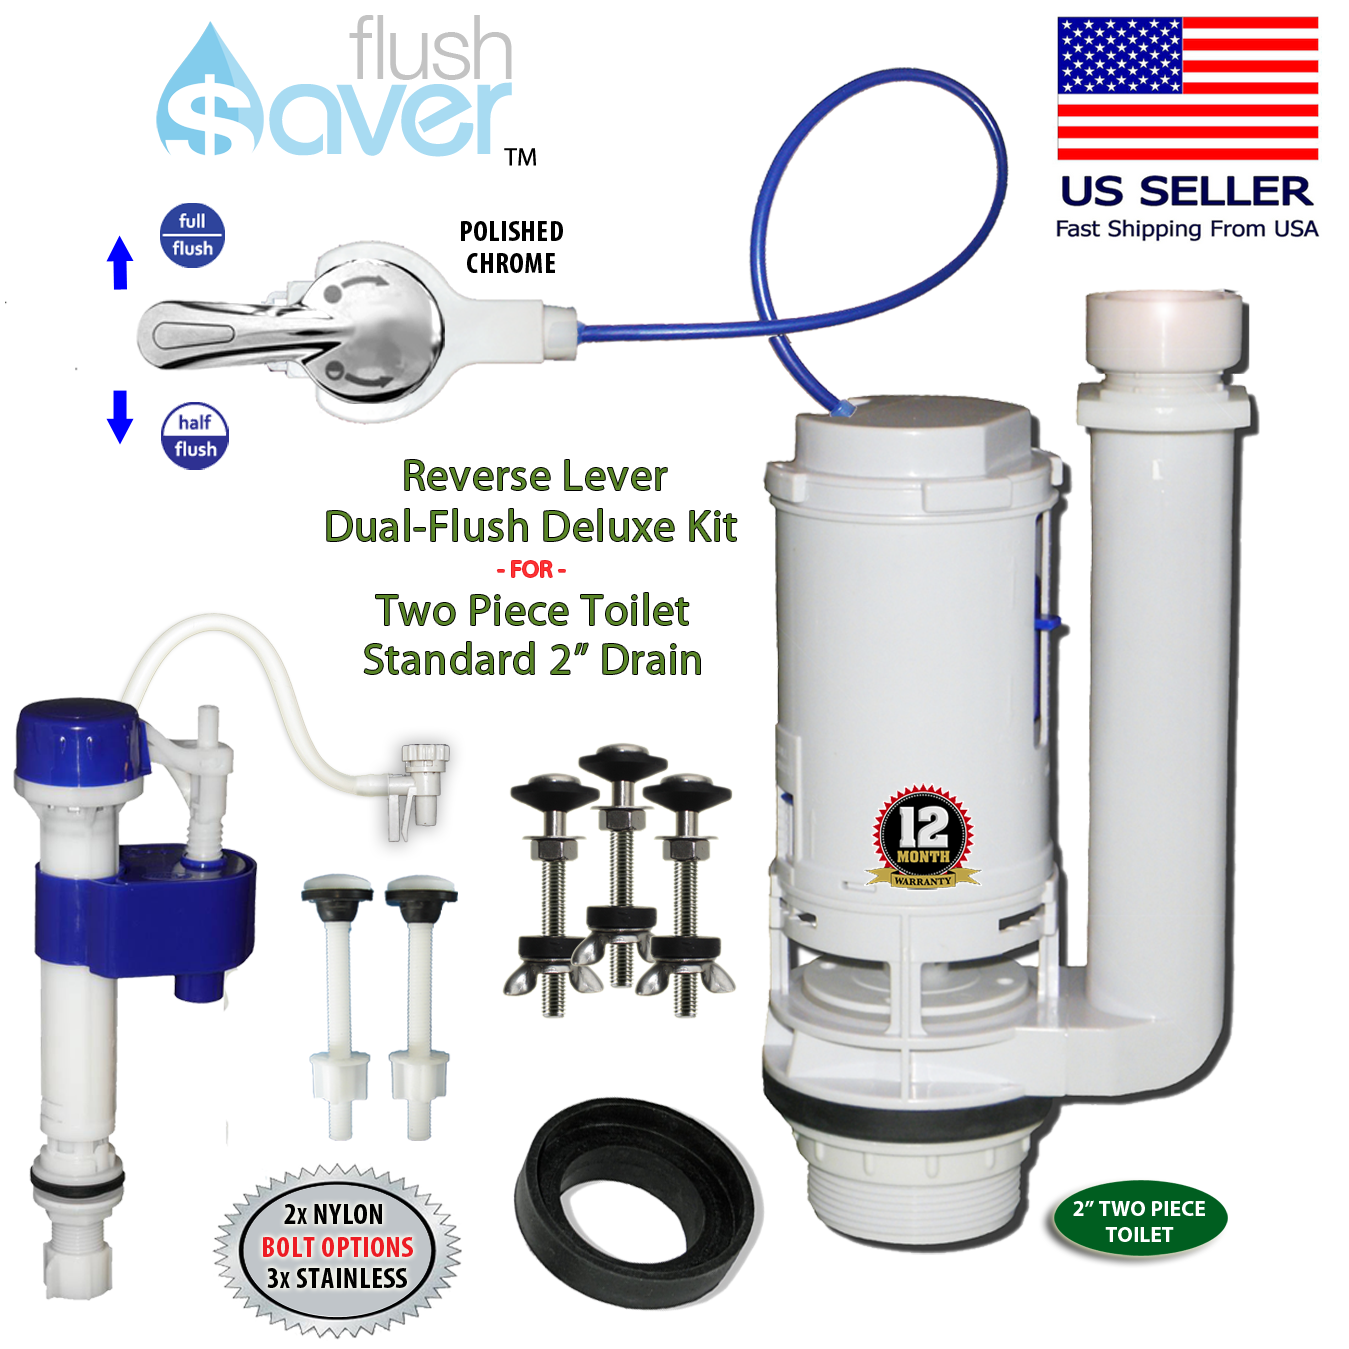
A cracked or misaligned overflow tube requires full assembly replacement to stop persistent leaking. This repair involves removing the tank, so prepare for a slightly more involved process.
Remove the Old Assembly
- Shut off the water and drain the tank completely using a sponge.
- Disconnect the supply line and the water refill hose from the overflow tube.
- Remove the tank bolts and lift the tank off the bowl with assistance.
- Unscrew the large plastic hex nut securing the flush valve from under the tank.
- Pull the entire assembly out from the top of the tank.
Install the New Flush Valve Kit
- Insert the new overflow tube through the tank opening from the top.
- Thread the new hex nut onto the valve from below and hand-tighten it.
- Turn the nut an additional half turn with pliers, being careful not to overtighten.
- Place the new rubber gasket over the nut on the underside of the tank.
- Reinstall tank bolts with fresh washers and nuts, tightening them gently and evenly.
Trim and Align the Overflow Tube
An improperly sized overflow tube causes water to spill even when the water level settings appear correct. You must ensure the tube height matches the fill valve specifications.
Cut to Correct Height
- Place a level on top of the fill valve to establish a horizontal reference line.
- Mark the overflow tube one inch below the fill valve water line indicator.
- Use a small hacksaw or PVC cutter to trim the tube at your marked line.
- Smooth the cut edges with sandpaper to prevent debris buildup and noise.
Prevent Chain and Flapper Issues
The flapper chain often causes leaks when it is too tight or gets trapped under the flapper seal. Proper chain management ensures the flapper closes fully after every flush.
Set Proper Chain Slack
Press the flush handle and watch the flapper lift to ensure it rises fully and straight up. When the flapper is closed, the chain should have just enough slack so it does not pull the flapper open. A tight chain prevents the flapper from seating correctly.
Trim Excess Chain
Remove extra links or re-hook the chain at a shorter point if it hangs too low. Ensure no part of the chain rests under the flapper when it is in the closed position. A tangled chain keeps the flapper from sealing, leading to constant refilling.
Upgrade the Supply Line
:max_bytes(150000):strip_icc()/flex-lines-2718729-hero-8be70f1945954c6eb52ff9a0f2cc3901.jpg)
While not the direct cause of overflow, a failing supply line can cause major flooding and should be replaced during any tank repair. Upgrading this component prevents future water damage emergencies.
Replace Plastic with Braided Metal
Plastic and rubber supply lines are prone to bursting under pressure and causing floods.
* Replace old lines with a braided stainless steel supply line.
* Apply plumber’s tape to the wall shutoff threads for a secure seal.
* Hand-tighten the coupling, then give it a quarter to half turn with a wrench.
Avoid Overtightening Damage
Porcelain tanks crack easily under excessive force, so use caution when tightening connections. Most DIY repairs fail due to overtightening rather than incorrect part installation.
Hand-Tight Plus a Quarter Turn
Tighten the flush valve hex nut by hand first, then add only a half turn with pliers. Snug the tank bolts with a wrench, alternating sides to distribute pressure evenly. Stop immediately if you hear cracking or see stress lines forming on the porcelain.
Test and Finalize the Repair
Verification ensures your repair successfully stops the toilet tank overflow tube leaking before you finish the job.
Turn On Water and Monitor
Slowly open the shut-off valve and watch for leaks at the supply line, tank bolts, and flush valve base. Let the tank fill completely to observe the shut-off mechanism in action.
Flush and Recheck
Flush the toilet two or three times to confirm the flapper seals completely each time. Ensure the water stops exactly one inch below the overflow tube and listen for silence. If the toilet runs, revisit your fill valve adjustment or flapper alignment.
When to Call a Plumber
Some situations require professional assessment to prevent severe water damage or structural failure.
Cracked Tank or Pipe
If the porcelain tank or plastic flush valve is cracked, replacement is the only solution. Attempting to seal cracks often leads to sudden failure and significant flooding.
Persistent Leaks After Repair
Contact a professional if you have replaced the fill valve and flapper but water still leaks. The problem may be a warped flush valve seat or an internal crack that requires expert diagnosis.
Frequently Asked Questions About Toilet Tank Overflow Tube Leaking
Why does my toilet overflow tube keep running?
The overflow tube runs continuously because the water level is too high or the fill valve fails to shut off. This forces excess water into the tube, causing a constant flow into the bowl.
How do I know if my flapper is causing the leak?
Check for black residue on your hands after touching the flapper, which indicates rubber deterioration. If the flapper is cracked or warped, it cannot seal properly, causing the tank to refill constantly.
What is the correct water level in a toilet tank?
The water surface must sit exactly one inch below the top rim of the overflow tube. Any higher, and water will spill into the tube, wasting water and causing noise.
Can I fix a cracked overflow tube?
No, you cannot repair a cracked overflow tube; you must replace the entire flush valve assembly. A cracked tube will continue to leak and may cause significant water damage if ignored.
How often should I replace my toilet flapper?
Replace the flapper every three to five years, or sooner if you notice leaks or rubber degradation. Harsh chemical cleaners can accelerate wear, requiring more frequent replacement.
Key Takeaways for Fixing Your Toilet Tank Overflow Tube Leaking
Fixing a toilet tank overflow tube leaking issue usually involves adjusting the water level, replacing a worn flapper, or installing a new fill valve. Remember that the water level must stay one inch below the overflow tube rim to prevent constant running.
Avoid overtightening bolts and upgrade to a braided metal supply line to prevent future flooding risks. Take action today to stop water waste and restore quiet, efficient operation to your toilet.



