
A puddle of green coolant under your car often signals the beginning of an expensive repair bill. However, learning how to rebuild a radiator can save hundreds of dollars while extending the life of your vehicle’s cooling system. Many drivers assume radiators are disposable, but most can be restored with the right tools and techniques.
This guide walks you through every stage of radiator rebuilding, from identifying your radiator type to pressure testing the finished unit. You’ll learn which damage is repairable, which tools you need, and how to avoid the common mistakes that send DIY repairs sideways. Whether you drive a classic car or a modern truck, this breakdown gives you a clear path forward.
Identify Your Radiator Material Before Starting
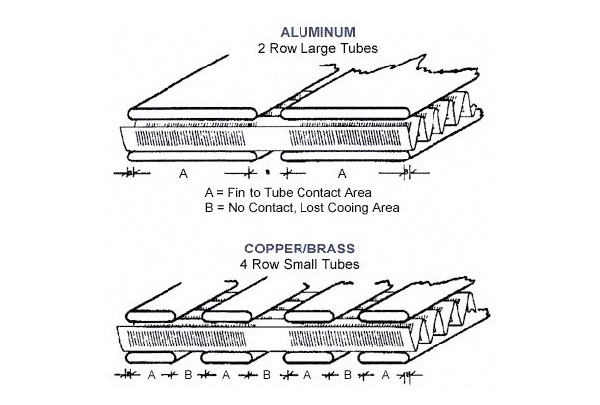
The first step in any radiator rebuild is knowing what you’re working with. Material determines whether rebuilding makes sense at all, or whether replacement is the smarter choice.
Aluminum vs. Copper-Brass Construction
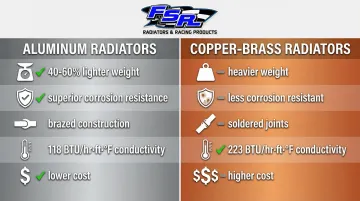
Modern vehicles typically use aluminum radiators because they are lightweight and transfer heat efficiently. Unfortunately, these units are difficult to rebuild using standard methods. Copper-brass radiators, by contrast, respond well to traditional repair techniques.
- Copper-Brass Radiators: Built from copper tubes and brass headers joined with solder. These units can be disassembled, cleaned, and re-soldered.
- Aluminum Radiators: Usually feature plastic tanks sealed with gaskets, or fully welded aluminum construction. Gasketed designs fail from thermal expansion differences, while welded units require professional repair.
Check Tank Type and Core Condition
Inspect the end tanks closely before committing to a rebuild. Plastic tanks on aluminum cores tend to crack from repeated heat cycles and are not good candidates for rebuilding. Brass or aluminum tanks attached to an intact core offer better repair potential.
If you spot visible corrosion, soft spots, or multiple leaks across the core, replacement usually costs less than a full rebuild.
Diagnose the Leak Before You Rebuild
Misdiagnosing a coolant leak wastes time and money. Confirm the radiator is actually the source before pulling it out of the vehicle.
Perform a Puddle Test
Park on a clean surface overnight and check the ground in the morning. Touch any fluid you find and wipe it on a white paper towel.
- Green or orange fluid indicates coolant.
- Clear water likely means A/C condensation.
- Oily residue could signal transmission fluid, especially if the radiator houses cooler lines.
Inspect Coolant Level and the Radiator Cap
Monitor the overflow reservoir over several days. A steadily dropping level confirms an active leak somewhere in the system.
Examine the radiator cap for cracks, worn seals, or oxidation. A faulty cap mimics internal leaks by failing to hold system pressure. Never open the cap on a hot engine, since pressurized steam can cause severe burns.
Pressure Test the Cooling System
A pressure tester reveals hidden leaks that visual inspection misses.
- Let the engine cool completely.
- Attach the pressure tester to the radiator neck.
- Pump to the psi rating printed on the cap, usually between 13 and 18 psi.
- Watch the gauge for drops and inspect seams, tanks, and core fins for seepage.
This step pinpoints the exact leak location and confirms whether rebuilding is worthwhile.
Distinguish Repairable Damage From Replacement Candidates
Not every radiator deserves a rebuild. Knowing the difference prevents wasted effort on units that should head to the scrap pile.
Conditions That Respond Well to Rebuilding
- Pinhole leaks in copper tubes
- Failed solder joints
- Minor tank cracks in brass units
- Solder bloom blockages restricting flow
These problems clear up with rodding, cleaning, and re-soldering.
Damage That Signals Replacement
- Severe plastic tank cracking
- Soft, corroded aluminum cores
- Multiple gasket failures across the unit
- Internal transmission cooler rupture
In these cases, replacement or re-coring offers better long-term value. Re-coring keeps the original tanks while swapping in a fresh core, which works well for custom-fit or vintage applications.
Gather Tools and Follow Safety Protocols
Rebuilding a radiator involves heat, chemicals, and pressurized systems. Preparation protects both you and the workspace.
Tools You Will Need
- Radiator rodding kit with brass rods or flexible cables
- Soldering iron rated 140W or higher, or a propane torch
- Acid-core solder and flux
- Wire brush and sandpaper
- Bench vise
- Pressure tester
- Protective gloves and safety goggles
Critical Safety Steps
- Coolant is toxic. Collect drained fluid in sealed containers for proper disposal.
- Never work under a vehicle supported only by a jack. Always use jack stands.
- Chemical cleaning baths involve hazardous substances best left to professionals.
- Work in a ventilated area to clear soldering fumes and solvent vapors.
Rebuild a Copper-Brass Radiator Step by Step
This process restores original performance and can last decades with proper maintenance. Copper-brass is the only radiator type that truly responds to traditional rebuilding.
Remove and Disassemble the Radiator
- Drain coolant completely from the system.
- Disconnect upper and lower hoses, transmission lines if equipped, and mounting brackets.
- Lift the radiator out of the vehicle carefully.
- Clamp the unit in a vise and cut off the end tanks using a hacksaw or tubing cutter.
Make clean, even cuts so the tanks reseat properly during reassembly.
Clean and Rod Out the Tubes
Soak the core in hot water to loosen debris before rodding.
- Insert brass rods into each tube to push out sludge and solder bloom.
- Flush with water from both directions until runoff runs clear.
- Scrub header surfaces with a wire brush where the tubes meet the tanks.
Solder bloom is a metallic buildup around joints caused by interaction between copper, brass, and solder. Removing it fully restores proper coolant flow.
Re-Solder the Joints
- Apply flux to all tube ends and header openings.
- Heat evenly with a propane torch.
- Feed acid-core solder into each joint until it flows smoothly around the tube.
Avoid overheating, since excessive heat warps brass and weakens the joint.
Reattach and Seal the Tanks
- Position the tanks back onto the core.
- Solder the tanks to the headers, creating a continuous seal around the perimeter.
- Reinforce corners and seams for added durability.
Let the assembly cool slowly to prevent thermal shock.
Test and Refinish the Rebuilt Radiator
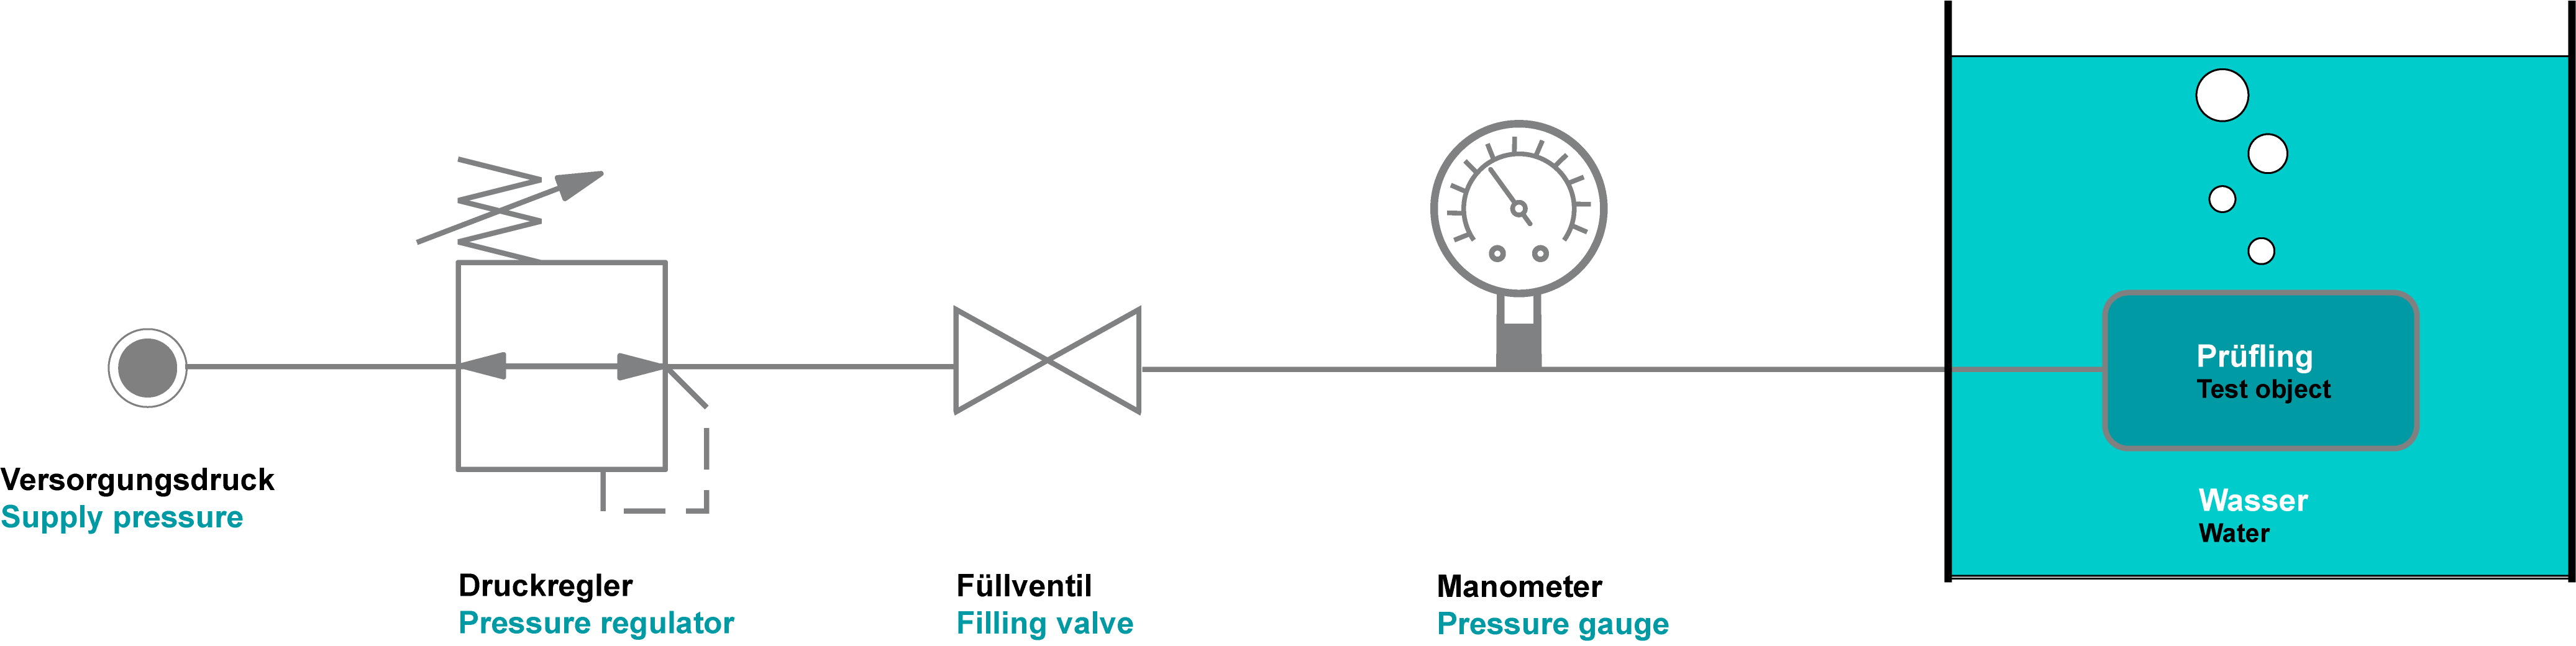
A rebuilt radiator must prove its integrity before reinstallation. Skipping the test phase risks another leak and another round of disassembly.
Pressure Test for Leaks
- Plug all openings except the filler neck.
- Attach the pressure tester and pressurize to 15 psi.
- Submerge the unit in water or spray joints with soapy solution.
- Watch for bubbles that indicate escaping air.
Repair any micro-leaks with additional solder before moving forward.
Apply Heat-Transfer Paint
Standard paint insulates the radiator and reduces cooling efficiency. Use specialized radiator paint designed to allow heat to radiate freely. Avoid spraying near fins or core passages, and let the unit dry fully before reinstalling.
Understand Your Options With Aluminum Radiators
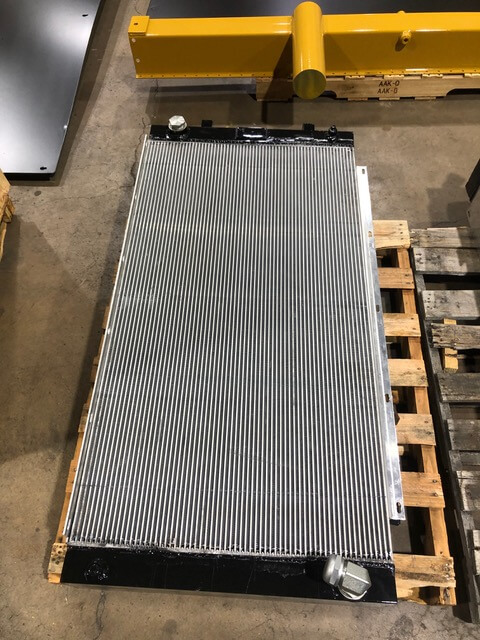
True rebuilding is rarely feasible for aluminum units. The focus shifts to assessment and limited fixes.
Can You Weld an Aluminum Radiator?
TIG welding is technically possible but risky for DIY repairs. Internal contaminants like coolant residue cause weak, porous welds. Metal fatigue around the crack often leads to new failures nearby, and the process requires professional skill plus post-weld cleaning.
Most DIY aluminum welds fail within weeks. For lasting results, professional service or replacement is the better path.
When Re-Coring Makes Sense
If the tanks remain in good condition but the core is damaged, re-coring offers a middle ground. A technician removes the old core and installs a new aluminum core, then brazes or seals the joint professionally. This approach costs less than full replacement for custom-fit or vintage applications.
Use Emergency Fixes Only as a Last Resort
These methods get you home or finish a race event, but none offer permanent solutions.
Stop-Leak Additives
Pour chemical stop-leak into a cool radiator. Particles accumulate at leak points and seal small holes from the inside.
- Works best on pinholes, not gasket or tank failures.
- Flush the system within 1,000 miles to avoid clogging the heater core or water pump.
External Epoxy Application
For accessible cracks, clean the area with brake cleaner and dry thoroughly. Knead the epoxy and press it over the crack, then cure overnight. This fix works best in low-pressure areas and rarely survives long-term heat cycling.
Skip the Pepper Trick
Adding pepper to coolant is a myth that causes more problems than it solves. The particles do not seal reliably, can clog narrow passages in the engine or heater core, and introduce abrasive debris into the system.
Prevent Future Radiator Failures
A rebuilt radiator lasts longer when paired with consistent maintenance and physical protection.
Change Coolant Every 30,000 Miles
Old coolant loses its corrosion inhibitors, which leads to internal rust and electrolysis.
- Cool the engine completely.
- Drain via the petcock or lower hose.
- Flush with water two to three times.
- Refill with a 50/50 coolant and water mix.
Use the correct coolant type for your vehicle, whether OAT, HOAT, or IAT.
Install a Radiator Guard
Physical damage from rocks and debris is a leading cause of sudden radiator failure.
- Nomex screens are lightweight, trimmable, and effective for off-road or racing use.
- Metal grilles offer durability but can reduce airflow if poorly designed.
Check Mounting and Supports
Rigid mounting creates stress cracks over time. Use rubber-isolated clamps, ensure core supports do not rub against tanks, and allow slight movement to absorb engine vibration.
Know When Replacement Beats Rebuilding
Rebuilding is not always worth the effort. Replace the radiator when:
- Plastic tanks show cracks or brittleness
- Multiple leaks exist across the core
- The vehicle is a daily driver needing reliability
- Labor costs exceed 60 percent of a new unit’s price
For modern vehicles, upgrading to a welded all-aluminum radiator eliminates gasket and plastic tank issues entirely.
Choose the Right Replacement Unit
If you decide to replace, match or exceed the original specifications.
- Core rows: Three-row cores cool better than two-row designs, though airflow trade-offs exist.
- Dimensions: Measure length, width, and depth precisely.
- Fittings and brackets: Confirm alignment with hoses and mounting points.
- Transmission lines: Ensure cooler ports match if your vehicle uses them.
Consider OEM or high-quality aftermarket units with furnace-brazed cores for maximum longevity.
Frequently Asked Questions About Rebuilding a Radiator
Can any radiator be rebuilt?
No. Only copper-brass radiators respond well to traditional rebuilding methods. Aluminum radiators with plastic tanks are generally replaced rather than rebuilt, and welded aluminum units usually require professional service.
How long does a rebuilt radiator last?
A properly rebuilt copper-brass radiator can last decades with regular maintenance. Aluminum replacements typically last 8 to 15 years depending on quality and environment. Racing applications see much shorter lifespans due to physical damage risk.
Is it cheaper to rebuild or replace a radiator?
Rebuilding costs less upfront for copper-brass units, especially when labor is DIY. Replacement costs more initially but offers longer service life and fewer recurring repairs. For aluminum radiators with plastic tanks, replacement almost always wins on value.
Can I use stop-leak as a permanent fix?
No. Stop-leak additives work only as emergency measures to seal small pinholes. The fix is temporary and can clog the heater core or water pump if left in the system too long. Plan for proper repair or replacement afterward.
What causes solder bloom in copper-brass radiators?
Solder bloom is a metallic buildup around joints caused by interaction between copper, brass, and solder over time. It restricts coolant flow, increases system pressure, and can burst tubes. Regular rodding and cleaning prevents the buildup from causing damage.
Do radiator guards really make a difference?
Yes, especially for off-road, racing, or dusty driving conditions. Nomex screens and metal grilles prevent punctures from rocks, dirt clods, and large insects. Physical impact is a leading cause of sudden radiator failure, and guards are a low-cost way to reduce that risk.
Final Takeaways on Rebuilding a Radiator
Learning how to rebuild a radiator gives you a valuable skill that saves money and extends component life, particularly for classic cars with copper-brass units. The process depends entirely on material, condition, and intended use. Aluminum radiators with plastic tanks rarely justify the effort, while copper-brass units can be restored to like-new performance with rodding, cleaning, and re-soldering.
Always pressure-test your work, maintain coolant on a regular schedule, and protect the core from physical damage. Start by identifying your radiator type and diagnosing the leak accurately, then decide whether rebuilding or replacement offers the better return. With the right approach, you can stop overheating problems and keep your engine running cool for years to come.



