

Your air conditioner isn’t cooling like it used to. The air from the vents feels warm, the unit runs constantly, or you notice frost forming on the pipes. You’ve probably heard someone say it needs “coolant” or a recharge. But here’s the important part: adding coolant to an air conditioner isn’t routine maintenance. It’s usually a sign of a leak, and improper handling can damage your system or violate the law.
This guide walks you through how to put coolant in air conditioner systems safely. You’ll learn to identify low refrigerant symptoms, understand the legal requirements, and see the proper charging procedures for home and car AC units. While DIY kits exist for vehicles, only EPA-certified technicians can legally handle refrigerant in home HVAC systems.
Spot Low Refrigerant Early
Key Warning Signs in Home AC
If your home AC struggles to cool, watch for these signs of low refrigerant. Warm air comes from the vents even when the unit runs. Airflow feels only slightly cool rather than cold. Frost or ice forms on the copper refrigerant lines or indoor coil. You hear hissing or bubbling sounds near the unit. Energy bills increase due to longer run times. The system short cycles, turning on and off frequently.
A properly charged system should create a 15 to 20 degree Fahrenheit drop in air temperature between the return and supply vents. Less than that indicates refrigerant may be low.
Automotive AC Warning Signs
In your car, low refrigerant shows up as weak or warm airflow from dashboard vents. Cooling works at first, then fails intermittently. The compressor clutch does not engage. You see visible oil residue on AC lines, which signals leaks.
Never ignore a frozen coil. If the suction line is icy, do not add refrigerant yet. You must thaw it first to avoid overcharging the system.
Know Your AC System Type
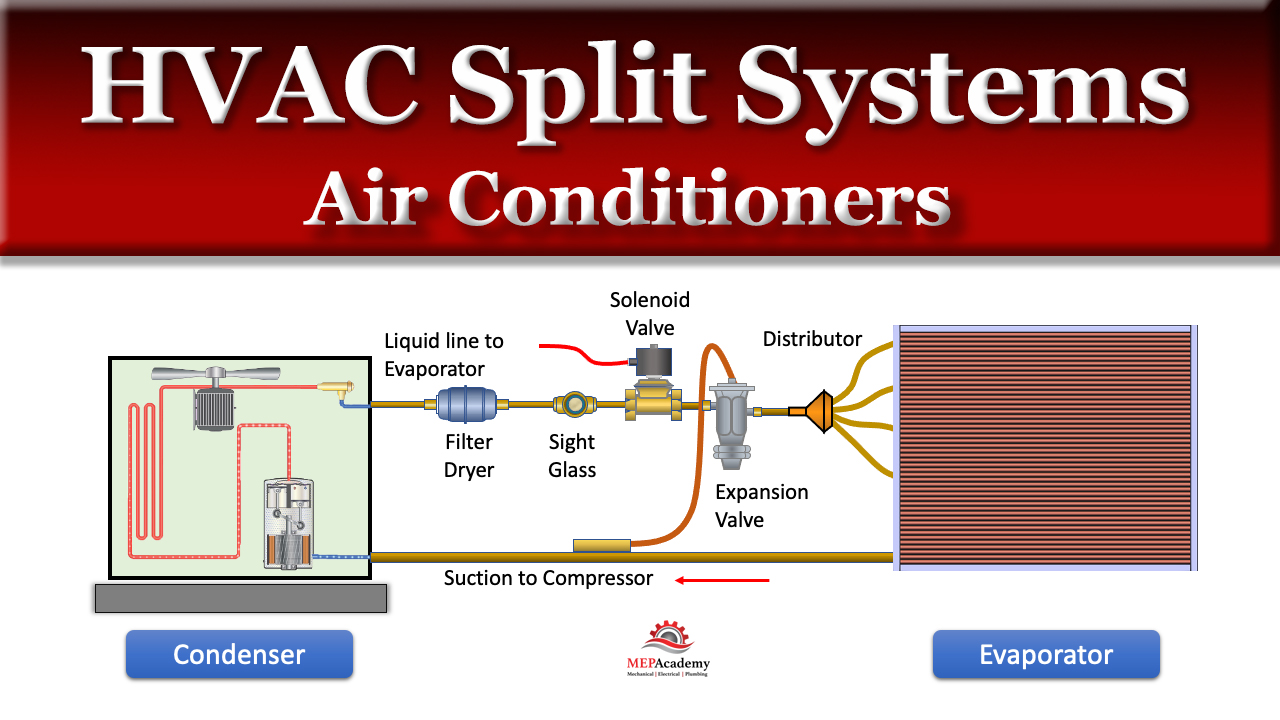
Home Split-System AC
Most homes use a split system with an outdoor condenser and indoor air handler connected by copper lines. The suction line, also called the low side, is the larger insulated pipe where refrigerant gets added. The discharge line, or high side, is the smaller hot pipe where you should never charge. These systems use R-22 in older homes or R-410A in modern ones. They require professional tools and EPA certification to service.
Window Air Conditioner
Self-contained units often lack service ports. They may need a saddle valve installed on the suction line for access. Window units typically use R-410A or R-134a with small charges of 10 to 20 ounces. DIY recharging is technically possible but carries risks.
Car AC System
Automotive systems are closed-loop and designed for consumer recharge kits. The low-pressure port is labeled L on the larger aluminum pipe, usually with a black or blue cap. These systems use R-134a in common vehicles or R-1234yf in newer models. Recharging is legal for DIY but precision is limited.
Always confirm the refrigerant type. Never mix R-134a and R-1234yf because they are not compatible.
Legal Rules You Must Follow
EPA Certification Required for Home AC
Under U.S. EPA Section 608, only certified technicians can legally handle refrigerant in stationary HVAC systems. DIY recharging of home AC units is prohibited. Fines can reach thousands of dollars for illegal releases. Refrigerants like R-22 are ozone-depleting and tightly regulated.
You can diagnose issues yourself, but only a licensed professional can recover, recycle, or recharge refrigerant in home systems.
Car AC: Legal but Risky
You can purchase R-134a recharge kits at auto stores, but these kits lack precision. Overcharging is common. No leak repair gets performed, so it’s only a temporary fix. Environmental release is still illegal if done carelessly.
This is a Band-Aid fix. It buys time, but you’ll need a real repair eventually.
Prepare Safely Before Starting
Turn Off Power
Shut off the outdoor unit at the disconnect switch or breaker. Keep the indoor fan running to help thaw ice. Never work on a live system.
Gear Up
Wear safety glasses and gloves because refrigerant can cause frostbite. Work in dry well-ventilated areas. Ensure no open flames are present because some refrigerants are flammable.
Confirm System Compatibility
Match the refrigerant type exactly. R-410A is not the same as R-22. Use only approved hoses and gauges. Never use automotive kits on home systems.
Skipping prep can lead to compressor slugging, overpressure, or personal injury.
Thaw the Evaporator Coil First
Why It Matters
A frozen coil gives false pressure readings. Charging while frozen risks overcharging or liquid slugging, which can destroy the compressor.
Thawing Steps
Turn off outdoor power. Keep the indoor fan on to circulate warm air. Run furnace or heat strips to speed thawing. Wait for water to stop dripping from the drain line. Wait 10 to 15 minutes for pressure to stabilize.
Only proceed when the coil is fully thawed and dry.
Access the Service Port

Factory Ports
Most systems have Schrader valve ports on the suction line, covered by a cap like a tire valve. Remove the cap and keep it safe.
Saddle Valve for Window Units
If no port exists, clean the suction line surface first. Attach a saddle valve with screws and a rubber gasket. Turn the piercing tool until it punctures the copper. Remove the tool, leaving a threaded port.
Saddle valves allow temporary access, ideal for emergency recharges.
Connect Manifold Gauges
Proper Hose Setup
Connect the blue hose to the low-side port on the suction line. Connect the red hose to the high-side port on the discharge line. Connect the yellow middle hose to the refrigerant tank.
Purge the Hoses
Attach the yellow hose to the tank. Briefly open the tank valve to bleed air and moisture. Close the valve. The hoses are now clean.
Never skip purging because moisture causes acid buildup and compressor failure.
Read Pressure Correctly

R-22 Home AC
The low side should read 70 to 85 PSI depending on outdoor temperature. The high side reads 225 to 250 PSI. When equalized and off, both gauges read about 55 PSI.
R-410A Modern Systems
The low side reads 110 to 130 PSI. The high side reads 350 to 400 PSI. Static pressure when off is around 200 PSI due to the high-pressure design.
R-134a Car AC
At 70 degrees Fahrenheit, low-side pressure should be 25 to 35 PSI. At 80 degrees, it rises to 30 to 40 PSI. At 90 degrees, expect 35 to 45 PSI.
Use the pink scale on R-410A gauges to read saturation temperature. Keep it between 38 and 42 degrees Fahrenheit to avoid freezing.
Add Refrigerant the Right Way
Home AC Professional Method
Restore power and start the AC. Open the low-side valve on the manifold. Open the tank valve slowly while keeping the tank upright to draw vapor only. Add refrigerant in 30-second bursts, pausing to monitor pressure. Stop when low-side reaches the target, such as 75 PSI at 85 degrees Fahrenheit. Close the tank valve, then close the gauge valve. Disconnect hoses in reverse order.
Window Unit DIY Method
Invert the refrigerant tank to feed liquid for faster fill. Open the manifold valve slowly. Add small amounts and wait five minutes between additions. Stop when saturation temperature reaches about 40 degrees Fahrenheit. Avoid overfilling because excess refrigerant increases pressure.
Car AC DIY Method
Shake the can of R-134a. Connect the hose to the low-side port. Start the engine and set AC to max with fan high and recirculate on. Open the valve slowly and shake the can every 15 seconds. Stop when vents blow cold and pressure stabilizes. Disconnect and recap the port.
Never charge through the high-side port because it risks overpressure and compressor damage.
Monitor While Charging
Watch Key Indicators
Low-side pressure should rise steadily. The high side must also increase because no rise may mean a blockage. The suction line should begin to sweat, which signs proper cooling. Listen for gurgling or knocking because these sounds indicate overcharge. Check the temperature drop at vents, which should reach 15 to 20 degrees Fahrenheit.
Use a digital thermometer to verify performance. Don’t rely on feel alone.
Final Checks After Recharge
Seal and Reassemble
Replace all service port caps with O-rings. For window units, reinstall foam strips and screws. Clean the condenser coil to improve heat rejection.
Test Performance
Run the system for 15 to 30 minutes. Measure return versus supply air temperature. A 15-degree drop is good. Verify airflow is strong and consistent. Check for frost, which should not form. Listen for normal cycling.
A successful recharge restores cooling even in 90 to 100 degree heat.
Critical Warnings You Cannot Ignore
This Is Not a Permanent Fix
All refrigerant loss means a leak exists. Recharging without repair leads to repeat failures. Eventually, the compressor may fail.
Environmental Harm
Refrigerants are powerful greenhouse gases. Intentional release is illegal under EPA rules.
Never Do These Things
Never mix refrigerants because it causes permanent damage. Never charge while frozen because it leads to overcharge. Never use liquid refrigerant on the low side because it causes slugging. Never overfill because it increases head pressure and risks compressor burnout.
A recharge is like a Band-Aid. It keeps you cool for now, but you’ll need real repair soon.
When to Replace Instead of Recharge
Consider replacement if the unit is 10 or more years old. Consider it if you’ve recharged multiple times. Consider it if the system uses R-22, which is obsolete and expensive. Consider it if the compressor or coil is failing. Consider it if repair cost exceeds 50 percent of replacement cost.
Upgrading to a modern R-410A system can save 30 to 50 percent on energy bills.
Maintenance Tips for Longevity
For Home HVAC
Replace filters every 1 to 3 months. Schedule annual tune-ups. Keep the outdoor unit clear of leaves and debris. Inspect for leaks using soapy water on connections.
For Car AC
Run AC for 10 minutes weekly even in winter. Replace the cabin filter every 12,000 to 15,000 miles. Use recirculation mode in hot weather. Fix weak cooling fast to prevent compressor strain.
A well-maintained system can last 15 to 20 years.
Cost of Refrigerant and Service
| Type | Price | Notes |
|---|---|---|
| R-22 | $200 to $300 per pound | Obsolete, expensive |
| R-410A | About $67 per pound | Standard for new systems |
| R-134a auto | $10 to $20 per can | DIY-friendly |
| R-1234yf | $100 or more per pound | Professional use only |
Professional HVAC recharge plus leak repair costs $300 to $1,500. Auto AC recharge by a pro costs $150 to $300. DIY auto kits cost $30 to $60.
DIY saves money short-term, but professional repair lasts longer.
Frequently Asked Questions About Putting Coolant in Air Conditioner
Can I add coolant to my home air conditioner myself?
No. Under EPA Section 608, only certified technicians can legally handle refrigerant in stationary HVAC systems. DIY recharging of home AC units is prohibited by federal law and can result in thousands of dollars in fines.
What are the signs that my AC needs coolant?
Watch for warm air from vents despite the unit running. Look for frost or ice on refrigerant lines. Listen for hissing sounds indicating leaks. Check for reduced airflow and higher energy bills. A properly charged system should create a 15 to 20 degree Fahrenheit temperature drop.
How much does it cost to recharge AC coolant?
Professional HVAC recharge plus leak repair costs $300 to $1,500. DIY automotive recharge kits cost $30 to $60. Refrigerant prices vary significantly, with R-22 costing $200 to $300 per pound while R-410A costs about $67 per pound.
Is recharging AC coolant a permanent solution?
No. Adding coolant addresses the symptom, not the cause. All refrigerant loss indicates a leak. Without repairing the leak, the system will lose coolant again. Repeated recharging damages the compressor and harms the environment.
Can I use automotive refrigerant recharge kits on my home AC?
No. Automotive kits are designed for car AC systems using R-134a or R-1234yf. Home systems use R-22 or R-410A at much higher pressures. Using the wrong refrigerant or kit can damage your system or cause injury.
What happens if I overcharge my AC with coolant?
Overcharging increases head pressure and can cause the compressor to overheat and fail. It reduces efficiency and can damage components. Signs of overcharge include gurgling sounds, reduced cooling, and the high-side pressure climbing abnormally high.
Key Takeaways for Putting Coolant in Your Air Conditioner
Adding coolant to your air conditioner requires understanding your system type, following safety protocols, and knowing the legal restrictions. For home AC systems, only EPA-certified technicians can legally handle refrigerant. For automotive systems, DIY recharge kits are legal but provide only temporary relief. Always identify and repair the underlying leak rather than treating low refrigerant as a routine maintenance item. Monitor pressures carefully and verify performance with temperature measurements after charging. With proper care and professional help when needed, your AC can keep you cool for years to come.



