A hot water tank leaking from the overflow pipe signals that your water heater is releasing dangerous internal pressure or heat. This discharge comes from the Temperature and Pressure Relief Valve, a critical safety device designed to prevent tank explosions. Ignoring this leak risks severe flooding, scalding injuries, or catastrophic equipment failure.
This guide helps you diagnose why your system is venting water and provides clear steps to fix it safely. You will learn how to test water pressure, inspect the relief valve, adjust thermostat settings, and determine if you need professional repair or full replacement.
Decode the Overflow Pipe Leak
The pipe dripping water is not a standard drain but a dedicated safety release line for the T&P valve. Its sole purpose is to vent water when internal tank conditions exceed safe operational limits. Under normal circumstances, this pipe remains completely dry at all times.
If you see water flowing here, the valve has activated due to excessive heat or pressure. Common triggers include incoming water pressure above 80 PSI or tank temperatures exceeding 200°F. The leak is a symptom of these dangerous conditions rather than the root problem itself.
What the Discharge Pipe Tells You
The discharge pipe indicates that your safety system is actively working to prevent a rupture. It means the internal pressure has surpassed the 150 PSI threshold or the temperature has reached critical levels.
- Wet Pipe: The valve has opened to release steam or hot water.
- Continuous Drip: The valve may be stuck open or failing to reseal properly.
- Intermittent Flow: Usually points to thermal expansion or pressure spikes during heating cycles.
Immediate Safety Actions
Prioritize safety before attempting any diagnosis or repair on your water heater. Hot water can cause severe burns, and high pressure poses explosion risks.
- Turn off power to electric heaters at the main breaker panel immediately.
- Switch gas units to the “Pilot” setting to stop the burner from firing.
- Shut off the cold water supply using the inlet valve located on top of the tank.
- Place a bucket under the discharge pipe to catch scalding water during inspection.
Never touch the pipe or valve directly while the system is hot. Water exiting the valve can exceed 140°F and cause instant burns.
Test Home Water Pressure

High incoming water pressure is a leading cause of T&P valve activation. If your municipal supply exceeds 80 PSI, it forces the valve open even during normal heating cycles.
Check Static Pressure First
Measuring static pressure is the first diagnostic step to rule out municipal supply issues. You need a standard water pressure gauge available at any hardware store.
- Attach the gauge to an outdoor spigot or washing machine cold water valve.
- Ensure all indoor water fixtures like showers and dishwashers are turned off.
- Open the valve slowly and read the gauge once the needle stabilizes.
Results Interpretation:
* 50–70 PSI: This is the normal and safe operating range.
* Above 80 PSI: Pressure is too high and requires a Pressure Reducing Valve installation.
If your pressure is high, you must install or adjust a PRV at your main water line. This protects your water heater, plumbing fixtures, and appliances from stress damage.
Identify Pressure Spikes
Even with normal static pressure, sudden spikes known as water hammer can trigger the valve. You might hear banging pipes when appliances like washing machines shut off rapidly.
These surges create momentary pressure spikes sufficient to trip the safety valve. Installing water hammer arrestors or ensuring your system has a functional expansion tank solves this issue effectively.
Inspect the T&P Valve
The T&P valve itself may be faulty due to age, corrosion, or mineral buildup. Testing it determines if the component is mechanically sound or if it needs replacement.
Perform a Manual Valve Test
Testing the valve verifies if it opens correctly and reseals tightly after release. Always ensure power and gas are off before starting this procedure.
- Position a sturdy bucket under the discharge pipe to catch hot water.
- Gently lift the test lever on the valve for a few seconds.
- Observe the water flow carefully when you release the lever.
Test Results:
* Good Result: Water gushes out forcefully and stops completely upon release.
* Bad Result: Water continues to drip, indicating the valve cannot reseal.
* Dangerous Result: No water comes out, meaning the valve is stuck closed and unsafe.
If the valve leaks after testing or was already dripping, replace it immediately to ensure safety.
Replace a Faulty T&P Valve
A failed valve is inexpensive to replace but critical for safe operation. Do not attempt to repair the internal mechanism of an old valve.
- Drain two to three gallons from the tank to lower the water level below the valve.
- Use a pipe wrench to unscrew the old valve from the tank fitting.
- Wrap the threads of the new valve with high-temperature pipe thread sealant.
- Install the new valve tightly and reattach the discharge pipe securely.
- Refill the tank, restore power, and check closely for any new leaks.
Pro Tip: Use a valve rated for your specific heater BTU and pressure, typically 150 PSI. Replace this component every 5 to 10 years as preventive maintenance.
Adjust Water Temperature
Overheating causes water to expand rapidly, increasing internal pressure until the valve opens. Many thermostats are set too high by default or malfunction over time.
Lower the Thermostat Setting
Reducing the temperature often stops the leak if overheating is the primary culprit. Gas and electric heaters have different adjustment methods.
For Gas Heaters:
* Turn the dial from “Very Hot” or “C” to “Hot” or “B.”
* Aim for a target range between 120°F and 140°F.
For Electric Heaters:
* Access the thermostat panels after turning off power at the breaker.
* Use a screwdriver to adjust dials down to the 120°F–140°F range.
Wait several hours after adjusting to let the system stabilize. If the leak stops, overheating was the cause of your hot water tank leaking from the overflow pipe.
Prevent Legionella Without Risk
Storing water below 120°F risks Legionella bacteria growth inside the tank. You should never lower the temperature below this safety threshold.
If you want safer tap water at lower temperatures, install a mixing valve at the outlet instead. This allows the tank to stay hot enough to kill bacteria while delivering cooler water to your faucets.
Install or Fix an Expansion Tank
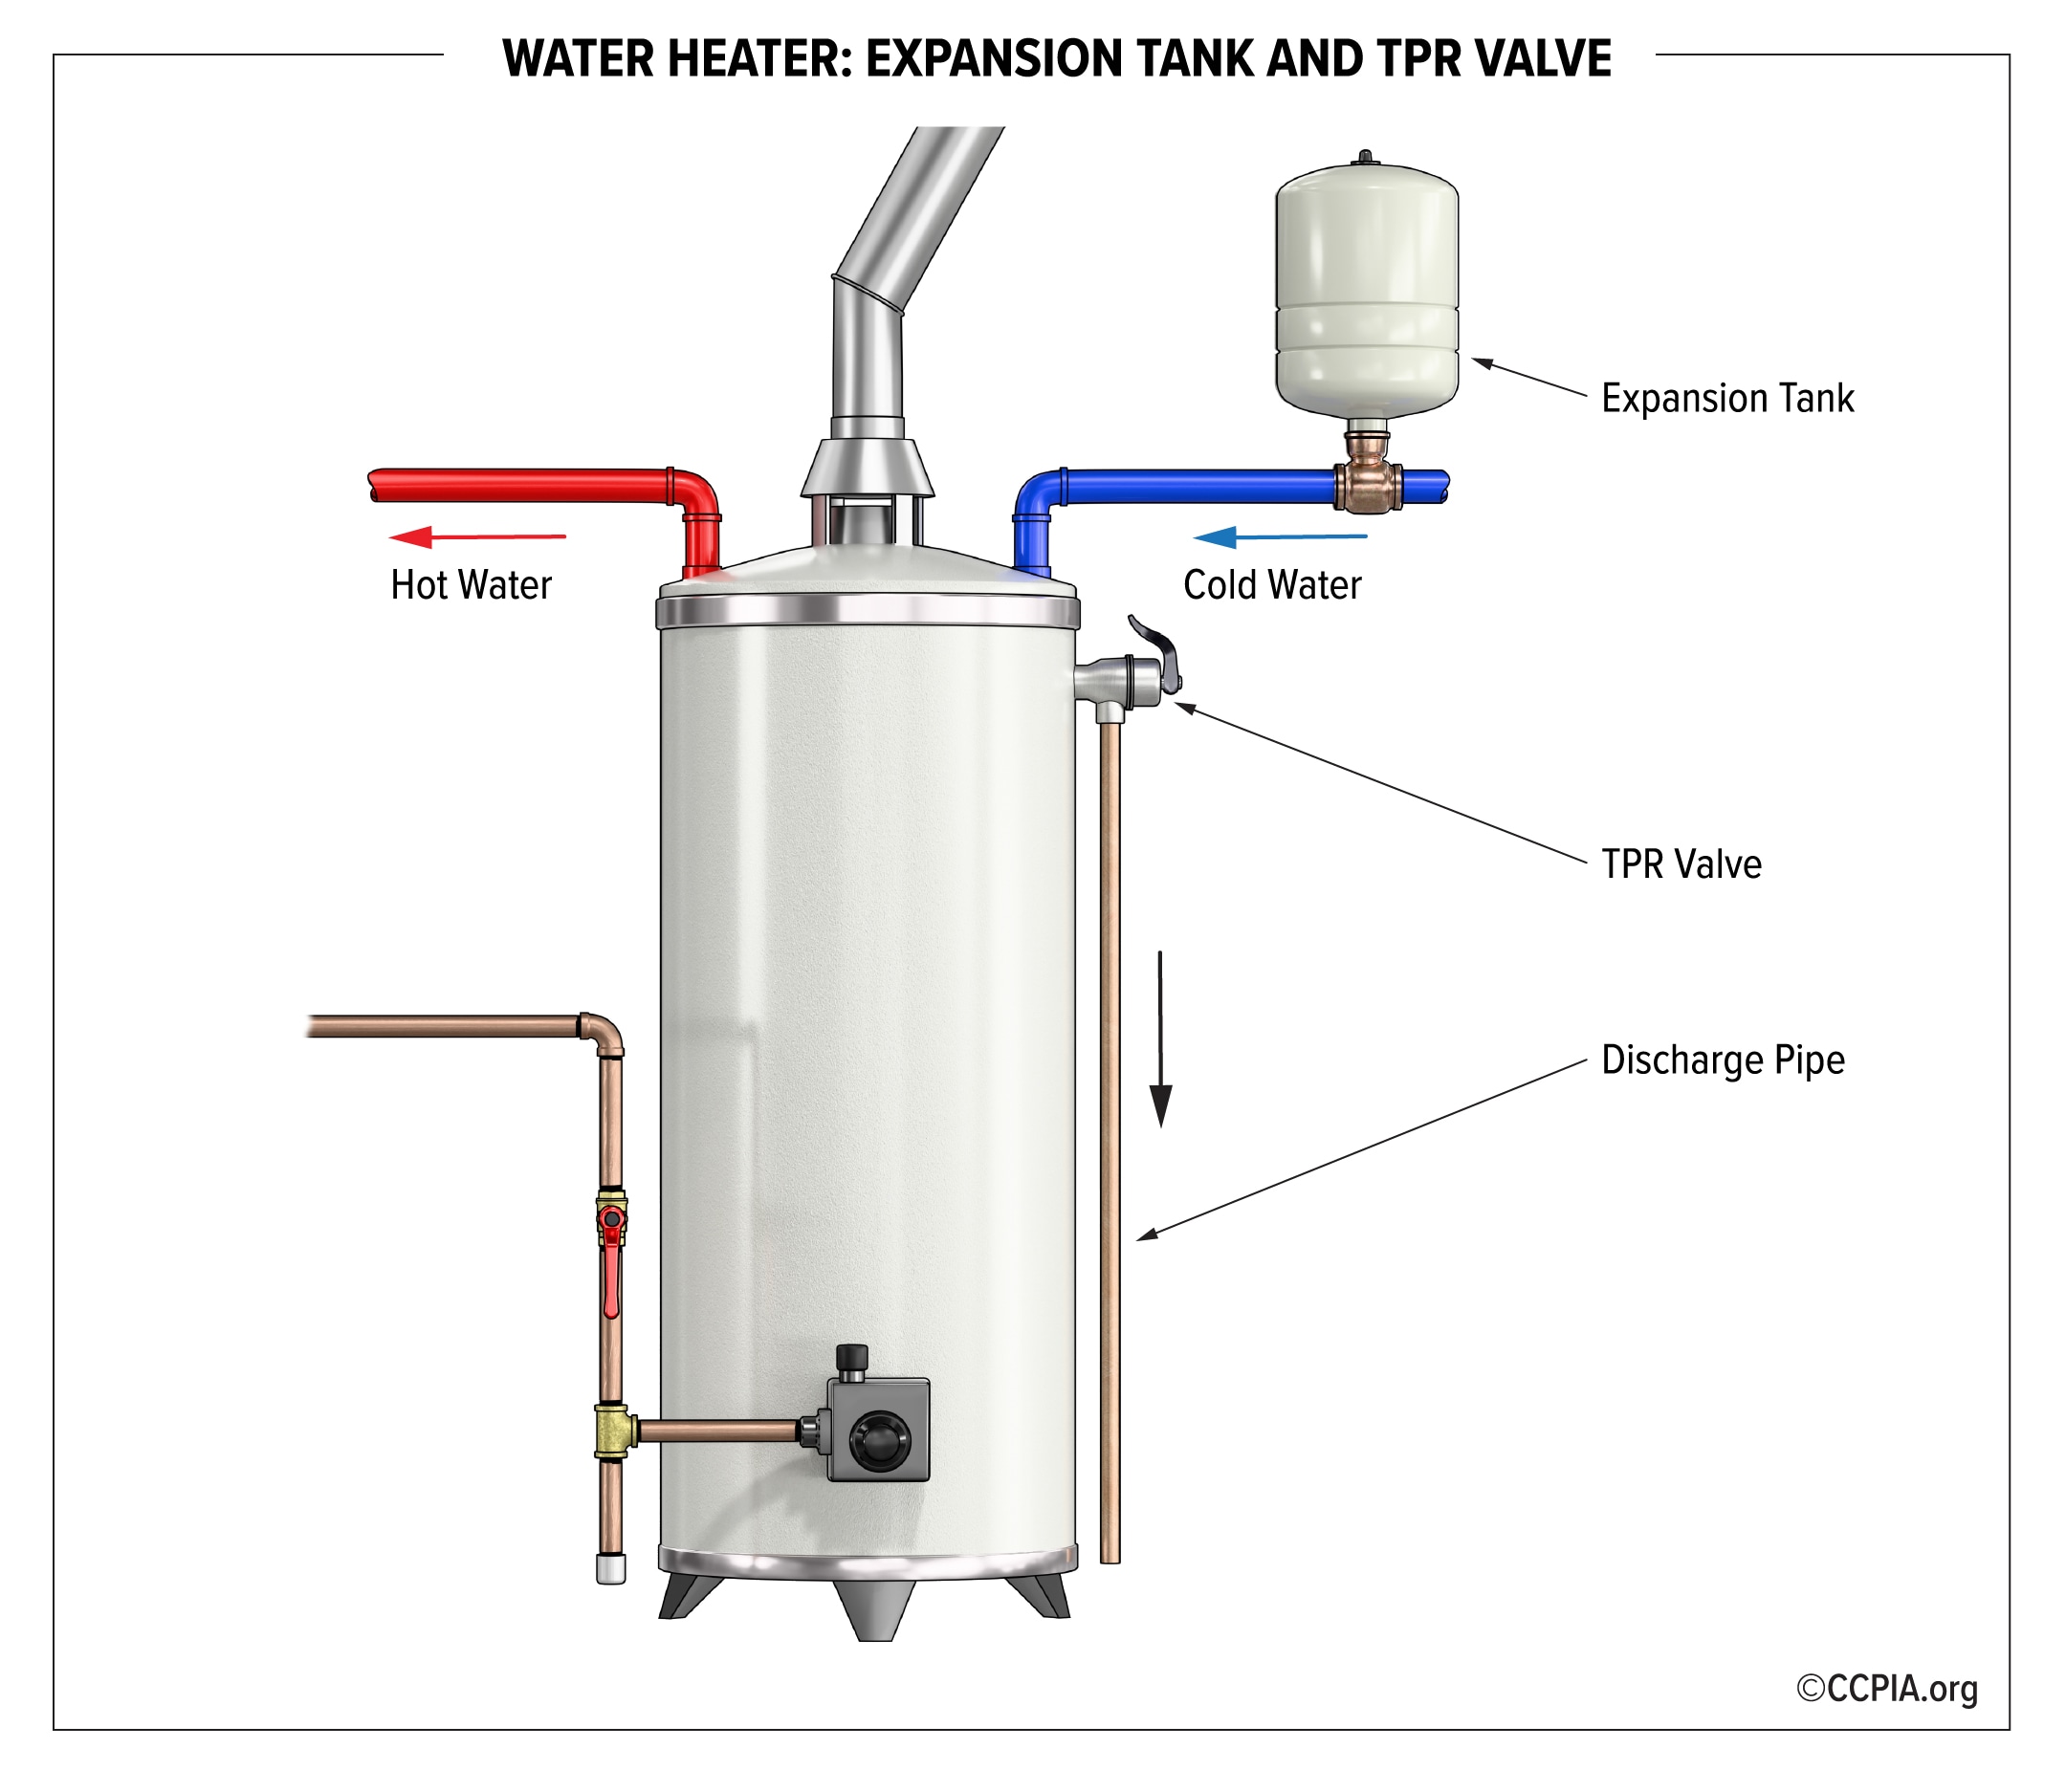
Homes with backflow preventers, check valves, or PRVs have closed plumbing systems. Heated water expands in volume, and without room to expand, pressure builds until the T&P valve opens.
Confirm You Have a Closed System
Check your main water line near the meter for a backflow preventer or PRV. If present, your system is closed and requires an expansion tank to absorb thermal expansion.
- Look for a small spherical tank, usually blue or gray, on the cold water line near the heater.
- If this component is missing, you must install one immediately to stop the leaks.
Test Expansion Tank Function
An expansion tank can fail if the internal bladder ruptures or loses its air charge. A failed tank acts like a solid block of water and cannot absorb pressure.
Two-Step Inspection:
1. Tap Test: Knock on the tank. The top should sound hollow while the bottom sounds solid. If the whole tank sounds solid, it is waterlogged.
2. Pressure Test: Use a tire gauge on the Schrader valve at the top. Air pressure should match your home static pressure, typically 50 to 60 PSI.
If the tank reads 0 PSI or is waterlogged, replace it with a unit sized for your water heater capacity.
Flush Sediment from the Tank
Hard water leaves mineral deposits at the tank bottom that insulate the heating element. This causes localized overheating and steam pockets that trip the T&P valve.
Why Sediment Triggers Leaks
Sediment buildup reduces heating efficiency and creates hot spots at the bottom of the tank. These hot spots generate steam bubbles that increase pressure rapidly.
Flushing the tank removes these deposits and restores normal operation. This maintenance task should be performed annually to prevent future leaks.
Full Tank Flush Procedure
- Turn off power or gas and let the water cool for four to six hours.
- Connect a garden hose to the drain valve and route it to a floor drain.
- Open a hot water faucet upstairs to break the vacuum in the lines.
- Open the drain valve and empty the tank completely.
- Briefly turn on the cold water supply to stir up and flush remaining sediment.
- Repeat until the water runs clear and free of debris.
- Close the drain, disconnect the hose, close the faucet, refill the tank, and restore power.
Diagnose Recurring Leaks

If basic troubleshooting does not stop the leak, you may face systemic issues or an aging unit. Understanding when to repair versus replace saves money and prevents disaster.
Is Your Water Heater Too Old?
Age plays a major role in the decision to repair or replace your system. Internal corrosion becomes likely as the unit approaches the end of its lifespan.
If Under 8 Years Old:
* The issue is likely a fixable component like the T&P valve or expansion tank.
* Repair costs are typically low, ranging from $50 to $150 in parts.
If 10–12+ Years Old:
* Internal corrosion and heavy sediment are probable causes.
* Replacing the valve may only offer a temporary fix before tank failure occurs.
* Recommendation: Replace the entire unit to avoid catastrophic flooding.
When Repairs Keep Failing
Recurring leaks after fixing the valve or expansion tank point to larger systemic issues. Undersized PRVs or incorrect expansion tank charging are common culprits.
Hire a licensed plumber to assess your main line and pressure regulation setup. Whole-house pressure regulation may be necessary to protect your plumbing infrastructure.
Prevent Future Leaks
Consistent maintenance prevents emergency repairs and extends the life of your water heater. Follow a strict schedule to keep your system running safely.
Stick to a Maintenance Schedule
Prevention is far cheaper than emergency water damage restoration. Mark your calendar for these essential tasks.
- Test T&P valve: Lift the lever every 6 months to ensure it moves freely.
- Flush tank: Remove sediment annually to prevent overheating.
- Check expansion tank: Verify air pressure once a year.
- Replace T&P valve: Install a new valve every 5 to 10 years.
- Inspect anode rod: Check every 3 to 6 years depending on water hardness.
Upgrade for Long-Term Reliability
Consider upgrading if your home experiences frequent pressure issues or if your family size has grown. Tankless water heaters eliminate storage tank risks entirely.
These systems provide endless hot water and have no risk of overflow pipe leaks due to tank pressure. Ensure all upgrades meet local plumbing codes and are installed by professionals.
Frequently Asked Questions About Hot Water Tank Leaking from Overflow Pipe
Is it normal for the overflow pipe to drip occasionally?
No, the overflow pipe should remain completely dry under normal operating conditions. Any dripping indicates the T&P valve has activated due to high pressure or temperature, or the valve itself has failed to seal properly.
How much does it cost to fix a leaking T&P valve?
Replacing a T&P valve typically costs between $15 and $30 for the part itself. If you hire a professional plumber, labor costs may bring the total to around $150 to $250 depending on your location.
Can high water pressure cause my water heater to leak?
Yes, municipal water pressure exceeding 80 PSI will force the T&P valve to open. Installing a Pressure Reducing Valve at your main water line solves this issue and protects your plumbing.
What happens if I ignore a leaking overflow pipe?
Ignoring the leak can lead to severe flooding, water damage to your home, and potential tank explosion if the safety valve fails completely. It also indicates your water heater is operating at unsafe pressure or temperature levels.
How often should I replace my T&P relief valve?
Manufacturers recommend replacing the T&P valve every 5 to 10 years as part of routine maintenance. You should also replace it immediately if it fails the manual test or shows signs of corrosion.
Key Takeaways for Fixing a Hot Water Tank Leaking from Overflow Pipe
A hot water tank leaking from the overflow pipe is a serious warning sign that requires immediate attention. By testing your water pressure, inspecting the T&P valve, and ensuring your expansion tank functions correctly, you can often resolve the issue safely. If your unit is over a decade old, replacing the entire system may be the most cost-effective and safest choice.
Do not ignore this leak or attempt to plug the discharge pipe, as this creates a severe explosion hazard. Take action today by testing your system or calling a professional to prevent minor dripping from becoming a major flood.