
Your engine temperature climbs every time you idle in traffic. The radiator fan refuses to kick on. You’re considering connecting the radiator fan directly to the battery to restore cooling fast. Before you grab a jumper wire, stop and read this.
Wiring a radiator fan directly to the battery can work, but only when done correctly and only with the right fan type. Apply power the wrong way and you risk destroying an expensive control module, blowing fuses, or starting a fire. This guide explains exactly how to connect a radiator fan directly to the battery safely, whether you drive a modern ECU-controlled vehicle or a classic car with a simple aftermarket motor.
Know Your Fan Type Before Touching Any Wires
The method for connecting a radiator fan directly to the battery depends entirely on whether you have a modern electronic fan or a basic aftermarket motor. Skipping this step leads to damaged components and wasted time.
Modern E-Fans Have Internal Control Modules
Vehicles built from the 1990s onward, including most BMWs, Mercedes, Audis, and American late-models, use radiator fans with built-in control modules. These fans don’t simply spin when power is applied. They require a specific signal to activate.
A modern E-Fan needs:
– A 12V power supply
– A solid ground connection
– A PWM (pulse-width modulated) or digital activation signal on a third or fourth wire
Apply 12V to the power and ground wires only, and the fan may do nothing because the control module never receives a valid “turn on” command.
Aftermarket Fans Are Simple Motors
Aftermarket fans and those found in classic cars are typically brushed DC motors with no internal electronics. These will spin the moment you connect the positive lead to battery power and the negative lead to ground.
However, direct connection is still not safe for permanent use. Most electric fans pull 15 to 30 amps. Running that current through a dashboard switch or thin factory wire causes heat buildup, melting, and fire risk. A relay is required, not optional.
Test a Modern E-Fan Without Causing Damage
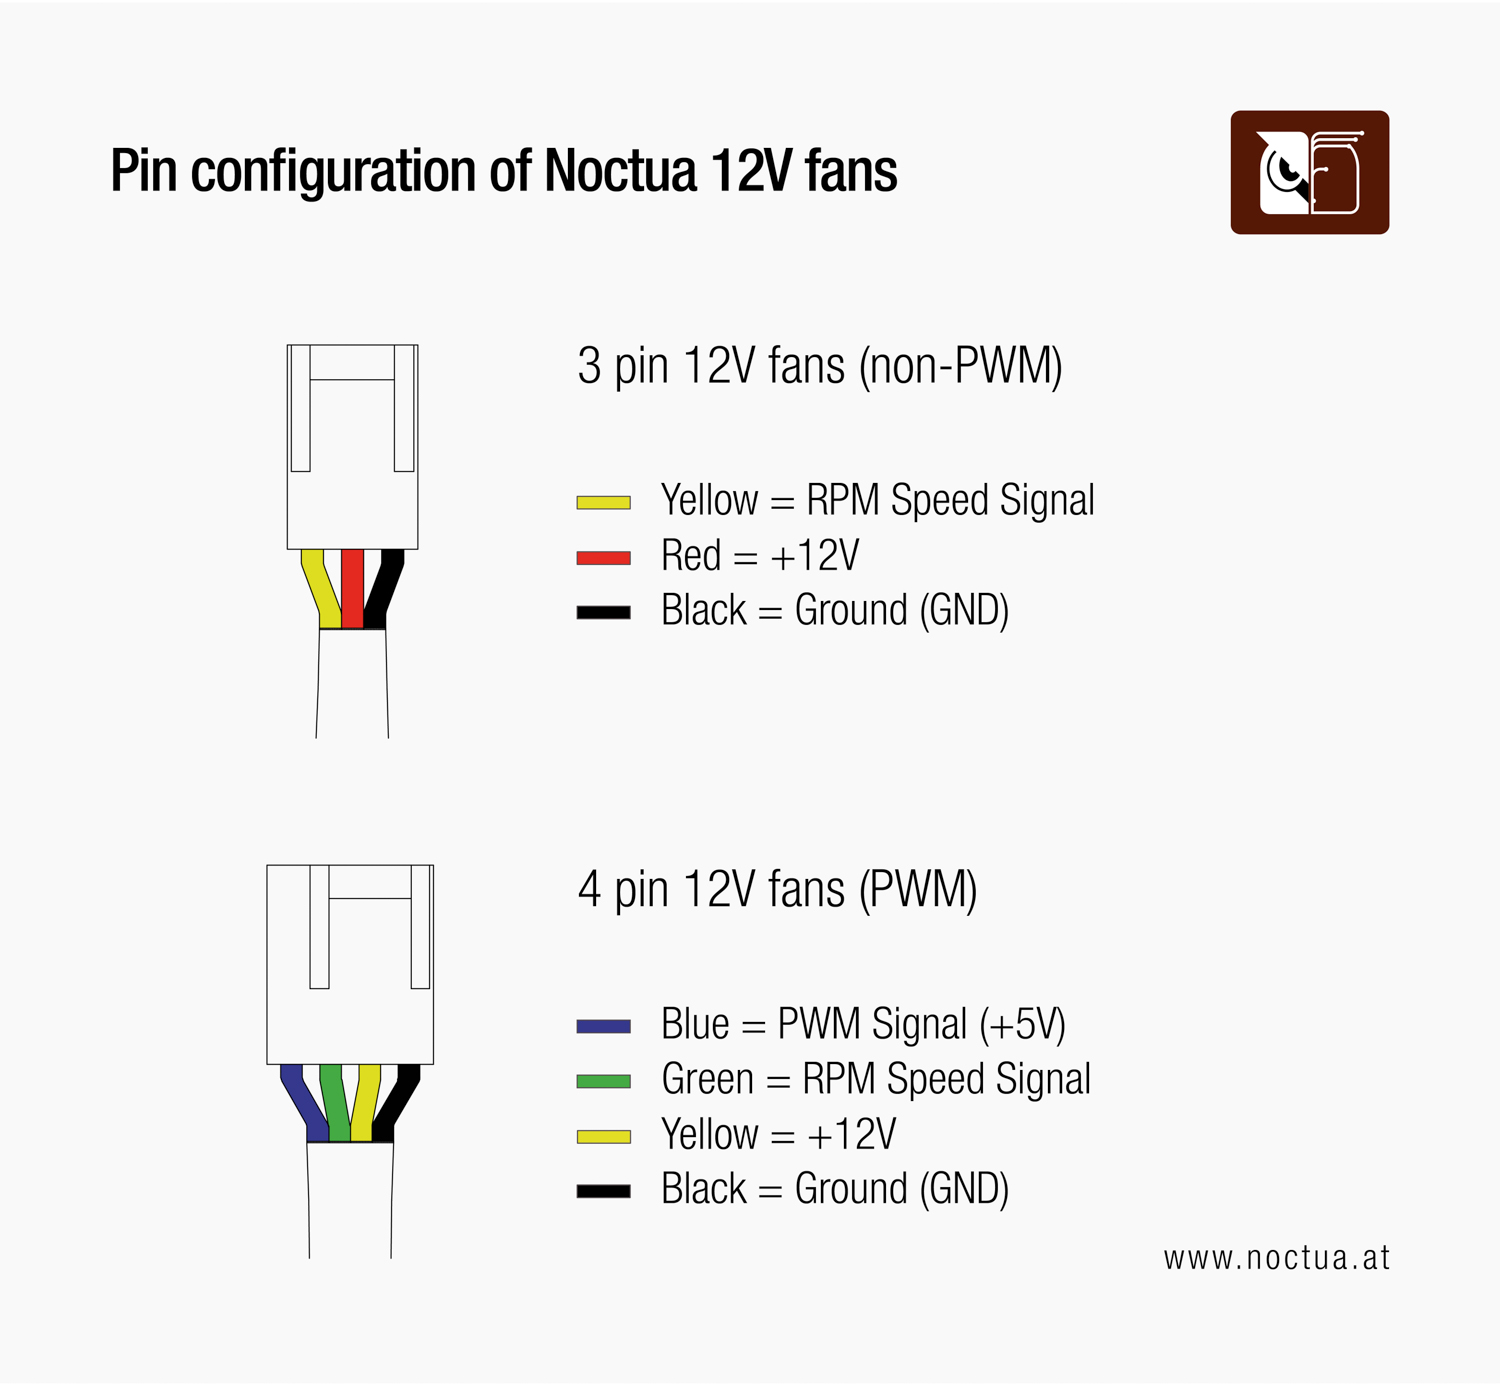
If you want to test whether your modern fan works, never jump the big wires straight to the battery. You risk destroying the fan’s internal module.
Identify the Connector Pins First
A typical 3-pin or 4-pin E-Fan connector includes:
– Thick Red/Blue wire: Main 12V power input
– Thick Brown wire: Ground
– Thin Black/Blue wire: Signal wire for PWM or speed feedback
Never apply voltage to the thin signal wire. It cannot carry power and will be destroyed instantly.
Safe Bench Test Method
To check if the fan motor still works:
1. Disconnect the fan connector from the vehicle harness.
2. Use a multimeter to confirm continuity on the thick power and ground wires.
3. Apply 12V only to the two thick wires on the fan side.
4. Leave the thin signal wire floating with no contact.
Some E-Fans spin at full speed when powered this way. Others stay still. If nothing happens, the fan may simply need a valid signal to run.
Use Diagnostic Software for the Safest Test
The most accurate way to test a modern E-Fan is with OBD2 software like INPA, ISTA, or Foxwell. Connect via a K+DCAN cable, manually activate the fan from the menu, and monitor real-time RPM and error codes. This confirms whether the DME (engine computer) is sending proper commands without any physical wire tampering.
Bypass the Relay Without Bypassing the System
In many modern vehicles, the problem isn’t the fan itself. It’s the fan relay or control circuit. In a BMW E90, for example, the K9137 relay in the E-box frequently fails.
Temporary Power Test Procedure
To diagnose a suspected relay failure:
1. Locate the fan relay using your fuse box diagram.
2. With the ignition on, use a jumper wire to bridge Terminal 30 (power) to Terminal 87 (output).
3. If the fan runs, the relay or its control signal is faulty, not the fan motor.
This sends power directly from the battery through the fuse box to the fan, bypassing the relay switch while still using factory wiring paths. Never leave this jumper installed permanently. Use it only for testing.
Wire an Aftermarket Fan to the Battery Using a Relay
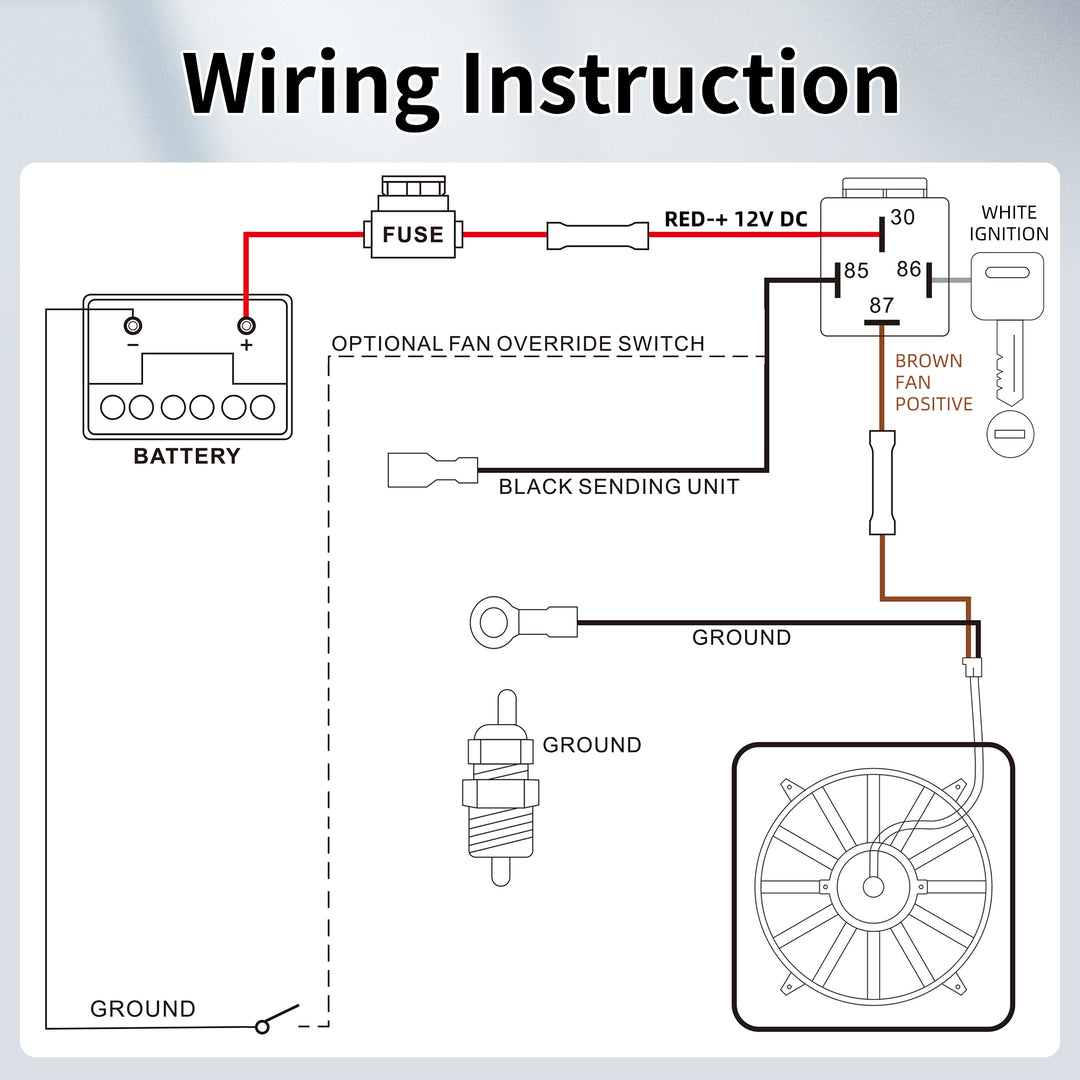
For classic cars, hot rods, or aftermarket upgrades, the correct way to connect a radiator fan directly to the battery is through a relay system. This delivers full power to the fan while protecting your switches and wiring.
Components You Will Need
- SPDT 30/40A automotive relay (ISO mini format)
- 30A fuse and inline fuse holder
- 12-gauge or 14-gauge wire in red, black, orange, and gray
- Temperature switch rated for 185°F activation
- Ring terminals, butt connectors, and dielectric grease
Step-by-Step Wiring Instructions
Run Power from Battery to Relay
Connect a red 12-gauge wire from the battery positive terminal to Terminal 30 on the relay. Install a 30A fuse within 12 inches of the battery. This is the high-current path, so keep it short and fused.
Connect the Fan to the Relay
Run a second red wire from Terminal 87 on the relay to the positive terminal of the fan. Connect the fan’s negative terminal to a clean, bare metal point on the chassis or directly to the battery negative.
Set Up the Trigger Circuit
Connect an orange wire from Terminal 86 on the relay to a 12V source that is active only when the ignition is on, such as a fuse box tap or ignition harness. This prevents the fan from running when the engine is off.
Wire the Temperature Switch
Connect a gray wire from Terminal 85 on the relay to one side of the temperature switch. Ground the other side of the switch. When coolant reaches approximately 185°F, the switch closes, completes the circuit, and activates the relay.
Test the Complete System
Start the engine and let it warm up. The fan should activate around 185°F and shut off near 165°F. If it doesn’t, check your ground connection, fuse integrity, and switch continuity.
Wire Dual Fans With Two Separate Relays
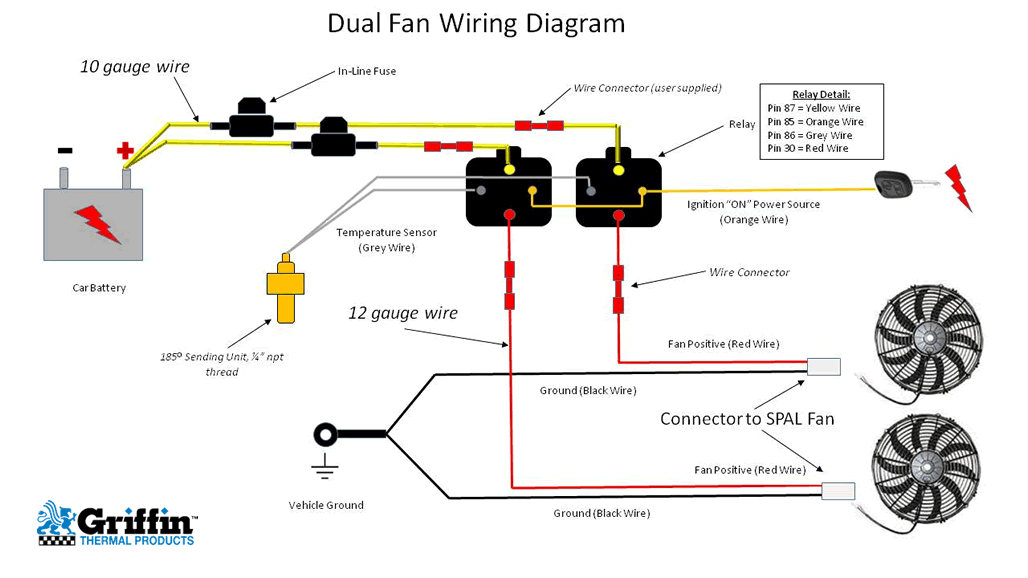
Running two cooling fans requires two relays. Don’t daisy-chain them on a single relay circuit.
Why Two Relays Are Necessary
Each fan draws 20+ amps on its own. Combined draw reaches 40 to 60A. A single relay will overheat and fail under that load. If one fan shorts out, it could kill the other fan as well.
Recommended Setup
Give each fan its own relay, fuse, and dedicated power wire from the battery. Both relays share the same ignition trigger (orange wire) and temperature switch (gray wire). Mount relays securely in locations protected from heat and water exposure.
This configuration provides redundancy, cooler operation, and better long-term reliability for high-performance applications.
Use a No-Cut Relay Harness for Classic Cars

In classics like the Ferrari 512TR, 456, or 550, the factory fuse board often becomes a failure point. Arcing and melting occur due to high fan and fuel pump loads cycling through decades-old components.
How the No-Splice Harness Works
A no-cut relay harness bypasses the original wiring without cutting a single factory wire. The harness plugs into the stock fan connector and uses the original wiring only as a low-current trigger signal. When the factory system commands the fan on, it activates a 70A high-power relay that sends direct battery power to the fan motor.
Key Benefits for Vintage Vehicles
- No permanent modification keeps the installation fully reversible
- Eliminates voltage drop caused by aged factory wiring
- Preserves concours value for collectors and judges
- Improves cooling response in stop-and-go traffic
This approach is ideal for any classic car where originality matters but reliability is also critical.
Why You Should Never Hardwire a Fan Directly to the Battery Permanently
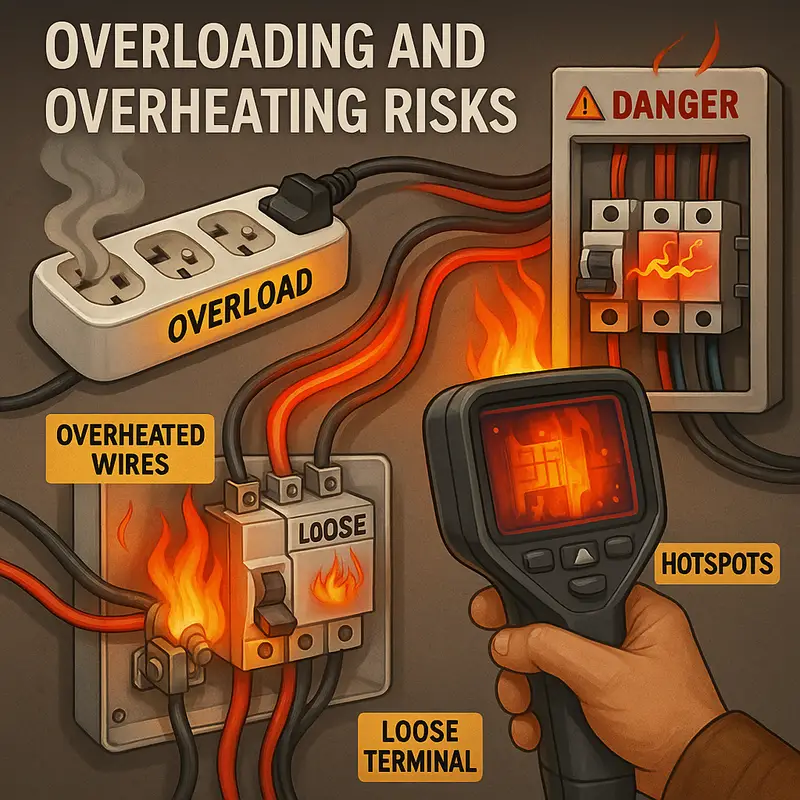
You might consider running two simple wires from the fan to the battery and calling it done. Don’t take that shortcut.
Risks of Permanent Direct Connection
- Battery drain occurs because the fan runs 24/7
- Overheating wires can cause fire if no fuse is present
- Melting switches happen when a dash switch carries 20+ amps
- No temperature control means the fan runs constantly or never
How a Relay Solves Every Problem
A relay handles high current safely, allows use of low-current switches or sensors, enables automatic on/off based on coolant temperature, and protects the rest of your vehicle’s electrical system from damage.
Troubleshoot Fan Problems Quickly
Use this reference table to diagnose common issues fast.
| Symptom | Likely Cause | Fix |
|---|---|---|
| Fan doesn’t run | Blown fuse, bad relay, no power | Check fuse; test relay with 12V on terminals 85/86 |
| Fan runs constantly | Stuck relay or grounded trigger wire | Disconnect temp switch; if fan stops, replace it |
| Fan is slow | Weak battery, bad ground, low voltage | Clean ground point; check wiring gauge |
| Fuse blows instantly | Shorted motor or chafed wire | Disconnect fan; check resistance |
| Switch is hot or melting | Direct current load on switch | Install relay so switch only carries trigger current |
Pro Tip: Always test a suspect relay by applying 12V between terminals 85 and 86. You should hear a click. If not, replace the relay immediately.
Check Your Alternator and Charging System
Adding electric fans increases electrical load. A weak alternator cannot keep up with the demand.
Know Your Total Draw
- Single fan: 15 to 25A
- Dual fans: 30 to 50A
- Total system load (lights, ignition, A/C): 20 to 40A
If your stock alternator produces 60A and total demand hits 70A, the battery will drain, especially at idle.
Upgrade When Necessary
For dual fans or high-performance builds, install a 100A+ alternator. Check voltage with the engine running. It should read between 13.8V and 14.4V. If voltage drops below 13V at idle with fans running, upgrade your alternator.
Maintain Your Fan System for Long-Term Reliability
Even the best installation fails without proper maintenance.
Five Critical Checks
- Fuses: Replace with the correct amperage rating (30A typical). Never install a higher-rated fuse.
- Grounds: Clean and tighten fan and relay ground points. Paint and rust destroy conductivity.
- Connections: Perform a wiggle test on all wires. Loose terminals cause arcing and heat.
- Dielectric grease: Apply to all connectors to prevent corrosion in the engine bay.
- Relay health: Swap relays if the fan acts up. It’s the cheapest and fastest diagnostic test.
Frequently Asked Questions About Connecting a Radiator Fan to a Battery
Can I connect a radiator fan directly to a battery without a relay?
No. Electric fans draw 15 to 30 amps, which will melt switches and overload thin wiring. A relay is required to handle the high current safely while a low-current switch or sensor triggers it.
Will a modern E-Fan spin if I connect it straight to the battery?
Usually not. Modern E-Fans have internal control modules that require a PWM or digital signal on a thin wire. Without that signal, the fan may stay still even with power and ground connected.
What gauge wire do I need to connect a radiator fan to a battery?
Use 12-gauge or 14-gauge wire for fan circuits drawing 15 to 30 amps. Thinner wire causes voltage drop, overheating, and potential fire hazards.
Where should I place the fuse when wiring a fan to the battery?
Install the fuse within 12 inches of the battery positive terminal. This protects the entire wire run from short circuits and is a critical safety requirement.
What temperature should the fan turn on at?
A standard temperature switch closes at approximately 185°F (85°C) and opens again near 165°F (74°C). This range keeps the engine in its optimal operating temperature.
Can I wire two fans to one relay?
Only if their combined draw stays under 15 amps. For most dual-fan setups, use two separate relays with individual fuses to prevent overheating and ensure redundancy.
Key Takeaways for Connecting Your Radiator Fan to the Battery
Connecting a radiator fan directly to the battery works only through a properly installed relay system. Never hardwire a modern E-Fan directly, as it may not function and could suffer permanent damage. For aftermarket fans, use a relay, fused power line, ignition trigger, and temperature switch for safe automatic operation. Classic cars with failing fuse boards benefit from no-cut relay harnesses that preserve originality while solving electrical issues.
Before starting any work, verify that your alternator can handle the additional load. A weak charging system will leave you stranded with a dead battery. Once installed, perform regular maintenance on grounds, fuses, and relays to keep your cooling system reliable for years to come.
Your next step: Identify your fan type using the connector guide above, then gather the correct relay kit and wire gauge before making any connections.



