
Steam radiators quietly heat millions of homes, but their performance depends on more than just turning on the boiler. Over time, dust, grime, and mineral buildup coat their surfaces and clog internal components, reducing efficiency, raising energy bills, and circulating allergens into your living space. Learning how to clean steam radiator systems properly is essential for maintaining peak performance, indoor air quality, and long-term durability. This guide walks you through every step, from routine wiping to deep sanitizing and vent maintenance, using proven, safe methods backed by technical and health standards.
Shut Off the System Safely Before Cleaning
Before any cleaning begins, safety comes first. A live steam radiator can cause serious burns, and introducing moisture to a hot unit may damage the system.
Confirm the Radiator Is Cool
Wait several hours after turning off the heating system. Touch the radiator with the back of your hand to verify it has cooled completely. Never attempt cleaning while steam is active or the unit is warm.
Isolate the Radiator When Possible
Close the supply valve at the base by turning the knob clockwise until tight. This prevents accidental steam flow during cleaning. If no valve exists, lower the thermostat to avoid system activation.
Remove Surface Dust and Debris
Dust buildup insulates the radiator, reducing heat output by up to 10%. Start with dry cleaning to avoid baking dirt into warm metal.
Vacuum Between Fins and Underneath
Use a vacuum cleaner with a brush attachment to remove loose dust from the front, back, between vertical fins, and beneath the unit. Focus especially on the rear wall behind the radiator, where heat and moisture promote bacterial growth.
Wipe Down Exterior Surfaces
Dampen a microfiber cloth with water or mild soapy solution. Wipe all exposed metal surfaces, including sides and top. Avoid abrasive pads or harsh chemicals that could damage the finish.
Dry the Radiator Immediately
Use a dry towel to wipe away moisture. Trapped water on iron or steel radiators can lead to rust, shortening the unit’s lifespan.
Deep Clean with Steam for Thorough Sanitization
For annual deep cleaning, especially before winter, steam is the most effective method to sanitize and reach hidden areas.
Why Steam Cleaning Works
Steam penetrates between fins and behind the unit, dissolving grease and killing bacteria like MRSA and C. Difficile without chemicals. It is safe for homes with children, pets, and allergy sufferers.
Gather Steam Cleaning Tools
You will need a handheld or upright steam cleaner, a narrow nozzle or detail attachment, a soft brush attachment, a radiator fin brush (long and flexible), and dry cloths.
Apply Steam to Interior Fins
- Slide the nozzle between the fins, moving slowly to allow steam to penetrate.
- Target the back of the radiator, which harbors the most dust and microbes.
- Use a fin brush to gently dislodge stubborn debris after steaming.
- If your steamer has suction, use it to extract loosened grime.
Dry All Metal Surfaces
Wipe down every section with a dry cloth immediately after steaming. Prevent condensation from sitting on metal to avoid corrosion.
Reassemble and Test the System
Reinstall any grills or covers you removed. Turn the heating system back on and listen for normal operation, with no banging or hissing sounds.
Clean or Replace Clogged Air Vents

Clogged air vents are the leading cause of inefficient heating and noisy radiators. Single-pipe systems rely on these vents to release air and allow steam in.
Locate the Air Vent
Found on the opposite end from the supply valve, the vent is typically bullet-shaped. It must point straight up to function correctly.
Remove the Vent Safely
Use an open-end wrench to unscrew the vent counterclockwise. Wear gloves if the radiator was recently warm.
Soak the Vent in Hot Vinegar
- Heat white vinegar in a small pot without boiling.
- Submerge the vent for 30 minutes.
- Vinegar dissolves mineral deposits and rust clogging the mechanism.
Test Vent Function
Rinse with cold water, then try blowing through it. Air should pass freely when cool. When heated, the internal mechanism should close to trap steam.
Replace the Vent if Needed
If the vent fails the airflow test or does not respond to temperature changes, install a new one. Reusing a faulty vent leads to uneven heating and noise.
Reinstall with Teflon Tape
Wrap three loops of plumber’s tape clockwise around the threads. Screw the vent in by hand, then tighten a quarter-turn with a wrench. Ensure it remains upright.
Prevent Rust and Corrosion on Radiator Surfaces
Rust weakens radiators and reduces efficiency. Catch it early during routine cleaning.
Spot and Treat Rust Early
Look for reddish flaking, especially near valves or on lower sections. Use fine-grit sandpaper to remove loose rust.
Apply a Protective Coating
After sanding, wipe clean with a dry cloth, apply rust-inhibiting primer, and finish with heat-resistant radiator paint. Avoid painting over valves or vents.
Fix Leaky Valves with Repacking
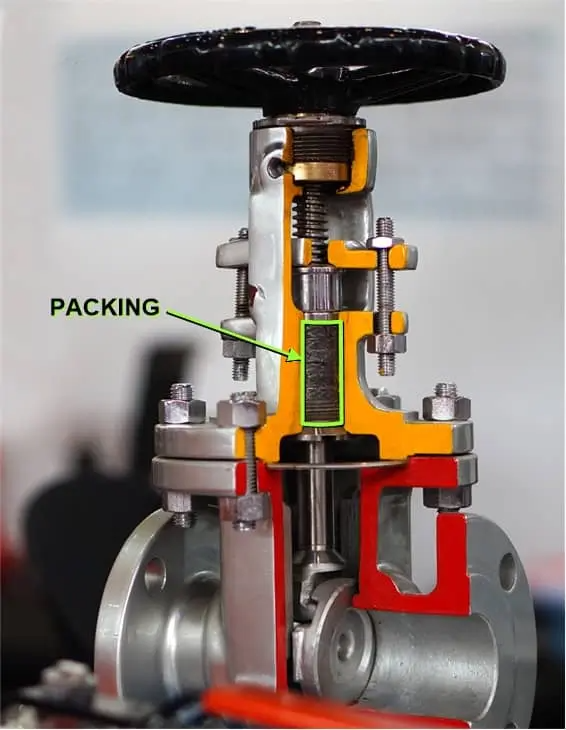
A steady drip from the base valve means the packing has worn out and needs replacement.
Shut Off and Depressurize the System
Ensure the supply valve is closed and the system is off before beginning work.
Remove the Handle and Packing Nut
Take off the valve handle. Use an adjustable wrench to loosen and remove the hexagonal packing nut.
Install New Packing Material
Wrap graphite-impregnated packing string around the valve stem once or twice. This creates a steam-tight seal.
Reassemble and Test for Leaks
Replace the nut and tighten gently. Reattach the handle. Turn the system on and check for leaks. A small drip should stop once the packing swells with heat.
Optimize Radiator Tilt for Proper Drainage

Improper slope causes water hammer, which produces loud banging when steam hits pooled condensate.
Check the Slope Direction
The radiator should tilt slightly (about 1/4 inch per foot) toward the inlet pipe where steam enters. This allows condensation to flow back to the boiler.
Adjust Mounting Brackets if Needed
Loosen the wall brackets slightly. Insert thin shims under the far end to create the correct angle. Retighten and test during the next heating cycle.
Monitor Boiler System Health Annually
Steam radiator performance starts at the boiler. Check these key points once a year.
Verify the Water Level
Use the gauge glass on the boiler. The water should sit between the two marked lines. Too low risks overheating; too high can cause water carryover.
Inspect the Combustion Chamber
Soot and debris reduce efficiency and increase fire risk. Hire a professional HVAC technician for annual cleaning.
Check Operating Pressure
Residential systems should run below 0.5 psi. Higher pressure causes excessive noise and strain. Adjust via the pressuretrol if needed, or call a technician.
Troubleshoot Common Radiator Problems
:max_bytes(150000):strip_icc()/Steam-radiator-air-vents-1824733_final-61b1ca142f9346e6af3595f9a59dd8ce.png)
Use this quick-reference guide to diagnose issues after cleaning.
Hissing Sound from the Radiator
A faulty or missing air vent causes continuous steam escape. Replace the vent to stop the hissing.
Banging or Clanging Noise
Water hammer occurs when steam hits pooled condensate. Adjust radiator tilt toward the inlet pipe and clean the vent to ensure proper drainage.
Whistling Noise
A partially open supply valve creates turbulence. Open the valve fully or close it completely; never leave it halfway.
Cold Spots on the Radiator
Trapped air or a clogged vent causes uneven heating. Clean or replace the air vent and ensure it stands upright and unobstructed.
Radiator Leaks at the Valve
Worn packing or a loose nut causes leaks. Repack the valve or tighten the packing nut slightly.
Low Heat Output
Dust buildup, low boiler pressure, or a blocked vent reduces heat. Deep clean the radiator, check boiler pressure, and test or replace the air vent.
Maintain Efficiency Year-Round
Regular upkeep keeps your system running quietly and efficiently through every season.
Schedule Annual Deep Cleaning
Clean every radiator once a year, ideally in early fall before heating season begins. This improves air quality and prevents allergens from circulating.
Vacuum Monthly
Use the brush attachment to remove dust around and under radiators, especially in high-traffic areas.
Wipe Exteriors in Spring
After turning off the heat, give radiators a quick wipe to remove winter grime before dust settles during summer.
Replace Air Vents Proactively
Even with cleaning, vents wear out. Replace them every 3 to 5 years to maintain performance.
Frequently Asked Questions About Steam Radiator Cleaning
How often should you clean a steam radiator?
You should deep clean a steam radiator once a year, ideally in early fall before the heating season begins. Monthly vacuuming and seasonal exterior wiping help maintain efficiency between deep cleans.
Can you use vinegar to clean a steam radiator?
Yes, vinegar works well for cleaning air vents. Soak the removed vent in hot white vinegar for 30 minutes to dissolve mineral deposits and rust. Avoid using vinegar on painted exterior surfaces, as it may damage the finish.
Is steam cleaning safe for old radiators?
Steam cleaning is safe for most radiators made of iron, steel, aluminum, or copper. Ensure the unit is cool before cleaning and dry all metal surfaces immediately afterward to prevent rust formation.
Why is my steam radiator making noise after cleaning?
Noise after cleaning usually indicates an improperly installed air vent, incorrect radiator tilt, or a partially open supply valve. Verify the vent points straight up, the radiator tilts toward the inlet pipe, and the valve is fully open or closed.
Do steam radiators need professional servicing?
Yes, the boiler’s combustion chamber requires annual professional cleaning to remove soot and prevent fire hazards. DIY cleaning works well for radiators, vents, and valves, but gas components should be handled by licensed HVAC technicians.
Key Takeaways for Cleaning Your Steam Radiator
Knowing how to clean steam radiator systems saves money, improves air quality, and extends equipment life. Start by shutting off the system and removing surface dust with a vacuum and damp cloth. Use steam annually to sanitize hard-to-reach areas and kill bacteria without chemicals. Clean or replace air vents every 3 to 5 years, since clogged vents cause most heating problems. Finally, inspect for rust, repack leaky valves, and verify proper tilt to prevent water hammer. Schedule your next deep clean in early fall, and consult a licensed HVAC professional for any boiler or gas component work to keep your system running safely for decades.



