

If your coolant temperature isn’t rising, your engine isn’t reaching its optimal operating range between 195°F and 205°F. This means reduced fuel efficiency, increased emissions, and accelerated engine wear. You might notice weak heater output, poor idle quality, or a check engine light with code P0128. The good news is that most causes are simple to diagnose and fix yourself. This guide walks you through every possible cause, how to test each component, and exactly how to restore proper engine temperature.
Stuck Open Thermostat: The Primary Cause
The thermostat is the number one reason coolant temperature fails to rise. It controls coolant flow between the engine and radiator. When stuck open, coolant circulates continuously through the radiator, preventing the engine from reaching operating temperature.
How a Thermostat Should Work
A thermostat regulates engine warm-up through three phases. First, when the engine is cold, the valve stays closed and coolant recirculates internally. Second, as the engine warms, a wax pellet expands at approximately 195°F, opening the valve. Third, during normal operation, coolant flows through the radiator only when needed to maintain temperature. If the thermostat opens too early or won’t close properly, the engine never heats up.
Signs of a Faulty Thermostat
Watch for these indicators that your thermostat may be stuck open. The temperature gauge stays in the lower third even after 10 minutes of driving. The upper radiator hose remains cool while the engine runs. Highway driving causes temperatures to drop further, sometimes to 120°F to 150°F. Replacing the thermostat with an aftermarket unit didn’t solve the problem.
Test With Boiling Water

You can verify thermostat operation with a simple test. Remove the thermostat and place it in a pot of water. Add a thermometer and heat the water slowly. Watch for the thermostat to open at its rated temperature, with full opening occurring 20°F to 25°F above that point. Replace the thermostat if it opens early, doesn’t seal properly when cooled, or fails to move at all.
Pro Tip: Aftermarket thermostats from brands like Stant or Murray often open 10°F to 20°F below their rated temperature. Use OEM or genuine manufacturer units for accurate performance.
Install the Thermostat Correctly
Proper installation prevents future problems. The spring and bulb end must face into the engine, not toward the radiator. Use a new gasket or O-ring every time. Lubricate the seal with a small amount of motor oil before installing. Torque the housing bolts evenly to specification, avoiding overtightening that could crack the housing.
Faulty Coolant Temperature Sensor
Even when the engine actually warms up, a bad sensor can make it seem cold to the engine control unit. This causes the ECU to continue treating the engine as cold, affecting multiple systems.
What the CTS Controls
The coolant temperature sensor impacts several critical functions. It determines fuel mixture enrichment during cold starts. It controls ignition timing advance. It activates cooling fans at the correct temperature. It regulates idle speed during warm-up. If the sensor reads too low, the ECU keeps the engine in cold enrichment mode.
Symptoms of a Bad CTS
Watch for these warning signs. The check engine light illuminates with codes P0115 through P0118. Fuel economy drops despite normal driving habits. The heater works weakly and cooling fans turn on too soon. A scan tool shows 150°F when the engine actually feels hot to the touch.
Diagnose With Live Data

Connect an OBD2 scanner and compare the coolant temperature reading to an infrared thermometer reading on the thermostat housing. If there’s more than a 5°F to 10°F difference, suspect a faulty sensor. You can also test resistance by unplugging the sensor and measuring with a multimeter. Cold sensors around 70°F should show 2,000 to 3,000 ohms, while hot sensors around 200°F show 200 to 300 ohms.
Warning: A failing CTS causes false cold-start enrichment, which can wash down cylinder walls and dilute the engine oil, leading to long-term damage.
Radiator Fan Running Constantly
If your radiator fan runs nonstop, it overcools the engine, especially during idle. This prevents normal warm-up and keeps temperatures too low.
Why Fans Should Stay Off During Warm-Up
Radiator fans are designed to activate at approximately 220°F and shut off when temperature drops about 20°F below that point. They should remain completely off during engine warm-up. If they run immediately after a cold start, something in the system is malfunctioning.
Common Causes of Continuous Fan Operation
Several issues can cause fans to run when they shouldn’t. A stuck relay has fused closed and constantly sends power. A bad fan control module sends continuous power signals. Wiring shorts bypass normal control circuits. A faulty CTS tells the ECU the engine is hot when it’s actually cold.
How to Check Fan Operation
Start the engine cold and watch the fan. It should stay off for at least 5 to 10 minutes. Use a test light or multimeter at the relay to check for power. No power should be present until the engine reaches operating temperature. If your scan tool supports it, perform a fan control test to verify proper operation.
Note: A constantly running fan can drop coolant temperatures 30°F to 50°F below normal, mimicking a stuck-open thermostat.
Coolant Bypass From Leaks and Seal Damage
Even a working thermostat can fail if coolant bypasses it due to leaks in the system. This creates a path for coolant to skip the thermostat entirely, preventing proper temperature regulation.
Where Bypass Happens
Coolant can escape past the thermostat in several places. The rubber seal on the thermostat may be missing, damaged, or improperly seated. The thermostat housing might be cracked, warped, or corroded. The gasket or O-ring could be degraded or seated incorrectly. Bolts may be loose, preventing full sealing pressure.
How to Inspect for Leaks
Remove the thermostat housing and check carefully. Verify the rubber seal is intact and properly seated in its groove. Inspect the housing mating surface for flatness and cracks. Look for coolant tracks or deposits that indicate seepage. Check that bolts are tight and threads are undamaged.
Repair Steps
Replace any damaged housing rather than attempting to repair warped metal. Use a new gasket every time you reinstall the thermostat. Torque bolts to specification in a crisscross pattern for even sealing. Clean sealing surfaces with proper gasket remover, leaving no debris behind.
Expert Note: Some bypass leaks don’t drip externally. Internal leakage is silent but just as damaging to temperature regulation.
Cold Weather Effects Versus Mechanical Faults
Cold climates naturally slow engine warm-up, but they shouldn’t prevent it from reaching normal operating temperature entirely.
What’s Normal in Winter
Expect longer warm-up times during cold weather. The engine may take 10 to 20 minutes to reach 195°F. Heater output improves after highway driving. Temperature eventually stabilizes within the normal range during extended drives.
What’s Not Normal
These symptoms indicate a mechanical problem rather than cold weather. Temperature never exceeds 180°F even after 20 minutes of driving. There’s no heat from the vents during extended drives. The engine feels cold even after long highway trips.
How to Tell the Difference
Drive at highway speed for 20 or more minutes. Use an infrared thermometer on the thermostat housing. If it reads below 190°F, you have a mechanical issue that needs repair rather than a weather-related delay.
Prevent Cold-Weather Problems
Use an engine block heater in sub-freezing temperatures. Install a radiator cover or grille block to reduce airflow. Avoid short trips that don’t allow the engine to fully warm up. Remove grille blocks in spring to prevent overheating.
Case Study: 2000 GMC Sierra 1500
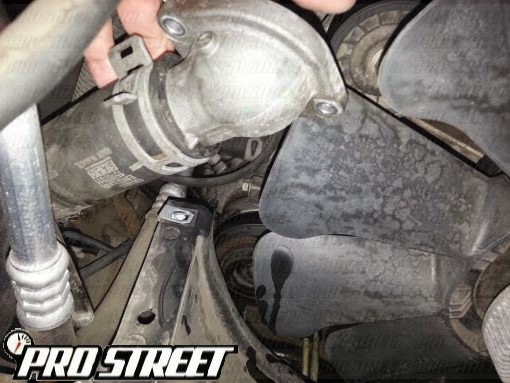
This common example demonstrates why part quality matters when fixing coolant temperature issues.
The Problem
The truck had its thermostat replaced three times without success. Temperature remained stuck below 180°F even after driving. Both scan tool data and infrared gun readings confirmed the engine was running cold.
Diagnosis Steps
Technicians verified correct thermostat installation with the bulb end facing the engine. The housing was inspected and showed no cracks or warping. The thermostat was removed and tested in boiling water, where it opened at 170°F instead of its rated 195°F.
Root Cause
The aftermarket thermostats were miscalibrated. They appeared functional but failed to open at the correct temperature, allowing continuous coolant flow through the radiator.
The Fix
A genuine GM 195°F thermostat was installed. The O-ring was lubricated with motor oil. The lower hose was reconnected securely with the bracket properly positioned.
Result
The engine reached 195°F within 5 minutes of startup. Temperature held steady under all driving conditions. The P0128 code cleared after one complete drive cycle.
Lesson: Never assume a new part is good simply because it’s new. Always test thermostats before and after installation.
Step-by-Step Thermostat Replacement
Replacing the thermostat is often the fastest fix for coolant temperature problems. Follow these steps for a successful repair.
Tools You Will Need
Gather these items before starting. A socket set with 10mm sockets. Basic wrenches. A drain pan. A funnel. A new thermostat rated at 195°F. A new gasket or O-ring. 50/50 pre-mixed coolant. A small amount of motor oil for O-ring lubrication.
1. Let the Engine Cool Completely
Never open the cooling system when the engine is hot. Wait several hours after shutdown to avoid scalding and allow the thermostat to close for proper removal.
2. Drain the Coolant
Open the radiator petcock or loosen the lower radiator hose. Catch the coolant in a pan. Dispose of old coolant properly by recycling it at an approved facility.
3. Access the Thermostat Housing
The thermostat housing is typically located at the end of the upper or lower radiator hose. On many vehicles like the 2000 GMC Sierra, it’s integrated into the lower hose neck near the water pump. Remove any components blocking access, such as air intake tubes.
4. Remove the Old Thermostat
Unbolt the housing and pull it away. Remove the old thermostat and gasket. Inspect the cavity for debris or corrosion. Clean any residue from the housing and engine surfaces.
5. Install the New Thermostat
Insert the new thermostat with the spring and bulb facing the engine. Apply a light coat of motor oil to the new O-ring for easier installation and better sealing. Position the new gasket precisely in its groove.
6. Reassemble Everything
Reattach the housing and tighten the bolts evenly to specification. Reconnect the radiator hose and secure the clamp firmly. Reinstall any components removed for access.
7. Refill and Bleed Air
Close the drain valve. Fill the reservoir and radiator with 50/50 coolant mixture. Bleed air by running the engine with the cap off until the thermostat opens and coolant flows. Squeeze the upper hose to release trapped bubbles. Turn the heater to maximum heat to purge air from the heater core.
8. Test Drive
Start the engine and watch the temperature gauge. It should reach 195°F within 5 to 10 minutes at idle. Check for leaks after the engine cools down.
Expected Results After Repair
After fixing the coolant temperature issue, you should see significant improvements. The engine reaches operating temperature within 5 to 10 minutes at idle. Heater output becomes strong and consistent. Fuel economy improves as the engine runs in its optimal range. Idle becomes smoother without cold-enrichment stuttering. The P0128 code clears and stays cleared.
Compare your situation to this reference table.
| Condition | Coolant Temperature | Warm-Up Time |
|---|---|---|
| Normal operation | 195°F to 205°F | 5 to 10 minutes at idle |
| Bad thermostat | Below 180°F | Never reaches normal |
| Bad sensor | Gauge shows low, actual may be normal | Varies |
| Fan always on | Fluctuates low | Delayed warm-up |
| Cold weather | Eventually reaches normal | 10 to 20 minutes |
Maintenance Tips to Prevent Future Issues
Protect your cooling system with these regular maintenance habits.
Replace the Thermostat Every 60,000 to 100,000 Miles
Heat cycles gradually degrade the wax pellet inside the thermostat. Contaminated coolant accelerates this failure. Replacing the thermostat proactively prevents unexpected temperature problems.
Use the Correct Coolant Type
Different vehicles require different coolant formulas. Use Dex-Cool for GM vehicles, Zerex G-40 for European vehicles, and follow manufacturer specifications. The wrong type causes sludge, corrosion, and sensor problems.
Flush the System Every 5 Years
Old coolant loses its inhibitors over time. The pH drops and metals corrode. Flushing removes debris that can jam thermostats and堵塞 cooling passages.
Check Hoses and Clamps Annually
Inspect hoses for softness, cracks, or swelling. Check clamps for tightness. Replace worn components before they cause leaks or air ingestion.
Buy OEM Thermostats
Aftermarket thermostats frequently fail calibration testing. OEM parts are manufactured to exact specifications and typically include a 2-year unlimited mileage warranty. Keep your receipt for warranty coverage.
Warranty Tip: OEM thermostats usually come with 2-year unlimited mileage coverage. Save your proof of purchase.
Frequently Asked Questions About Coolant Temperature Not Rising
Why does my coolant temperature stay low even after driving for 20 minutes?
This most commonly indicates a stuck-open thermostat. Even after 20 minutes of driving, a faulty thermostat allows coolant to flow continuously through the radiator, preventing the engine from reaching operating temperature. Test the thermostat with boiling water or replace it with a quality OEM unit.
Can a bad coolant temperature sensor cause low temperature readings?
Yes. The sensor tells the ECU what temperature the engine is running. If it reads artificially low, the ECU keeps the engine in cold-enrichment mode, which can cause various symptoms. However, the actual engine temperature may be normal. Compare scan tool readings to an infrared thermometer to diagnose this issue.
How do I know if my radiator fan is running when it shouldn’t?
Start the engine cold and listen for the fan. It should remain completely off for at least 5 to 10 minutes. If you hear it running immediately after a cold start, check the fan relay, wiring, and coolant temperature sensor. A constantly running fan can drop temperatures 30°F to 50°F below normal.
Will driving with low coolant temperature damage my engine?
Yes. Running cold causes incomplete fuel combustion, increasing hydrocarbon emissions. The engine uses more fuel due to cold enrichment. Cold oil is thicker and provides less lubrication. These factors combine to accelerate engine wear and reduce component lifespan.
What’s the difference between a stuck-open thermostat and a cold weather effect?
With a mechanical failure, temperature never reaches normal even during highway driving. With cold weather alone, temperature eventually stabilizes in the normal range after extended driving, though it takes longer. An infrared thermometer reading below 190°F after 20 minutes of highway driving indicates a mechanical problem.
Can I use an aftermarket thermostat or should I buy OEM?
Aftermarket thermostats often fail calibration, opening at temperatures well below their rated specification. Many technicians recommend OEM or genuine manufacturer parts for reliable performance. The extra cost is worth avoiding repeated repairs and diagnostic time.
Key Takeaways for Fixing Coolant Temperature Not Rising
A coolant temperature that fails to rise above 195°F is abnormal and usually indicates a faulty thermostat, even after multiple replacement attempts. Aftermarket thermostats frequently suffer from miscalibration, making OEM parts the safer choice for reliable repairs. Always verify thermostat function using the boiling water test before and after installation. Ensure proper sealing with intact rubber seals, undamaged housing, and correct torque to prevent coolant bypass. Rule out electrical causes such as faulty coolant temperature sensors and continuously running radiator fans before assuming the thermostat is the problem. Cold weather exacerbates warm-up issues but should never prevent the engine from reaching full operating temperature during sustained driving. Low engine temperature harms fuel economy, increases emissions, and accelerates wear, making prompt diagnosis and repair essential for maintaining your vehicle’s performance and longevity.



