
You start your engine and watch the temperature needle climb toward the red zone, yet the lower radiator hose stays cold to the touch. You crank the heater hoping for warmth, but only chilly air pushes through the vents. These are unmistakable signs that coolant is not circulating in the radiator, a dangerous condition that can destroy your engine within minutes.
Unlike a simple coolant leak, poor circulation means fluid stays trapped in the engine even when the reservoir shows full. Heat cannot transfer away from the block, the heater core never warms up, and internal components begin to warp. The underlying cause ranges from a failed water pump to a stuck thermostat or an invisible air pocket blocking flow.
This guide walks you through proven diagnostic checks, the most common mechanical culprits, and step-by-step repair procedures. You will learn how to pinpoint the exact failure and restore proper flow before costly damage occurs.
Compare Upper and Lower Radiator Hose Temperatures
Touching the radiator hoses is the quickest way to confirm whether coolant is actually moving through the system. A clear temperature difference between the two hoses reveals exactly where flow has stopped.
Hot Upper Hose and Cold Lower Hose Signals a Blockage
When the top hose feels hot and pressurized but the bottom hose remains cool, coolant is failing to pass through the radiator core. This pattern typically points to a thermostat stuck in the closed position or a water pump that has stopped moving fluid.
Start the engine from cold and feel both hoses after 10 to 15 minutes of idle. The lower hose should gradually warm as the thermostat opens and coolant begins circulating. If it stays cold, shut the engine off immediately. Continued driving in this state will cause severe overheating.
Cold Heater Hoses Confirm Poor Cabin Heat
Lack of heat inside the cabin is another strong indicator of restricted flow. Locate the two heater core hoses under the hood and compare their temperatures. If one runs hot while the other stays cold, or both remain cool despite a warm engine, an air lock or clogged heater core is likely the culprit.
Run the engine with the heater set to maximum temperature and fan speed on low. If the hoses never equalize, trapped air is probably preventing coolant from reaching the heater core at all.
Diagnose Water Pump Failure and Impeller Damage

The water pump is the driving force behind coolant movement. When it fails, circulation halts completely, often without any obvious external warning signs.
Impeller Separation Creates Silent Circulation Loss
A frequent failure in high-mileage vehicles involves the impeller separating from the drive shaft. The pulley spins normally and the belt looks intact, giving the false impression that everything works. However, the impeller inside does not rotate, so no coolant moves through the system.
With the engine running, carefully remove the radiator cap only when the engine is completely cold. Look into the filler neck for any fluid movement or bubbling. No visible flow suggests the pump is not circulating. You can also squeeze the upper hose. If it feels solid but no flow registers, the impeller has likely detached.
Broken or Corroded Impeller Blades Reduce Flow
Physical damage to the impeller blades lowers flow efficiency dramatically. Corrosion from old, acidic coolant gradually erodes the blades, especially in aluminum pump housings.
When replacing the pump, always inspect the old impeller before disposal. Missing, bent, or severely worn blades confirm the pump was the failure point. Never reinstall a suspect pump, even if the exterior looks fine.
Test for Stuck, Missing, or Faulty Thermostat
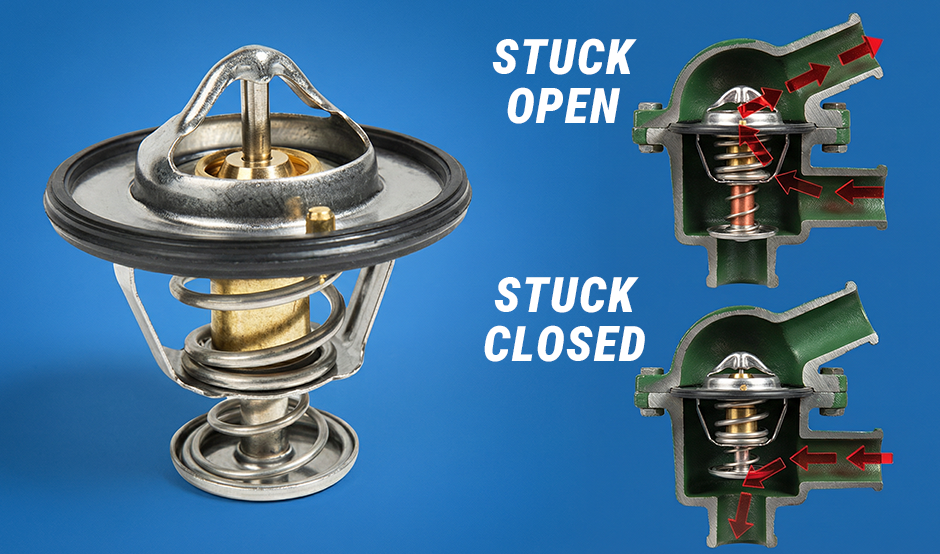
The thermostat acts as a gatekeeper, controlling when coolant flows to the radiator. Its failure can stop circulation entirely or create confusing pressure problems.
Stuck Closed Thermostat Causes Rapid Overheating
A thermostat that refuses to open blocks all coolant flow to the radiator. The engine overheats within minutes, the upper hose gets hot, and the lower hose stays cold. This is one of the most common circulation failures.
Replace the thermostat with the exact temperature rating specified for your vehicle. Always install it with the spring side facing the engine block so the wax pellet senses engine temperature accurately.
Stuck Open Thermostat Disrupts Pressure Cycles
When the thermostat stays open, the engine may never reach proper operating temperature. More critically, it cannot build the pressure differential needed for proper coolant expansion and contraction. Without pressure, coolant does not flow into the reservoir when hot or get drawn back when cold.
The telltale sign is an engine that runs cool, no heat from the vents, and a radiator that stays empty despite a full reservoir tank.
Never Remove the Thermostat as a Quick Fix
Some drivers remove the thermostat entirely, believing it prevents overheating. This actually causes bypass loop short-circuiting. Coolant flows through the engine’s internal bypass passage instead of the radiator, defeating the entire cooling system.
The result is poor heat transfer, erratic temperature readings, and potential overheating during slow traffic or idle conditions.
Bleed Air Locks from the Cooling System
Trapped air is one of the leading causes of no-circulation symptoms, especially following coolant service or component replacement. Air pockets block flow and prevent the thermostat from sensing true coolant temperature.
Standard Bleeding Procedure Works for Most Vehicles
- Start with a completely cold engine.
- Remove the radiator cap and open any bleed screws if equipped.
- Set the heater controls to maximum heat with the fan on low.
- Slowly fill the radiator or reservoir with a 50/50 coolant mix.
- Start the engine and let it warm up while watching for bubbles.
- Top off the coolant as needed until flow stabilizes and no more air escapes.
This process typically takes 20 to 30 minutes and resolves most air pocket issues.
Advanced Hose Fill Method for Stubborn Air Locks
For vehicles with persistent air pockets, particularly European models:
- Disconnect the upper radiator hose while the engine is cold.
- Fill the hose directly from the expansion tank until coolant overflows.
- Quickly reconnect the hose and reinstall the cap.
- Start the engine to force trapped air out through the overflow.
Check the coolant level the following morning and add 4 to 5 ounces if the level has dropped.
Inspect the Radiator Cap and Pressure System
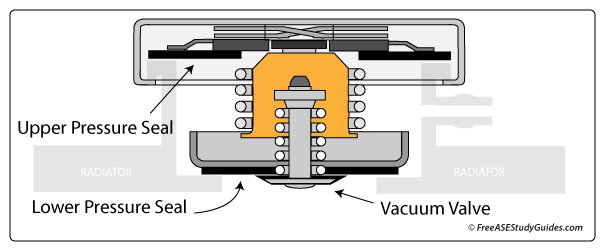
The radiator cap does far more than seal the filler neck. It maintains system pressure and enables vacuum return during cooling cycles. A faulty cap can stop circulation even when every other component works perfectly.
Weak Cap Springs Cause Pressure Loss
A worn spring or damaged seal allows pressure to escape. Coolant boils at lower temperatures, creating steam pockets that block flow through the radiator.
Use a pressure tester to verify the cap holds its rated pressure, typically 15 to 16 PSI. Replace the cap immediately if it fails the test.
Failed Vacuum Return Leaves the Radiator Empty
As the engine cools, coolant contracts and reduces in volume. A functional cap creates a vacuum that pulls fluid back from the reservoir into the radiator. If the vacuum valve sticks closed, the radiator stays empty while the reservoir overflows.
Replace the radiator cap every 3 to 5 years or after any major cooling system service to prevent this issue.
Identify Physical Blockages Inside the System
Even with a working pump and thermostat, internal restrictions can halt coolant flow entirely.
Clogged Radiator Core Stops Flow Internally
Rust, scale, and debris accumulate inside the narrow tubes of the radiator over time. The exterior fins may look clean, but internal blockage stops circulation completely.
Perform a reverse flush by disconnecting both hoses and forcing water backward through the radiator. Weak flow output confirms internal blockage and the need for replacement.
Collapsed Lower Hose Cuts Off Return Flow
The lower radiator hose operates under suction from the water pump. Old or low-quality hoses can collapse inward, strangling flow without any visible external damage.
Inspect the hose while the engine runs. Look for soft spots, flattening, or abnormal bulging. Replace any suspect hose with a reinforced version containing a spiral wire insert.
Debris from Recent Repairs Blocks Narrow Passages
Metal shavings, gasket fragments, or sealant can enter the system during engine work and lodge in the heater core or radiator tubes.
Always flush the entire system thoroughly after any engine repair. Consider installing a coolant filter during refill if contamination is suspected.
Perform Pressure Tests and Flow Diagnostics

Use these proven diagnostic methods to confirm the exact cause of poor circulation before replacing parts.
System Pressure Test Reveals Hidden Leaks
With the engine cold, attach a cooling system pressure tester to the radiator neck. Pump to the cap’s rated pressure, usually 15 to 16 PSI, and monitor for 10 to 15 minutes.
If pressure drops during the test, you have a leak. The source may be external hoses, the head gasket, or an internal seal failure.
Combustion Leak Test Detects Blown Head Gaskets
When overheating and coolant loss occur without visible external leaks, perform a chemical block test. Place the tester with blue fluid over the radiator neck while the engine runs.
If the fluid turns green, combustion gases are entering the cooling system. This confirms a blown head gasket and the need for immediate professional repair.
Verify Cooling Fan Operation
Fans do not drive circulation, but they are essential for heat dissipation. If fans fail to engage, the radiator cannot release heat even with perfect coolant flow.
Check the fuses, relays, and fan motors. Turn on the A/C and confirm both fans activate. If not, diagnose the electrical circuit before assuming a mechanical failure.
Replace Faulty Components Using Proper Techniques
Correct installation prevents repeat failures and protects your cooling system investment.
Thermostat Replacement Best Practices
- Use the exact temperature rating specified for your vehicle model.
- Install with the spring side facing the engine block.
- Always use a new gasket and tighten bolts evenly.
- Never reuse an old gasket, as leaks and air ingress will follow.
Water Pump Installation Guidelines
- Inspect the new pump’s impeller before mounting it.
- Replace the timing belt or serpentine belt if removal is required.
- Torque mounting bolts to factory specifications to avoid cracking the housing.
Radiator and Hose Upgrade Tips
- Replace old hoses with OE-spec or reinforced versions.
- Flush all cooling lines thoroughly when installing a new radiator.
- Use distilled water in your 50/50 mix to prevent mineral buildup.
Follow Preventive Maintenance to Avoid Future Failures
Prevention is always cheaper than repair when it comes to cooling system health.
Flush Coolant Every 30,000 to 50,000 Miles
Old coolant becomes acidic and forms sludge that corrodes metal components. Routine flushing removes contaminants and restores corrosion protection.
Watch for rust-colored coolant, sludge in the reservoir, or inconsistent temperature readings as signs that a flush is overdue.
Replace the Radiator Cap Proactively
Even if it looks fine, the internal spring weakens gradually over time. Replace the cap every 3 to 5 years or with every major cooling system repair.
Always Bleed the System After Coolant Work
Air pockets cause the majority of post-repair circulation problems. After any coolant service, radiator replacement, or pump installation, always complete the full bleeding procedure.
Some vehicles, particularly certain BMW and Audi models, require a scan tool to activate electric auxiliary pumps for proper bleeding. Consult your vehicle-specific service manual for details.
Frequently Asked Questions About Coolant Not Circulating
What causes coolant to stop circulating in the radiator?
The most common causes are a failed water pump, a thermostat stuck in the closed position, trapped air pockets, or a clogged radiator core. Each of these prevents coolant from completing its normal loop through the engine and radiator.
Can you drive with coolant not circulating?
No. Operating an engine without proper coolant circulation causes rapid overheating and can warp the cylinder head or crack the engine block within minutes. Tow the vehicle to a repair shop rather than driving it.
How do I know if my water pump is bad?
Common signs include a hot upper radiator hose with a cold lower hose, no visible coolant movement in the radiator neck, and overheating that worsens under load. A whining noise from the pump area also indicates bearing failure.
Why is my radiator empty but my reservoir is full?
This typically happens when the radiator cap fails to create a vacuum return during cooling. The engine pushes coolant into the reservoir when hot, but the cap cannot pull it back when cold, leaving the radiator empty.
How long does it take to bleed air from a cooling system?
A standard bleeding procedure takes 20 to 30 minutes. Stubborn air locks in European vehicles may require additional time or a specialized hose fill method to fully resolve.
Is a thermostat expensive to replace?
A thermostat itself costs between $20 and $50 for most vehicles. Labor adds $100 to $300 depending on the engine design. Replacing it promptly prevents far more expensive engine damage from overheating.
Key Takeaways for Restoring Coolant Circulation
Coolant circulation failure is a serious condition that demands immediate diagnosis and repair. Start by comparing upper and lower hose temperatures to confirm the problem, then test the water pump, thermostat, and radiator cap in sequence. Always bleed the system thoroughly after any coolant work, since trapped air causes the majority of post-repair circulation issues.
Your next step is to perform the hose temperature check on a cold engine start. If the lower hose stays cold after 15 minutes, inspect the thermostat first, followed by the water pump impeller. Address the issue before driving the vehicle again to avoid catastrophic engine damage.



