You check your coolant reservoir and notice it is low again. But there is no puddle under your car, no stains on the garage floor, and no visible leaks anywhere. So where is the coolant going?
If your car is low on coolant but not leaking, this is not normal and it is not something to ignore. Coolant does not simply evaporate in a properly sealed system. When coolant disappears without an obvious external leak, it means the fluid is escaping through internal pathways, burning off, or leaking in places where it evaporates instantly on contact with hot engine parts. This guide covers every real cause, how to diagnose each one, and which fixes are cheap versus costly.
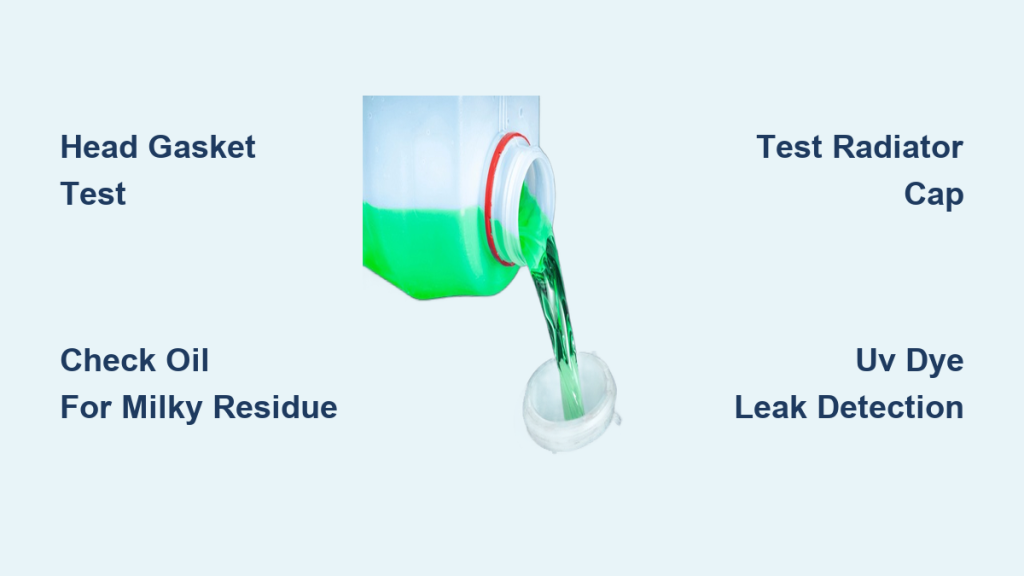
Head Gasket Failure: The Silent Engine Killer
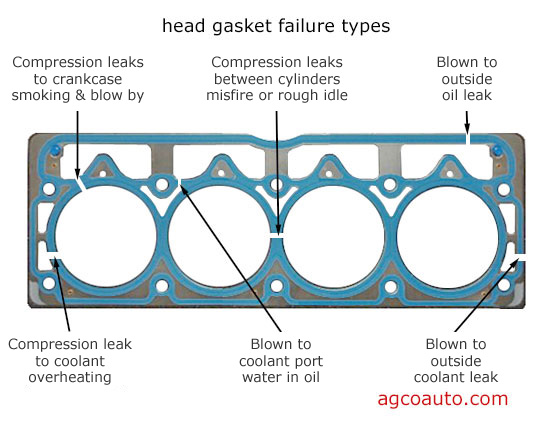
When coolant goes missing and there is no puddle, the first suspect should be the head gasket. This is one of the most common and dangerous causes of internal coolant loss.
White Smoke from Exhaust? What to Check
A failing head gasket allows coolant to seep into the combustion chamber, where it burns and exits as thick white smoke from the tailpipe. This is not the brief puff you see on cold mornings. This is continuous, sweet-smelling vapor even when the engine is warm.
Other signs to watch for include overheating that comes and goes, rough idle or misfires when the engine is cold, bubbling in the radiator or coolant reservoir while the engine runs, and milky oil if coolant leaks into the crankcase.
Critical Clue: If you see bubbles in the coolant with the cap off while the engine runs, combustion gases are entering the cooling system. This is a hallmark of head gasket failure or a cracked head.
How to Test for a Blown Head Gasket
You do not need to tear the engine apart to confirm. Use these field-tested methods.
Block Tester Method: Remove the radiator cap only when the engine is cold. Attach a block tester with blue chemical fluid to the radiator neck. Run the engine at 2,000 RPM. If the fluid turns green or yellow, exhaust gases are in the coolant, confirming a head gasket is compromised.
Pressure Test the Cooling System: Use a hand pump to pressurize the system to 1.1 times the cap rating. For example, 16.5 psi for a 15 psi cap. Watch the gauge. If it holds pressure, there is no major leak. If it drops steadily, there is likely an internal leak. Perform this test both cold and hot, since some leaks only appear under thermal stress.
Compression or Leak-Down Test: This measures cylinder integrity. Uneven compression or high leak-down in one cylinder points to gasket failure.
Repair Costs and Realities
Head gasket repair typically costs between $1,200 and $2,500. The job is labor-intensive and requires head removal, surface inspection, and proper torque sequencing. Engines that are turbocharged, have aluminum heads, or are known problem models like the BMW N52, GM LS, or Hyundai Theta II carry higher risk.
Pro Tip: If your car has ever overheated, the head gasket should be under suspect status, even if symptoms seem mild now.
Coolant in Oil: Emergency-Level Problem

If coolant mixes with engine oil, it is not just a leak. It is a lubrication crisis that can destroy your engine quickly.
How to Look for This Problem
Pop the oil filler cap or pull the dipstick. If you see a chocolate mousse texture, frothy milky residue, or a sweet chemical smell in the oil, coolant is inside the crankcase.
Why This Is So Dangerous
Coolant reduces the oil is ability to lubricate engine parts. This leads to bearing wear, hydrolock, or spun rods. Once severe, it can destroy the engine in minutes.
What Causes This
This happens through a failed head gasket, cracked cylinder head or block, leaking intake manifold gasket (especially in V6 and V8 engines), or a failed oil cooler seal in some models.
Immediate Actions Required
Stop driving immediately. Drain the oil and inspect it for contamination. Flush the entire lubrication system before attempting any repair. Most importantly, diagnose the root cause. Do not just replace the head gasket without checking for underlying issues.
Warning: Running the engine with coolant in the oil accelerates damage. Even driving 10 miles can turn a repairable issue into a full engine rebuild.
Cracked Head or Engine Block: Worst-Case Scenario
Overheating, freezing, or manufacturing defects can cause microscopic cracks in the cylinder head or engine block. These cracks may only open when the engine reaches operating temperature.
Symptoms That Mirror Head Gasket Failure
Watch for white exhaust smoke, coolant loss, overheating, bubbles in the radiator, and possible oil contamination. The symptoms are nearly identical to head gasket failure, which makes diagnosis challenging.
Why Diagnosis Is Difficult
There are no external signs of a crack. Dye tests often fail because the leak path is internal. Advanced tools are required, including borescope inspection of combustion chambers, ultrasonic testing for subsurface cracks, and dye penetrant testing after disassembly.
Repair Options and Costs
A cylinder head may be weld-repaired or sleeved if the crack is accessible. An engine block typically requires replacement. Costs range from $2,000 to $6,000 or more. Some engines, like the Subaru EJ series, are notorious for head cracks after overheating.
Expert Note: Some shops offer stop-leak additives for cracks. These are temporary at best and can clog heaters, thermostats, or radiators.
Leaking Heater Core: Hidden Cabin Leak
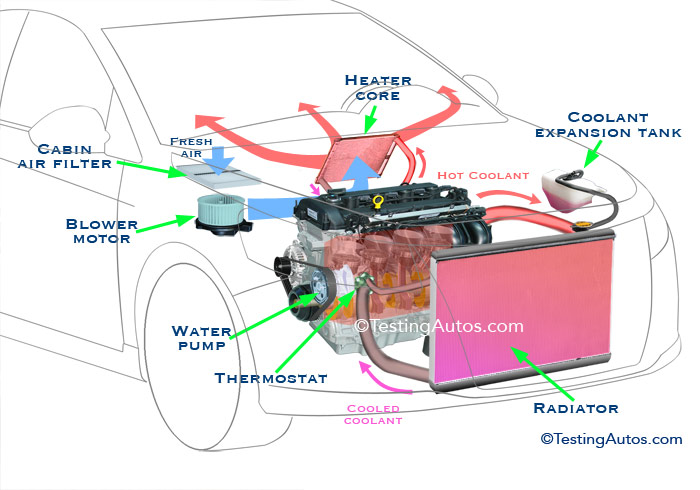
The heater core is a small radiator inside your dashboard. A leak here does not drip under the car. It leaks into the cabin, creating a distinctive set of symptoms.
Telltale Signs of Heater Core Failure
Look for a sweet, syrupy smell inside the car, especially when using the heater. Check for wet passenger floor mats, often soaked after short drives. Notice foggy windows that will not clear, even with defrost. Look for a greasy film on interior glass and reduced heater output over time.
Common Mistake: Many drivers blame AC condensation for wet floors. But AC drains water slowly and clear. Coolant leaks are sticky, sweet-smelling, and persistent.
How to Confirm a Heater Core Leak
Visual Inspection: Remove the passenger kick panel and look for dampness, crystallized coolant, or staining on the firewall.
Pressure Test with Sniff Test: Pressurize the cooling system and run the heater on high. If a sweet odor appears inside the cabin, the core is leaking.
Hose Isolation Test: Disconnect the heater hoses at the firewall and plug both ends. Drive for a few days. If coolant loss stops, the heater core is the culprit.
Repair Cost and Complexity
Heater core replacement costs $800 to $1,500 due to the need for dash removal. Always flush the system before refilling to prevent clogs. Use OEM or high-quality aftermarket cores, since cheap ones fail faster.
Bad Radiator Cap: Cheap Fix with Big Impact
One of the most overlooked parts, the radiator cap, can cause coolant loss that mimics serious internal failure.
How a Faulty Cap Causes Coolant Loss
A failed cap does not maintain pressure, causing coolant to boil at a lower temperature. The coolant then boils over into the reservoir and evaporates or leaks from the overflow. It also prevents siphoning back into the radiator when cooling. The result is coolant slowly disappears, especially after highway driving or idling.
Warning Signs to Watch For
Watch for coolant being pushed into the overflow tank and never returning. Look for white crust around the cap or neck. Notice if the system runs hotter than normal. Check if the reservoir empties but there is no undercar leak.
How to Test the Cap
Use a radiator cap pressure tester. Pressurize to the rated psi, such as 15 psi. Hold for 2 minutes. Any drop means the cap needs replacement.
Replacement Tips
Always use an OEM-specified cap. Aftermarket caps often fail early. Replace the cap every 3 to 5 years or 60,000 miles, even if there are no symptoms. Typical cost is $10 to $30.
Pro Tip: A failing cap can mimic head gasket failure. Always test the cap before condemning the engine.
Evaporative Leaks: Invisible but Real
Some leaks do not leave puddles because the coolant burns off instantly on hot surfaces.
Common Sources of Evaporative Leaks
These include pinhole leaks in the radiator plastic tank, cracked thermostat housing, hairline cracks in coolant hoses or plastic tees, water pump weep holes designed to leak when the seal fails, and loose hose clamps on high-temp lines.
Why You Will Not See a Puddle
The leak only occurs under pressure when the engine is hot. Coolant sprays onto the exhaust manifold or cylinder head and evaporates before dripping to the ground. This leaves behind white, chalky residue, which is a key clue.
How to Find These Invisible Leaks
UV Fluorescent Dye Test: Add coolant-compatible dye to the reservoir. Run the engine until it is hot. Scan the engine bay with a UV flashlight. Glowing trails reveal even microscopic leaks.
Electronic Sniffer: This detects glycol vapor in the engine compartment and pinpoints leaks without disassembly.
Thermal Imaging: This shows evaporation hotspots and is useful for pinpointing intermittent leaks.
Look For: White crust on hoses, brackets, or near the water pump. This residue often indicates a weep hole leak that was mistaken for normal seepage.
Overflow Reservoir Problems: Often Overlooked
The reservoir itself can be the source of coolant loss.
Common Failure Points
The plastic tank may crack, especially near mounts or hose fittings. The cap may be loose or degraded, allowing vapor to escape. The overflow hose may be dislodged, dumping coolant on hot parts. The system may be overfilled, causing spills during expansion.
How to Diagnose
Inspect the tank for hairline cracks that may only appear under pressure. Ensure the cap seals tightly. Confirm the overflow hose is intact and routed correctly. Mark the fluid level before and after driving to track consumption.
Red Flag: A gurgling noise when opening the cap after driving indicates improper vacuum draw-back.
Wrong Coolant Mix: Boil-Over Risk
Using the wrong ratio of coolant to water reduces the boiling point and increases evaporation.
The Ideal Mix: 50/50
Too much water causes boiling at 212°F, which is dangerous under pressure. Too much coolant results in poor heat transfer. Tap water causes scale and corrosion.
Why Boiling Point Matters
A 50/50 mix boils at approximately 223°F at atmospheric pressure. Under 15 psi system pressure, it reaches approximately 265°F. Every 1 psi increase raises the boiling point by about 3°F.
How to Test Your Mix
Use a coolant refractometer for the most accurate reading. A hydrometer works but is less precise. Adjust if outside the 40% to 60% glycol range. Always use distilled water and manufacturer-approved coolant type.
Thermostat Failure: Indirect Cause of Coolant Loss
A stuck-closed or slow-opening thermostat causes localized overheating, leading to pressure spikes and coolant expulsion.
Symptoms to Watch For
Watch for slow warm-up followed by a sudden temperature rise. Notice coolant loss after idling in traffic. Look for inconsistent heater performance.
The Fix
Replace the thermostat every 100,000 miles or per the manufacturer schedule. Use an OEM-spec unit, since aftermarket thermostats often fail early.
Air Pockets: Ghost Overheating
Trapped air creates hot spots that cause boiling and false low coolant readings.
How to Prevent This
Use a coolant filling funnel, also called a burp bottle. Run the engine with the heater on high and the radiator cap off. Squeeze the upper hose to release air. Follow manufacturer-specific procedures, such as elevating the front end.
Tip: Many modern cars require a scan tool to activate electric bleed valves. Do not skip this step.
Diagnostic Flow: Step-by-Step Checklist
Follow this order to avoid misdiagnosis.
Step 1: Cold Engine Visual Check
Check the oil cap and dipstick for milky residue. Inspect floor mats for wet or sticky areas. Look at the radiator and reservoir for crusty deposits. Examine hoses for softness, swelling, or cracks.
Step 2: Pressure Test the System
Pump to 1.1 times the cap rating. Monitor for 30 minutes. A drop indicates a leak, either internal or hidden.
Step 3: Test the Radiator Cap
Perform an independent pressure test. Replace if failed.
Step 4: UV Dye Test
Add dye, run the engine, and scan with UV light. Look for glowing trails.
Step 5: Check Exhaust and Oil
White smoke when warm indicates an internal leak. Milky oil means coolant in the crankcase.
Step 6: Block Tester
Confirm combustion gas is in the coolant.
Step 7: Heater Core Evaluation
Use the smell test and isolation test.
Step 8: Coolant Mix Analysis
Use a refractometer check. Flush if the mix is wrong or contaminated.
Cost Comparison: What You Might Face
| Issue | Repair Cost | Time to Fix |
|---|---|---|
| Radiator cap | $10–$30 | 5 minutes |
| Thermostat | $150–$300 | 1–2 hours |
| Water pump | $400–$900 | 3–5 hours |
| Heater core | $800–$1,500 | 6–10 hours |
| Head gasket | $1,200–$2,500 | 1–2 days |
| Cracked block | $2,000–$6,000+ | 2+ days |
Bottom Line: A $20 cap can prevent a $2,500 engine job. Never ignore coolant loss.
Prevention: Save Thousands
Check coolant monthly. Replace the radiator cap every 3 to 5 years. Flush coolant every 30,000 to 100,000 miles, depending on the type. Use the correct coolant and never mix types. Bleed the system properly after any service. Record top-off frequency to track changes over time.
Frequently Asked Questions About Car Low on Coolant but Not Leaking
Why does my car lose coolant but there is no leak?
Coolant is being consumed internally. This happens when the head gasket is blown, the heater core is leaking into the cabin, or coolant is evaporating from a faulty radiator cap or hidden micro-leak. The coolant is burning, mixing with oil, or evaporating on hot engine parts before it can drip to the ground.
Can I drive my car with low coolant if there is no visible leak?
No. Driving with low coolant risks overheating and catastrophic engine damage. Even without an external puddle, internal leaks can quickly escalate into a blown head gasket, cracked engine block, or complete engine failure. Address the issue immediately.
How do I know if my head gasket is blown without disassembling the engine?
Use a block tester. Remove the radiator cap when cold, attach the tester with blue fluid, and run the engine at 2,000 RPM. If the fluid turns green or yellow, exhaust gases are in the coolant, confirming head gasket failure. Other signs include white smoke from the exhaust, milky oil, and bubbling in the radiator.
Is a small amount of coolant loss normal?
No. In a properly sealed system, coolant should not disappear. Needing to top off more than once every few months is not normal. Track your coolant level monthly. Any steady decline requires diagnosis.
Why does coolant only disappear after highway driving?
This typically points to a faulty radiator cap that fails to maintain pressure or allow proper siphoning. It can also indicate an evaporative leak where coolant burns off on hot components only under high-temperature, high-pressure conditions.
Key Takeaways for Fixing Unexplained Coolant Loss

Coolant does not simply evaporate or disappear. If your car is low on coolant but not leaking externally, the fluid is going somewhere internally. The most serious causes are head gasket failure and cracked engine components, which can destroy your engine if ignored. Simpler issues like a bad radiator cap, wrong coolant mix, or heater core leak are also common and often mistaken for something worse.
Start your diagnosis with the simplest tests. Check the radiator cap, test the coolant mixture, and perform a pressure test. Use UV dye for hidden leaks. If you find white smoke, milky oil, or a sweet smell inside the cabin, act immediately. These are not minor issues. They are early warnings.
A $20 radiator cap can prevent a $2,500 head gasket repair. Monthly checks and early detection save thousands. Do not wait for the engine to overheat or for a small problem to become a catastrophic failure. Fix it now before no leak becomes no engine.