

A wobbling radiator fan is more than just an annoying noise. On many General Motors vehicles from 1982 to 1992, especially V8 models like the Chevrolet Camaro or S10 pickup, a loose fan blade signals a failed retention mechanism. The plastic blade spins freely on the motor shaft because the tiny metal washer holding it in place has worn out. Ignore this issue long enough, and you risk fan-to-radiator contact, motor damage, or a serious overheating event.
The good news is that learning how to fix a loose radiator fan on these older GM vehicles is straightforward and affordable. You do not need specialty tools or expensive parts. This guide covers how to diagnose the wobble, understand why it happens, and choose the best replacement option for your situation. Whether you grab a used fan from a salvage yard or upgrade to an aftermarket unit, you can restore reliable cooling in under an hour.
Diagnose the Wobble Before Replacing Parts

Jumping straight to a replacement without confirming the problem wastes time and money. A proper diagnosis ensures you fix the actual cause of the wobble.
Confirm the Fan Blade Is the Culprit
Grab the fan blade with the engine off and try to wiggle it side-to-side on the motor shaft. If the plastic hub moves independently of the shaft, the retention washer has failed. The motor shaft itself should feel solid with no play. If the entire motor assembly shakes instead of just the blade, check the four mounting bolts and inspect the radiator shroud for cracks.
Rule Out Fan Clutch Confusion
This fix applies only to electric fans with plastic blades mounted directly to a motor. If your vehicle uses a belt-driven mechanical fan with a thick round clutch behind the blades, you have a different system entirely. The loose fan issue described here is specific to 1982 through 1992 GM electric cooling fans.
Check for Secondary Damage
A wobbling fan can cause additional problems before you catch it. Look for these warning signs:
- Scratches or gouges on the radiator fins
- Cracked or chipped fan blades
- Bent motor mounting tabs
If the radiator shows damage, you may need to replace or repair it before installing a new fan assembly.
Understand Why the Fan Came Loose
Knowing the root cause helps you choose a fix that lasts. This is not random wear; it is a known design weakness in a specific era of GM vehicles.
The Flawed Metal Washer
GM used a small stamped metal washer with spring-loaded fingers to lock the plastic fan onto the motor shaft. These fingers press into the plastic hub to prevent slippage during operation. Unfortunately, the washer is made from thin, soft metal that degrades with heat cycles and vibration over time.
Once the fingers lose tension or break off completely, the fan spins freely on the shaft. There is nothing to tighten because no threaded fastener holds the blade in place. The design was cost-effective for manufacturing but unreliable for long-term service.
Why Quick Repairs Fail
Some owners try gluing the fan in place or hunting for a replacement washer online. The OEM washer is nearly impossible to find separately, and even if you locate one, it carries the same design flaw. Epoxy, rivets, or hose clamps might hold briefly, but they create imbalance that can destroy motor bearings. Replacing just the washer does not solve the underlying problem.
Best Fix: Swap with a Junkyard Fan

For most drivers, the fastest and cheapest solution is a used fan from a local salvage yard. This is the go-to method for learning how to fix a loose radiator fan on a budget.
Why a Used Fan Makes Sense
- Costs under $20, sometimes free with a core return
- No shipping wait since you grab it the same day
- Used units often outlast repaired originals
- Installation requires only four bolts and one plug
Donor vehicles like the Chevrolet S10, Camaro, or full-size GM pickups from 1982 to 1992 are compatible. The fan assemblies are nearly identical across V8 models in this era.
How to Find a Quality Used Fan
Call local salvage yards first and ask if they have GM electric radiator fans from the 1980s or early 1990s in stock. Some lots allow self-service while others require a staff puller. When you locate a candidate:
- Spin the fan by hand to confirm smooth rotation
- Inspect the plastic hub for cracks or stripped areas
- Check the motor housing for rust or bent mounting points
Even gutted donor vehicles sometimes still have their fans attached. Persistence pays off when hunting for these parts.
Install the Replacement Fan
- Disconnect the battery to prevent accidental fan activation during the swap.
- Unplug the two-wire electrical connector from the fan motor.
- Remove the four mounting bolts, typically 10mm or 13mm.
- Lift out the old assembly and drop in the replacement.
- Reconnect the plug, reinstall the bolts, and test the fan operation.
Total time for this swap is under 30 minutes for most DIYers.
Alternative: Upgrade with an Aftermarket Fan

If you want better cooling performance and long-term reliability, consider an aftermarket electric fan kit.
Benefits of High-Performance Fans
- Stronger motors with sturdier mounting hardware
- Dual-fan setups for improved airflow capacity
- Better cooling in stop-and-go traffic or hot climates
- No reliance on the original GM washer design
Aftermarket kits from brands like Flex-a-Lite or Derale cost between $50 and $80 online and often include a thermostat control switch for automatic operation based on engine temperature.
When an Upgrade Makes Sense
- You are restoring a classic vehicle or keeping it long-term
- You tow trailers or drive frequently in hot conditions
- You have already replaced the fan once and want a permanent solution
Some aftermarket fans require minor modifications to fit the original shroud. Always check compatibility with your specific radiator core size before purchasing.
Installation Tips for Aftermarket Kits
- Match fan size to your radiator core dimensions
- Use the included relay and fuse kit for safe wiring
- Mount the thermal switch in the radiator or engine block per instructions
- Avoid routing wires near sharp edges or hot exhaust components
Avoid Repairing the Old Fan
Replacing just the metal washer or attempting to fix the original fan rarely produces lasting results.
Why Repairs Fail
- The OEM washer is not sold separately by GM
- Aftermarket washers do not fit consistently across models
- The plastic hub is often already worn or cracked
- Even with a new washer, the design flaw remains
Temporary fixes using epoxy, rivets, or hose clamps can cause vibration imbalance. This imbalance leads to premature motor bearing failure and potentially worse damage than the original loose fan.
The Bottom Line on Repair
Do not waste time repairing a known weak component. The cost of a junkyard fan is so low that replacement always beats repair. If you are not upgrading to aftermarket, just swap in a used unit and move on.
Tools and Time Needed for the Job
You do not need a full toolbox to complete this repair.
What You Will Need
- Socket wrench or ratchet set with 10mm and 13mm sockets
- Flathead or Phillips screwdriver for shroud clips
- Work gloves to protect your hands from sharp blades
- Flashlight for working in tight engine bay spaces
No specialty tools are required. The swap is a straightforward job for any DIYer.
Time Estimates
- Experienced DIYer: 15 to 20 minutes
- First-timer: 30 to 45 minutes
- With shroud removal: Add 10 to 15 minutes
If the fan is rubbing against the shroud or stuck in place, add time to clear debris or free the blades before removal.
Prevent Future Fan Failures
Once you fix the loose radiator fan, a few simple habits keep it running properly.
Regular Visual Checks
Every few months, pop the hood and inspect the cooling fan:
- Look for any wobble in the blade with the engine off
- Check for cracks in the blades or motor housing
- Ensure wiring is not frayed or touching hot components
A quick visual check catches problems before they become serious failures.
Upgrade the Control System
Old GM fan circuits sometimes fail due to bad relays or thermoswitches. Consider adding:
- A manual override switch for emergency fan control
- A modern dual-speed controller for better temperature management
- A digital temperature gauge to monitor cooling performance
These upgrades help prevent overheating even if the fan itself runs perfectly.
Frequently Asked Questions About Fixing a Loose Radiator Fan
Can I just tighten a loose radiator fan?
No, tightening is not possible on these GM electric fans. The looseness comes from worn fingers on the metal retention washer, not a loose bolt. The only real fix is replacing the fan assembly.
How long does a junkyard fan typically last?
Used fans from this era often remain functional for many years after installation. Reports of 14 or more years of service from junkyard swaps are common. The odds of finding a working unit are high given how many of these vehicles were produced.
Is an aftermarket fan worth the extra cost?
Only if you keep the vehicle long-term or need better cooling performance. For a basic daily driver, a junkyard fan under $20 is the smarter investment. High-performance aftermarket fans costing $50 to $80 make sense for enthusiasts or vehicles used in demanding conditions.
What vehicles are affected by this loose fan problem?
General Motors V8 vehicles from 1982 to 1992 are most commonly affected. Specific examples include the Chevrolet Camaro, S10 pickup with a 4.3L engine, and full-size GM trucks. The issue is specific to electric fans with plastic blades mounted directly to the motor.
Do I need to remove the radiator to replace the fan?
No, you do not need to remove the radiator. The fan assembly bolts to the radiator or core support with four bolts and connects to a simple two-wire plug. The swap is accessible from the engine bay without draining coolant.
What if the radiator is already damaged from the wobbling fan?
Inspect the radiator fins for bent or crushed areas before installing the new fan. Minor damage can sometimes be straightened with a fin comb tool. Severe damage requires radiator replacement to ensure proper cooling performance.
Key Takeaways for Fixing Your Loose Radiator Fan
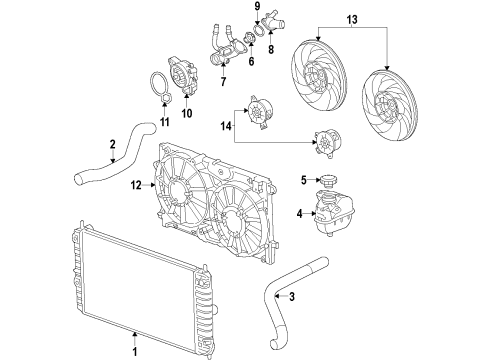
A loose radiator fan on a 1982 to 1992 GM vehicle almost always traces back to a worn metal retention washer with failing fingers. This is a known design flaw, not user error. The fix is replacement, not repair, and the most cost-effective option is a used fan from a salvage yard costing under $20.
For enthusiasts keeping a classic long-term, an aftermarket fan kit between $50 and $80 offers better cooling and eliminates the original design weakness. Either approach takes less than an hour with basic tools and no special skills. Stop driving with a wobbling fan and address it now to prevent radiator damage, motor failure, or dangerous overheating on the road.



