
Connecting a radiator to pipes the wrong way can leave you with leaks, cold spots, or even system damage. Whether you’re swapping an old unit for a new one or upgrading your home’s heating, knowing how to connect a radiator to pipes correctly saves time, money, and frustration. Most like-for-like replacements are manageable for confident DIYers with basic tools. However, moving a radiator or adding new pipework should always be left to a qualified professional. This guide covers planning, tools, installation, testing, and maintenance so you can complete the job safely and keep your central heating running efficiently.
Plan Your Radiator Replacement
Before touching any pipes, confirm your new radiator matches your existing setup and heating needs.
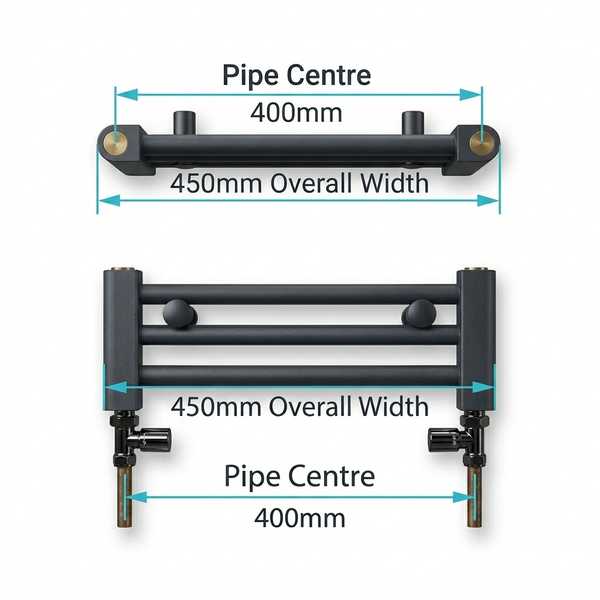
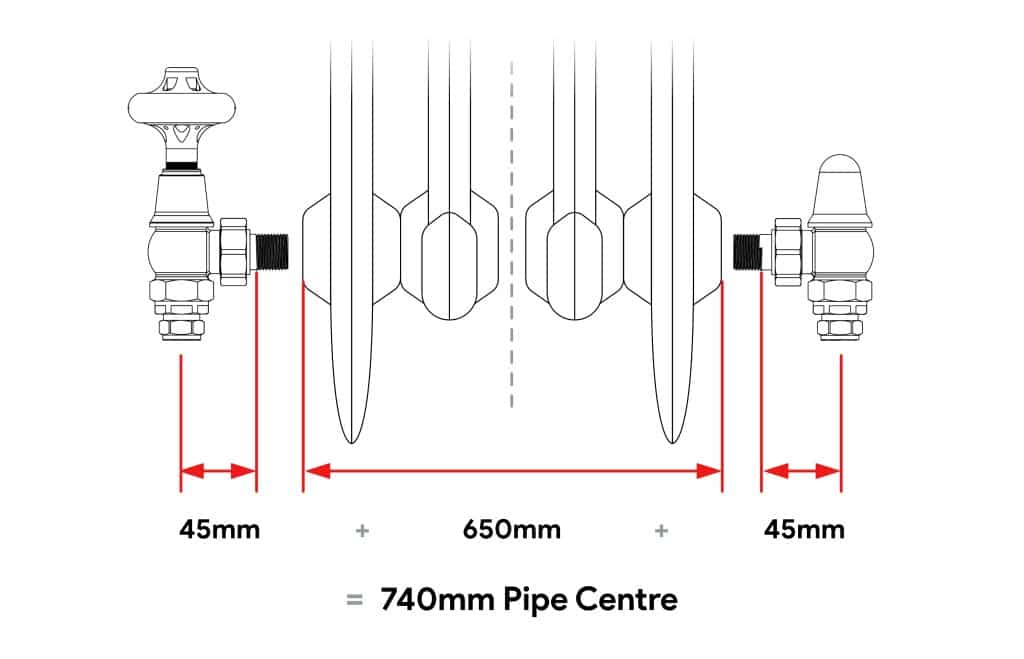
Match Pipe Centres and BTU Output
The distance between valve connections, known as pipe centres, must align with your current pipework. If they don’t match, you’ll need to adjust the pipes, which adds complexity and cost. Use the manufacturer’s template or measure the back of the radiator to mark bracket positions accurately.
Heat output matters just as much. Calculate your room’s required BTUs using room volume (length × width × height), insulation quality, and the number of external walls and windows. An undersized radiator won’t heat the room, while an oversized one wastes energy and may imbalance the system. Always check that your boiler can handle the total load of all radiators in your home.
Choose the Right Valves
You’ll need two valves per radiator:
• Control Valve (Manual or TRV): Regulates heat output. A Thermostatic Radiator Valve (TRV) adjusts automatically based on room temperature, which improves energy savings.
• Lockshield Valve: Balances flow by limiting water return. It’s usually covered with a plastic cap and must be set precisely during installation.
Use flexible tails if pipe alignment is tight or slightly off. They make connections easier and reduce stress on joints.
Gather Tools and Materials
Having everything ready prevents delays and ensures a smooth installation.
Essential Tools for Radiator Connection
• Spirit level for straight hanging
• Tape measure and bracket template
• Wall scanner to detect studs and wiring
• Two adjustable wrenches
• Radiator key for the bleed valve
• Lockshield valve key
• Drill with masonry or wood bits
• Pipe cutters (only if modifying lines)
• Buckets, trays, and towels
Required Materials
• New radiator with fixings
• Radiator valves (TRV plus lockshield)
• PTFE tape or jointing compound
• Compression fittings (nuts and olives)
• Wall plugs and screws
• Central heating inhibitor
Shut Off and Drain the System
Never work on a live heating system. Safety always comes first.
Turn Off Heating and Isolate the Radiator
- Switch off the central heating and let the system cool completely.
- Close both valves on the radiator:
• Control valve: turn clockwise until tight
• TRV: set to “off” (snowflake symbol) - Lockshield valve: remove the plastic cap and turn clockwise until closed. Count the exact number of turns so you can rebalance the system later.
Break the Vacuum and Drain Water
- Place a tray under the control valve connection.
- Use a radiator key to open the bleed valve at the top of the radiator.
- Air will hiss in, breaking the vacuum. Water will start draining into the tray.
- Once drained, disconnect the swivel nut on the control side using two wrenches.
- Repeat on the lockshield side.
Keep towels handy, because some water always remains in the pipes.
Remove Old Radiator and Prepare Wall
Safely Take Down the Old Unit
Lift the radiator off its brackets. For heavy models, especially cast iron, get help to avoid injury or wall damage.
Remove old brackets and patch any holes if relocating or redecorating. If reusing the same position, clean the wall surface and check fixings.
Install New Brackets
- Use the template or measure from the radiator’s mounting holes.
- Mark bracket positions, ensuring they align with existing pipe centres.
- Use a spirit level to keep marks horizontal.
- Drill holes and insert appropriate wall plugs:
• Masonry walls: standard plastic plugs
• Stud walls: cavity fixings for secure hold - Screw in brackets tightly. They must support the radiator’s full weight when filled with water.
Connect Radiator to Pipes

This is where precision prevents leaks. Follow each step carefully when learning how to connect a radiator to pipes for a watertight seal.
Attach Valves to the Radiator
- Wrap PTFE tape clockwise around the threads of the valve tails (5 to 10 turns).
- Screw valves into the radiator inlets by hand, then tighten gently with a spanner.
- Do not overtighten, especially on cast iron, because cracking is a real risk.
- Position the TRV on the flow side (usually under the window) and the lockshield on the return.
Join Pipes to Valves
- Align the valves with the existing copper or PEX pipes.
- Slide compression fittings (olive and nut) onto the pipe before connecting.
- Connect the pipe to the valve tail.
- Use two wrenches: one to hold the valve body steady, one to tighten the compression nut.
- Tighten only half to three-quarters of a turn past hand-tight. Over-tightening distorts threads and causes leaks.
Repeat for both sides.
Reconnect Radiator to Valves
Attach the swivel nuts from the valves to the radiator inlets. Apply PTFE tape to ensure a watertight seal. Hand-tighten, then give a gentle quarter-turn with a wrench.
Ensure the bleed valve is closed and secure.
Refill, Bleed, and Test the System
A proper restart ensures no air locks or leaks.
Reopen Valves and Restore Pressure
- Open both valves fully:
• Control valve: turn anti-clockwise
• Lockshield valve: open by the exact number of turns recorded earlier - Refill the central heating system:
• For combi boilers, use the filling loop to raise pressure to 1.0 to 1.5 bar
• Monitor the boiler pressure gauge closely
Bleed the Radiator
- With the heating off, insert the radiator key into the bleed valve.
- Slowly turn anti-clockwise until you hear a hiss of air.
- Close immediately when water starts to drip.
- Recheck boiler pressure and top up if needed.
Check for Leaks and Performance
- Turn the heating on and let it run for 10 to 15 minutes.
- Inspect all joints with a dry cloth, because even small drips can grow.
- If leaking, turn off heat, drain, re-tighten, or reapply PTFE tape.
- Feel the radiator:
• Should heat evenly from bottom to top
• Cold top means air remains, so bleed again
• Cold bottom may indicate sludge, so consider a system flush
Test the TRV by adjusting the setting. The temperature should respond accordingly.
Avoid Common Connection Mistakes

Even small errors can cause big problems.
Skip PTFE Tape? Expect Leaks
Threaded joints must be sealed. Always use 5 to 10 wraps of PTFE tape, applied clockwise. Skipping this step is the leading cause of post-installation leaks.
Over-Tightening Damages Components
Hand-tight plus half to three-quarters of a turn is enough. Over-tightening cracks valve bodies, warps compression olives, and damages radiator inlets.
Forget the Lockshield Setting
The lockshield balances your whole system. If you don’t record and replicate the turn count, some radiators will run hot while others stay cold. This leads to inefficient heating and higher bills.
Poor Bracket Placement Causes Failure
Mounting on weak or uneven surfaces risks the radiator falling. Always use a spirit level, anchor into solid material, and use heavy-duty fixings for large or cast iron units.
When to Call a Professional
Not all radiator jobs are DIY-friendly.
New Locations Require Pipe Runs
Installing a radiator where no pipes exist means cutting floors or walls, running new copper or PEX lines, soldering or compression fitting, and rebalancing the entire system. This is not a DIY job. Hire a registered plumber.
Moving a Radiator Involves System Work
Relocating even a short distance often means capping old pipes, extending or rerouting new lines, and partial or full system drain. These tasks require professional tools and expertise.
Electric Radiators Need Certified Installation
Unless it’s a plug-in model, electric radiators must be hardwired by a qualified electrician. Improper wiring risks fire and voids insurance.
Maintain Efficiency After Installation
Keep your system running well with simple steps.
Add Central Heating Inhibitor
After any radiator work, add inhibitor fluid to prevent rust, sludge buildup, and corrosion in your boiler and pipes. Most manufacturers require it for warranty validity.
Bleed Seasonally
Air accumulates over time. Bleed radiators at the start of each heating season to maintain efficiency and eliminate cold spots.
Use TRVs for Smart Control
Fit thermostatic valves in every room except bathrooms, where humidity can affect sensors. They maintain consistent temperatures, cut heat when windows are opened, and reduce energy bills by up to 15%.
Cost and Time Estimates
Know what to expect if hiring help.
| Job | Time | Cost (GBP) |
|---|---|---|
| Remove small radiator | 1 hr | £80 |
| Remove and replace (double panel) | 1 to 2 hrs | £200 |
| Replace large radiator | 2 hrs | £300 |
| Move radiator location | 2 hrs | £275 |
| Install with pipe rerouting | 2 to 3 hrs | £250 to £350 |
Note: London and southeast rates are typically higher.
Radiator costs vary:
• Basic panel: £50 to £100
• Designer or vertical: £200 to £500+
• Cast iron: £300+
Frequently Asked Questions About Connecting Radiators to Pipes
Can I connect a radiator to existing pipes without a plumber?
Yes, for a like-for-like replacement where pipe centres match. You’ll need basic plumbing skills, the right tools, and careful attention to sealing threaded joints with PTFE tape. Any pipe modifications or new locations require a professional.
How do I know if my pipe centres match?
Measure the distance between the two valve connections on your existing pipework. Compare this to the specification on your new radiator. Most manufacturers provide this measurement, called the pipe centre, in their product details.
What pressure should my boiler be after connecting a radiator?
For combi boilers, the pressure should read between 1.0 and 1.5 bar on the gauge. Always monitor the gauge while refilling and top up if pressure drops after bleeding the radiator.
Why is my radiator cold at the top after installation?
Cold spots at the top indicate trapped air. Turn off the heating and bleed the radiator again using a radiator key. Open the valve slowly until water trickles out steadily, then close it immediately.
How many turns should I open the lockshield valve?
Open the lockshield valve by the exact number of turns you counted when closing it during removal. This maintains system balance and ensures even heating throughout your home.
Do I need to add inhibitor after connecting a new radiator?
Yes. Adding central heating inhibitor after any radiator work prevents rust and sludge buildup. This protects your boiler, extends system life, and is often required to keep your warranty valid.
Key Takeaways for Connecting a Radiator to Pipes Successfully
Learning how to connect radiator to pipes comes down to three critical steps. First, always match pipe centres and calculate BTU output before purchasing. Second, seal every threaded joint with 5 to 10 wraps of PTFE tape and tighten only half to three-quarters of a turn past hand-tight. Third, record your lockshield valve turn count and replicate it exactly during reinstallation to keep your system balanced.
Start your project by turning off the heating, draining the radiator, and gathering all tools. Work methodically through each connection, then test thoroughly for leaks before considering the job complete. For any pipe rerouting, new locations, or electric installations, hire a qualified professional to ensure safety and compliance.



