

Is your engine running hotter than usual? Is the heater blowing cool air even after the car warms up? These could be signs that it is time to replace the coolant in your radiator. Over time, engine coolant degrades and loses its ability to regulate temperature, prevent corrosion, and protect vital components like the radiator, water pump, and heater core. Replacing coolant is a critical maintenance task that helps avoid overheating, internal rust, and costly repairs like head gasket failure.
This guide walks you through the complete process of how to replace coolant in radiator systems, from draining and flushing to refilling and bleeding. You will learn professional tips, safety precautions, and model-specific advice to ensure your cooling system runs efficiently for years to come.
Verify Coolant Replacement Need
Check Coolant Condition Visually
Open the hood when the engine is cold and inspect the coolant reservoir and radiator filler neck. Healthy coolant should be bright green, orange, blue, or red depending on the type, and it should be clear rather than cloudy or murky. The fluid should be free of rust particles, oil sheen, or floating debris.
If the fluid appears brown, gunky, or has a milky film, contamination is likely present. This may indicate internal corrosion, oil or fuel leakage into the cooling system, or previous mixing of incompatible coolants. A sweet smell near the engine or undercarriage could also signal a coolant leak, as ethylene glycol is toxic and attractive to pets.
Test Freeze Point and pH
Use a coolant tester such as a hydrometer or refractometer to check the freeze protection level and pH balance. The freeze point should protect down to at least -34°F (-37°C), while the ideal pH range is 8.5 to 10.5. Below 7 indicates acidity and corrosion risk.
Replace coolant if the freeze point exceeds the safe threshold, the pH is outside the recommended range, or the vehicle has exceeded the manufacturer service interval. Most manufacturers recommend changing coolant every 24,000 to 36,000 miles or every 2 to 3 years, though some long-life formulations can last up to 150,000 miles.
Gather Required Tools and Supplies

Essential Tools for Coolant Replacement
You will need several tools to perform this job safely and effectively. Gather a socket wrench set and ratchets, an adjustable wrench, and a torque wrench for accurate drain plug tightening. A fluid catch pan with at least 10 liters (2.6 gallons) capacity is essential to accommodate full system drainage.
You will also need a spill-free funnel such as the Lisle Spill-Free Funnel for easier filling and air bleeding, a garden hose for flushing the radiator and heater core, and jack and jack stands or ramps for safe undercarriage access. Do not forget to wear chemical-resistant gloves and safety goggles when handling coolant and flush chemicals.
Coolant and Fluids
Choose the correct coolant type by matching the OEM specification such as Honda Type 2 Blue, GM DEX-COOL, or Toyota Long Life Coolant. Use demineralized or distilled water rather than tap water to prevent mineral buildup that causes scaling.
Purchase premixed 50/50 coolant for ready-to-use convenience, especially if residual water remains in the engine block. For contaminated systems, consider a radiator flush solution such as Pro-Strong Extreme Flush for oil or fuel residue or heavy sludge removal.
Replacement Hardware
Keep new drain plug washers or O-rings on hand for reinstallation. High-temperature thread sealant ensures a secure seal on drain bolts. Have hose clamps or radiator hoses ready for replacement if existing components are cracked or soft.
Follow Critical Safety Steps
Never Open a Hot Cooling System
Wait at least one hour after engine shutdown before beginning work. Perform the job in the morning or after overnight cooldown to ensure the engine is completely cold. Leave the hood open to speed cooling, and confirm the radiator is cool to the touch before removing the cap.
Opening a pressurized hot system can release scalding steam and high-pressure coolant, causing serious burns. Always observe warning labels on the radiator cap indicating danger when hot.
Handle Coolant Safely
Wear chemical-resistant gloves and goggles when working with coolant and flush chemicals. Work in a well-ventilated area to avoid inhaling fumes. Keep pets and children away, as ethylene glycol is lethal if ingested.
Clean spills immediately with absorbent material, and store used coolant in labeled, sealed containers. The sweet taste of ethylene glycol makes it particularly dangerous to pets and wildlife.
Dispose of Old Coolant Properly
Never pour coolant down drains, toilets, or onto soil. Take used fluid to recycling centers or auto parts stores such as AutoZone, O’Reilly, or Pep Boys, which offer free recycling. Used coolant is classified as hazardous waste and requires proper handling.
Prepare Vehicle for Service
Park on Level Ground Safely
Apply wheel chocks to rear wheels before elevating the vehicle. Use ramps or jack stands at manufacturer-specified lift points, and avoid working on unstable surfaces. Ensure the vehicle is on level ground for accurate fluid level readings.
Position for Optimal Drainage and Bleeding
For better gravity drainage, park with the front slightly lower than the rear. For easier air bleeding during refill, park with the front elevated. Engage the parking brake and ensure the vehicle is stable before beginning work.
Set Climate Controls for Full Circulation
Turn the ignition to “ON” without starting the engine. Set the heater to maximum heat and fan speed. This opens the heater core valve, allowing full system access during the refill process and helping to purge air more effectively.
Inspect Cooling Components Before Proceeding
Check for cracks or bulges in hoses, a leaking water pump weep hole, corrosion on radiator fins, and low or discolored reservoir fluid. Replace any damaged parts before proceeding with the coolant replacement to avoid repeat repairs.
Drain Old Coolant Completely
Remove Radiator Cap and Break Vacuum
With the engine cold, remove the radiator cap or expansion tank cap. This allows air to enter the system for smooth drainage and prevents vacuum lock that can slow the draining process.
Drain Radiator Fluid
Place the catch pan under the radiator and locate the drain plug, which is usually at the bottom left or right corner. Loosen the plug with a wrench, and allow the coolant to flow out completely. This may take 5 to 10 minutes depending on the system.
Some vehicles lack a drain plug. In that case, disconnect the lower radiator hose at the radiator end to drain the fluid.
Drain Engine Block If Equipped
Move the catch pan under the engine block drain bolt, which is typically near the rear of the block. Remove the plug to drain coolant from the block and heater core. Reinstall with a new washer and thread sealant, then torque to 58 lb-ft (80 Nm) or verify the specification in your owner’s manual.
Note that not all vehicles have engine block drain plugs. If absent, multiple flush cycles will be needed to remove all old fluid.
Flush System to Remove Contaminants
When to Flush vs. Simple Drain
Choose a simple drain and refill if the coolant is clean and on schedule. Perform a full flush if the fluid is gunky or discolored. Use a heavy-duty chemical flush if oil or fuel has contaminated the coolant. A full flush is also required when switching coolant types.
Water-Only Flush Procedure
Close all drain plugs and fill the radiator with distilled water. Start the engine and idle for 15 minutes with the heater on maximum heat. Shut off the engine, allow it to cool, and drain completely. Repeat this process 3 to 5 times until the discharged water runs clear. Expect to use 5 or more gallons of water for a complete flush.
Chemical Flush for Heavily Contaminated Systems
Refill with tap or distilled water and add a radiator flush solution following the product label instructions. Run the engine for 10 to 90 minutes depending on the product, then drain completely. Rinse with distilled water until the discharge is clear.
Products containing potassium hydroxide, such as Pro-Strong Extreme Flush, are effective on oil and fuel residue and safe for all radiators.
Back-Flush Heater Core
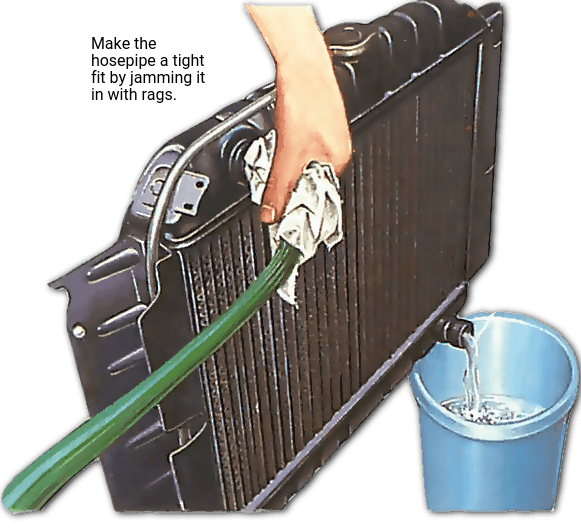
Disconnect the heater hoses at the firewall and use a garden hose to push water backward through the core. Continue until the outflow runs clear, then reconnect hoses with new clamps if needed. This step is especially important for restoring cabin heat performance.
Choose Correct Coolant Type
Match Manufacturer Specification
Consult the owner’s manual or online lookup tools to determine the correct coolant type for your vehicle. Use only OEM-approved coolant to maintain warranty coverage and ensure proper performance. Mixing incompatible coolants can cause gel formation, clogs, or accelerated corrosion.
Coolant Types and Lifespan
IAT (Inorganic Additive Technology) coolants are typically green and require changes every 2 years or 30,000 miles. OAT (Organic Acid Technology) coolants are often orange or red and can last 5 years or 150,000 miles. HOAT (Hybrid Organic Acid Technology) coolants appear in yellow, turquoise, or blue and last 3 to 5 years. Some manufacturers require specific OEM coolants such as Honda Type 2 Blue or BMW-specific formulations.
Use Distilled Water and Correct Mix
The ideal ratio is 50% coolant to 50% distilled water. This provides freeze protection down to -34°F (-37°C) and raises the boiling point to approximately 265°F (130°C). Never use tap water, as minerals cause scaling that restricts coolant flow.
If using premixed 50/50 coolant after a full water flush, remember that residual water in the engine block will dilute the final mixture. Use concentrated coolant after a complete flush, or perform multiple drain-and-refills instead of a full flush when using premixed coolant.
Refill Cooling System Properly
Determine System Capacity
Check the owner’s’s manual or manufacturer website for total cooling system capacity. A typical 10-liter system requires 5 liters of coolant mixed with 5 liters of distilled water. Alternatively, use premixed 50/50 coolant directly if the system has been drained but not flushed with water.
Step-by-Step Refill
Ensure all drain plugs are tight before refilling. Pour the coolant mixture into the radiator filler neck and fill to the base of the neck without overflowing. Add 50/50 mix to the reservoir between the MIN and MAX lines, then replace the reservoir cap securely.
Parking with the front slightly elevated helps purge air during the refill process.
Bleed Air from Cooling System
Why Bleeding Is Critical
Trapped air in the cooling system causes overheating, inaccurate temperature gauge readings, lack of cabin heat, and water pump cavitation that can damage the impeller. Proper bleeding ensures the system is full and air-free.
Open-Cap Bleeding Method
Remove the radiator cap and start the engine outdoors, letting it idle with the heater set to maximum heat and high fan speed. Watch for bubbling at the filler neck, which indicates air escaping from the system.
Allow the engine to warm until the thermostat opens, indicated by a sudden drop in coolant level. The radiator fan should cycle at least twice during this process. Top up coolant continuously as air is purged and the level drops. Once bubbles stop appearing, securely replace the radiator cap. This process may take up to 30 minutes.
Use a Spill-Free Funnel
Mount a Lisle Spill-Free Funnel in place of the radiator cap and fill it with coolant. Run the engine until no bubbles remain in the funnel. This tool removes air efficiently with minimal mess and is highly recommended by DIY mechanics.
Bleeder Valves and Engine Cycling
Some vehicles have bleeder screws on the thermostat housing, water pump, or engine block. Open each valve until coolant flows without bubbles, then close securely.
Alternatively, run the engine until hot, shut it off, allow it to cool, and repeat 2 to 3 times. This engine cycling method helps dislodge stubborn air pockets. Some modern vehicles require a scan tool to activate electric bleed valves, so check your owner’s manual for specific procedures.
Perform Final Checks
Inspect for Leaks
Run the engine and check all connection points for leaks. Inspect the radiator drain plug, engine block drain bolt, hoses and clamps, water pump seal, and reservoir connections. Tighten any fittings as needed.
Test Drive and Recheck
Take a 10 to 15 minute drive and monitor the temperature gauge for stability. Confirm that cabin heat is strong and the engine reaches normal operating temperature without spikes. After the engine cools down, recheck the coolant level and top off if needed.
Label and Dispose of Used Coolant
Store used coolant in a sealed container and label it clearly with “Used Engine Coolant – Toxic.” Recycle the fluid at an auto parts store or hazardous waste center rather than pouring it down any drain.
Maintain Long-Term Cooling Health
Follow Recommended Service Intervals
Replace standard coolant every 24,000 to 36,000 miles or every 2 to 3 years. Long-life coolants may last up to 100,000 miles or 5 years, but verify with your product specifications. Perform an annual inspection to check color, clarity, and freeze point protection.
Preventive Tips to Extend Component Life
Never mix coolant colors or types, as chemical reactions can cause serious damage. Use only distilled water when diluting concentrate or performing flushes. Replace the reservoir cap if it is cracked or not sealing properly. Inspect hoses at every oil change for signs of wear, cracking, or bulging.
For well-maintained vehicles, a simple drain-and-refill is sufficient. Full flushing is only needed for contamination, coolant type changes, or when switching from incompatible fluids.
Frequently Asked Questions About Replacing Coolant in Radiators
How often should I replace the coolant in my radiator?
Most manufacturers recommend replacing coolant every 24,000 to 36,000 miles or every 2 to 3 years, whichever comes first. Some long-life coolants can last up to 150,000 miles, but you should visually inspect the fluid annually and test freeze point protection to confirm it still meets specifications.
Can I replace coolant myself at home?
Yes, replacing coolant is a straightforward DIY procedure that most car owners can complete with basic tools. The job takes 1 to 2 hours for a simple drain-and-refill or 2 to 3 hours if flushing is required. DIY costs approximately $20 to $30 for coolant and supplies, compared to $100 to $150 at a shop.
What happens if I do not bleed the air out after refilling?
Trapped air causes overheating, inaccurate temperature readings, lack of cabin heat, and potential water pump damage from cavitation. Air pockets create hot spots in the engine and prevent proper coolant circulation. Always bleed the system thoroughly after refilling.
Is it okay to mix different colors of coolant?
No, mixing different types or colors of coolant can cause chemical reactions that lead to gel formation, clogs, or accelerated corrosion. Always use the specific coolant type recommended by your vehicle manufacturer, even if the colors appear similar.
How do I know if my cooling system needs flushing rather than just draining?
Flush the system if the coolant appears brown, gunky, or discolored, if there is evidence of internal corrosion, if oil or fuel has contaminated the coolant, or if you are changing from one coolant type to another. A simple drain-and-refill works for clean, on-schedule coolant replacement.
Key Takeaways for Replacing Radiator Coolant
Replacing coolant in your radiator is essential maintenance that prevents overheating, internal corrosion, and costly engine damage. The process involves draining old fluid, optionally flushing to remove contaminants, selecting the correct coolant type, refilling to proper levels, and bleeding trapped air. Always use distilled water rather than tap water, and maintain the correct 50/50 mixture ratio for optimal freeze and boil protection.
Safety is critical throughout this procedure. Never open a hot cooling system, handle toxic ethylene glycol with gloves and goggles, and dispose of used coolant properly at recycling centers. Following manufacturer specifications for coolant type and service intervals ensures your cooling system delivers reliable performance for years to come.



