

Nothing ruins a ride faster than an overheating engine, and more often than not, the culprit is low or degraded coolant. Knowing how to fill motorcycle coolant properly is essential for maintaining a sealed, air-free system that keeps your engine running at peak temperature. Whether you’re topping off after a leak or performing a full coolant change, skipping critical steps can lead to air pockets, corrosion, or even head gasket failure. This guide covers everything you need to know, from selecting the right coolant to bleeding air from the system, ensuring your bike stays cool under pressure.
Prepare the Motorcycle Safely
Work Only on a Cold Engine
Never open the cooling system when the engine is hot. A pressurized radiator can release boiling coolant and scalding steam with explosive force. Wait at least 6 to 12 hours after your last ride to ensure the engine and coolant have fully cooled. To double-check, touch the radiator or upper hose. If it feels warm, wait longer before proceeding.
Position the Bike Correctly
Park your motorcycle on level ground using the center stand or paddock stands. This ensures accurate coolant levels in the radiator and expansion tank. Uneven positioning can cause false readings and lead to improper filling, which compromises cooling efficiency.
Remove Access Panels
Many modern bikes hide the radiator behind fairings, side covers, or the seat. Use a screwdriver or socket set to remove necessary panels. Keep screws organized to avoid losing them. Common access points include side fairing near the radiator cap, the seat to expose the expansion tank, and lower cowling for drain bolt access.
Drain Old Coolant Completely

Locate the Drain Bolt
The drain bolt is usually on the water pump cover or the lowest point of the engine. Consult your owner’s manual if unsure about the location. Some models lack a drain plug and require disconnecting the lower radiator hose to drain the system completely.
Use a Drain Pan with Handle
Place a drain pan under the bolt to catch all fluid. Pans with handles make transport safer and reduce spill risk. Ethylene glycol coolant is toxic to pets and wildlife, so containing all runoff is essential for safety and environmental reasons.
Remove the Bolt and Washer
Unscrew the drain bolt with a wrench or socket. Discard the old crush washer because reusing it risks leaks. Allow coolant to drain fully, then tilt the bike slightly or squeeze hoses to evacuate trapped fluid. Don’t forget to drain the expansion tank separately by removing the reservoir cap and disconnecting the bottom hose or siphoning out the remaining coolant.
Flush the Cooling System
Why Flush Coolant
Old coolant loses corrosion inhibitors over time and can turn into sludge, reducing heat transfer efficiency. A system flush removes contaminants, especially in high-mileage bikes or those with unknown service history. Flushing every 2 to 3 changes keeps the system clean and functioning properly.
Choose the Right Flush Method
Different flush methods work better for different situations. Tap water works for light maintenance with minimal buildup. A 50/50 vinegar-water solution handles light scale or rust but should not exceed 30 minutes. Chemical flush products like Holts SpeedFlush work best for heavy contamination, and aluminum-safe formulas are available. For neglected systems, use a double flush with vinegar first, then distilled water rinse.
Perform the Flush
Reinstall the drain bolt with a new washer. Fill the system halfway with your chosen flush solution. Start the engine and idle at 1,500 to 2,000 rpm for 10 minutes. Shut off the engine, let it cool, then drain completely. Repeat with distilled water to remove all residue before refilling with fresh coolant.
Inspect Components Before Refilling
Check Hoses and Clamps
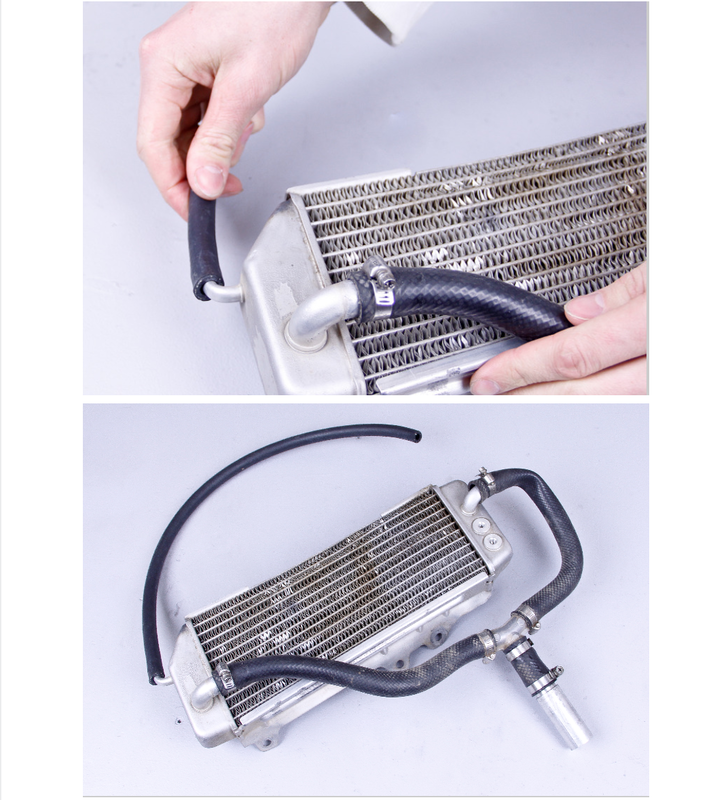
Squeeze the upper and lower radiator hoses to check their condition. Replace hoses if they appear cracked, swollen, or brittle. Also replace if they feel soft or spongy, which indicates internal breakdown. Inspect clamps for rust or looseness and upgrade to stainless steel worm-drive or constant-tension clamps for better reliability.
Examine the Radiator
Straighten bent fins with a plastic comb or small screwdriver. Blocked airflow from damaged fins reduces cooling efficiency significantly. Check the radiator for pinhole leaks or signs of corrosion that could cause problems later.
Test the Radiator Cap
Inspect the rubber seal on the radiator cap. A cracked or warped gasket prevents proper pressure sealing, which leads to overheating. Most caps are rated 1.1 to 1.4 bar, so replace the cap if it’s damaged or past its service life.
Refill with Correct Coolant Type

Choose the Right Coolant
Never use automotive coolant without verifying compatibility with your motorcycle. Motorcycle engines often combine aluminum, cast iron, and copper alloys, requiring specific chemistry. Using the wrong type can cause corrosion and reduce cooling efficiency.
Coolant Types Compared
Different coolant technologies suit different bikes. IAT coolants work best in older bikes with copper and brass radiators and should be replaced every 2 years. OAT coolants suit modern bikes and offer long-life performance but should never be mixed with IAT. HOAT coolants work in hybrid systems and some Japanese models. Propylene glycol options are pet-safe and non-toxic, though they offer slightly lower efficiency.
Use Premixed Coolant When Possible
For most riders, premixed 50/50 coolant is safer and more convenient because it eliminates dilution errors. If using concentrate, mix only with distilled water because tap water contains minerals that cause scaling and reduce heat transfer.
Fill the Radiator Correctly
Use a Narrow-Spout Funnel
Insert a funnel into the radiator filler neck and pour coolant slowly to allow air to escape. Listen for gurgling sounds, which indicate air is moving out of the system. Taking your time during this step prevents air lock problems later.
Remove Air Pockets
Rock the bike gently side-to-side to dislodge trapped air. Squeeze the lower radiator hoses firmly to force trapped air upward. Continue filling until coolant reaches the bottom of the filler neck. Overfilling causes expansion overflow that can damage paint or electrical components, so stop at the right level.
Open Bleed Bolts if Equipped
Some models, particularly Ducatis, BMWs, and certain Harley-Davidsons, have bleed screws at high points in the system. Open them until a steady stream of coolant flows, then close securely. This step is crucial for proper cooling system function.
Bleed Air from the System
Run Engine Without Radiator Cap
Start the engine and let it idle without the radiator cap installed. Blip the throttle to 4,000 to 5,000 rpm several times to activate the water pump and circulate coolant. Watch the filler neck because coolant level will drop as air escapes. Continue for 1 to 2 minutes until no more bubbles rise.
Let Engine Cool and Recheck
Turn off the engine and wait 5 to 10 minutes. The coolant will settle, so top up to the filler neck if needed. For V-twin engines, lift the front wheel slightly on a stand because this angle helps air escape more effectively.
Install Radiator Cap
Only install the cap when the system is cool enough to touch. Press down and twist until it clicks into place. A loose cap causes pressure loss and overheating, so ensure it’s properly secured.
Fill the Expansion Tank
Use Cold Engine Reference
The expansion tank must be filled when the engine is cold. Add coolant to the MAX or upper fill line, never above it. This space allows for thermal expansion as the engine heats up, so overfilling causes overflow problems.
Use Matching Coolant
Always top up with the same type and color already in the system. Mixing incompatible coolants risks chemical reactions that cause gelation, sludge, and blockages. When in doubt, stick with what was previously in the bike.
Routine Checks
On most bikes, you’ll only need to check and top up the reservoir between full changes. The radiator stays sealed between services, making reservoir checks the primary maintenance task.
Post-Fill Verification and Testing
Take a Test Ride
Ride for 15 to 20 minutes at moderate speed and monitor the temperature gauge. It should stay in the normal range. Watch for cooling fan activation, which typically occurs around 75 to 80°C or 167 to 176°F. Feel all hoses to ensure they heat evenly, which indicates proper circulation.
Check for Leaks
Inspect the drain bolt, hose connections, water pump weep hole, and radiator core for leaks. Even a small drip can lead to rapid coolant loss, so address any leaks immediately before they become serious problems.
Recheck Levels After Cooling
Let the engine cool overnight, then remove the radiator cap carefully using a rag. The level should be level with the top of the filler neck. Top up if low. The expansion tank should read full when cold, which confirms proper bleeding. Repeat this verification after 2 to 3 rides to ensure stability.
Topping Up Coolant
When to Top Up
Add coolant if the reservoir level drops below the low mark. Minor fluctuations are normal due to temperature changes, but frequent drops indicate a leak that needs investigation.
Procedure
Start the bike and let it warm up because coolant expands when hot and should stabilize at the low mark. Add 100 mL increments of matching coolant until the level is just above low. Run the engine briefly, then let it cool. Recheck and repeat if needed until the level reaches full when cold.
Emergency Top-Up
In a pinch, use distilled water only. Tap water introduces minerals that cause scaling, so replace with proper 50/50 mix as soon as possible. Water dilutes antifreeze protection, so this is only a temporary solution.
Troubleshoot Common Coolant Issues
Coolant Disappears Quickly
Likely causes include a leaking hose or clamp, cracked radiator, failing water pump seal, or blown head gasket if the coolant appears milky. Inspect all connections and perform a pressure test if the leak isn’t visible.
Overheating After Refill
This is usually caused by air lock. Re-bleed the system by running the engine without the cap, blipping the throttle repeatedly, and squeezing hoses. Recheck the level after cooling.
Milky or Foamy Coolant
This indicates oil contamination, which means possible head gasket failure or a cracked cylinder head. Stop riding immediately and inspect the engine to prevent catastrophic damage.
Reservoir Overflowing When Hot
Causes include an overfilled system, faulty radiator cap that isn’t holding pressure, or blocked overflow hose. Check the cap pressure rating and ensure the overflow tube is clear.
Dispose of Used Coolant Responsibly
Never Pour It Out
Ethylene glycol is lethal to pets and wildlife and contaminates water systems. Even small spills are dangerous, so never pour used coolant down drains, toilets, or onto soil.
Recycle Properly
Transfer used coolant to a sealed container and take it to auto parts stores that offer free recycling, municipal hazardous waste facilities, or certified recycling centers. Use a drain pan with handle for safe transport and spill prevention.
Maintain Coolant for Longevity
Follow Replacement Schedule
Replace coolant every 2 years regardless of mileage. Some models require replacement at 16,000 to 24,000 miles, whichever comes first. Always check the owner’s manual for specific requirements.
Prevent Corrosion
Fresh coolant contains corrosion inhibitors that degrade over time. Old fluid can eat away at the head gasket, causing costly repairs. Replacing coolant on time prevents expensive engine damage and extends component life.
Track Riding Tips
Consider using track-specific coolant like Engine Ice for high-performance situations. Perform a full flush before installation and carry extra coolant for long track sessions.
Frequently Asked Questions About Filling Motorcycle Coolant
How often should I change motorcycle coolant?
Replace motorcycle coolant every 2 years regardless of mileage. Some manufacturers recommend replacement at 16,000 to 24,000 miles, so always consult your owner’s manual for the specific interval for your bike.
Can I use car coolant in my motorcycle?
You should not use car coolant without verifying compatibility. Motorcycle engines often combine aluminum, cast iron, and copper alloys that require specific coolant chemistry. Using the wrong type can cause corrosion and cooling problems.
Why does my motorcycle overheat after changing coolant?
Overheating after a coolant change is usually caused by air lock in the system. Re-bleed by running the engine without the radiator cap, blipping the throttle to 4,000 to 5,000 rpm, and squeezing the lower hoses to force air out.
What happens if I mix different coolant types?
Mixing coolant types, even if colors appear similar, can cause additive gelation, sludge, and clogged passages. Never mix IAT, OAT, and HOAT coolants because chemical reactions can lead to overheating and system damage.
How do I know if my motorcycle has an air lock?
Symptoms of air lock include fluctuating temperature gauge, overheating at idle but not at speed, and low coolant readings despite a full reservoir. Bleed the system by running the engine without the cap and blipping the throttle to resolve air lock.
Is it safe to top up with water in an emergency?
Using distilled water temporarily is acceptable in emergencies, but tap water should be avoided because minerals cause scaling. Replace the water with proper 50/50 coolant mixture as soon as possible because water dilutes freeze and boil-over protection.
Key Takeaways for Filling Motorcycle Coolant
Proper coolant maintenance is one of the most effective ways to protect your motorcycle’s engine and ensure reliable performance. Always work on a cold engine, drain the system completely including the expansion tank, and use the correct coolant type specified for your bike. Premixed coolant eliminates mixing errors and is recommended for most riders. Bleeding air from the system is critical, so run the engine without the cap and blip the throttle to purge trapped air. Finally, recycle used coolant responsibly at certified collection points to protect pets, wildlife, and water systems. By following these steps, you ensure your cooling system operates efficiently, preventing costly repairs and extending the life of your engine.



