

Running low on coolant can lead to overheating, engine damage, and even total breakdown—but knowing how to fill coolant in a car properly keeps your engine safe and running at peak performance. Whether you’re topping off after a leak or refilling post-flush, this guide walks you through every step with precision. You’ll learn where to add coolant, which type to use, how to avoid air pockets, and what mistakes to avoid so you never risk engine damage from improper filling.
Locate the Correct Fill Point
The first step in filling coolant is identifying the right location. Modern vehicles typically have two possible fill points: the coolant reservoir or the radiator/expansion tank. Using the wrong one can lead to underfilling or overfilling, and confusing it with the windshield washer tank can cause serious engine damage.
Check Reservoir vs. Radiator Cap
Most daily drivers use a pressurized cooling system with an overflow reservoir. This plastic tank, usually translucent and marked with “MIN” and “MAX” lines, is the primary fill point for top-offs when the engine is cold.
• If the level is below “MIN,” add coolant here
• The reservoir connects to the radiator and automatically balances fluid as the engine heats and cools
However, if you’re performing a full refill after draining the system, you must fill directly into the radiator or expansion tank through its metal or hard plastic cap.
Identify Your Vehicle’s System Type
Vehicle age and type determine your fill approach.
• 1980s to present (most cars): Use the reservoir for top-offs; radiator for full fills
• Older or performance models: Fill directly into the radiator neck
• European or luxury vehicles: May have a pressurized expansion tank requiring special caps
Choose the Right Coolant Type
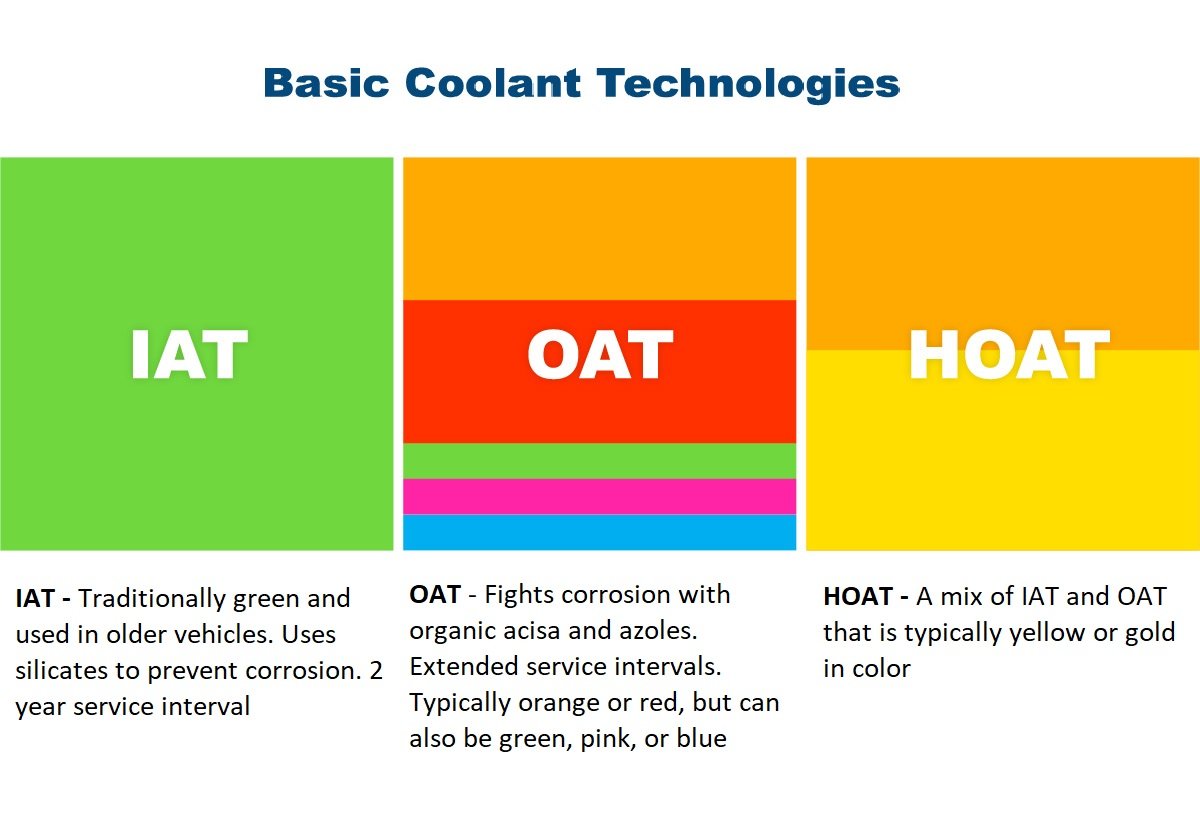
Using the wrong coolant can cause sludge, corrosion, or seal failure. Not all antifreeze is the same, even if the colors look similar.
Match Coolant to Manufacturer Specifications
There are three main types of coolant, each with different chemical formulations.
| Type | Best For | Service Life | Key Notes |
|---|---|---|---|
| IAT (Green) | Pre-1996 vehicles | 2 years | Fast-acting but short-lived |
| OAT (Orange/Red) | GM, VW, Audi | Up to 5 years | Long-life formula |
| HOAT (Yellow/Blue) | Ford, BMW, Mercedes | 5 years | Hybrid formula balances speed and longevity |
Always check your owner’s manual or the label on the reservoir cap for the correct specification. Coolant color is not reliable since manufacturers use different dyes for the same type.
Avoid Mixing Coolant Types
Mixing incompatible coolants can create serious problems.
• Forms gel or sludge, blocking coolant passages
• Depletes corrosion inhibitors
• Reduces heat transfer efficiency
If you’re unsure what coolant is already in the system, drain and flush before adding new coolant.
Prepare the Correct Coolant Mixture
Coolant must be diluted properly. Too strong or too weak reduces performance and protection.
Use 50/50 Mix for Optimal Protection
A 50% coolant, 50% distilled water blend provides excellent protection.
• Freeze protection down to -34°C (-30°F)
• Boiling point over 125°C (260°F) under pressure
• Maximum heat transfer and corrosion inhibition
Never use tap water. Minerals cause scale buildup and corrosion. Always use distilled or deionized water.
Choose Premixed or Concentrate
Pre-mixed coolant is ideal for top-offs since no measuring is required. Concentrate must be mixed in a clean container before adding. Never pour concentrate and water separately into the system.
Beyond 70% concentrate, heat transfer drops sharply. Stick to 50/50 for best results.
Follow Safety Procedures First
Working with coolant and hot engines poses serious risks. Follow these steps before opening any cap.
Wait for a Cold Engine
Never open the cooling system when hot. Pressurized coolant can exceed 15 psi and 100°C, spraying scalding fluid and steam.
• Wait 30 to 60 minutes after shutdown
• Test pressure by placing a thick cloth over the cap and turning slowly
• If you hear hissing, close it and wait longer
Wear Protective Gear
• Chemical-resistant gloves
• Goggles to prevent splashes
• Long sleeves and pants to protect skin
Ethylene glycol is toxic. Its sweet smell attracts pets and children. Clean spills with absorbent material and store coolant securely.
Fill Coolant: Step-by-Step Guide
Now that the system is safe and the correct coolant is ready, it’s time to refill.
Top Off When Level Is Low
Use this method for routine maintenance when the reservoir is below the “MIN” line.
- Ensure engine is cold
- Wipe the reservoir cap to prevent contamination
- Open cap and insert a clean funnel
- Add premixed coolant to the “COLD” or “MAX” line
- Reinstall cap securely
- Start engine and run until warm with heater on high to purge air
- Let cool completely, then recheck level and top off if needed
Running the heater opens the heater core valve, helping air escape faster.
Refill After Full Drain or Flush
When replacing all coolant after a flush or repair, follow this complete process.
- Drain old coolant using the radiator drain valve
- Inspect fluid for rust (corrosion) or oil (head gasket leak)
- Flush system 2 to 3 times with distilled water until clear
- Close drain valve and reinstall
- Fill radiator to just below the neck rim with premixed coolant
- Bleed air from the system
- Run engine 10 to 15 minutes with heater on high
- Shut off, cool down, then top off reservoir
Typical system capacity ranges from 8 to 18 quarts. Check your manual for your specific vehicle.
Bleed Air from the Cooling System

Trapped air causes hot spots, overheating, and poor heater output even if the gauge reads normal.
Use Passive Bleeding
Most common method for DIYers involves squeezing the upper radiator hose repeatedly while filling. Feel for bubbles and continue until flow is smooth. Run engine with heater on high to push air to the reservoir.
Open the Bleed Valve
Some engines have a bleed screw behind the thermostat housing.
- Open the valve
- Fill radiator slowly as air escapes first
- When coolant flows steadily, close the valve
- Finish filling to base of neck
Follow Service Manual Procedure
For example, a 2007 Honda Civic requires filling the reservoir to MAX, adding coolant to the radiator base, loosely installing the cap, running until the fan cycles on, then retightening and topping off.
Never run engine with radiator cap fully off unless the manual explicitly allows it.
Handle Special Cases and Advanced Methods
Some vehicles require extra care due to complex cooling circuits.
Fill After Engine Block Drain
If the block was fully drained during thermostat replacement, premix coolant first. Fill radiator slowly with engine cold. Start engine, but coolant enters the block only after the thermostat opens and the upper hose gets hot. Shut off, cool down, then recheck levels in both radiator and reservoir.
Use Vacuum Filling
This professional method is common in European and high-end models. It evacuates air before adding coolant and prevents airlocks in high-point circuits. If you don’t have the tool, run engine with cap slightly loose until warm, then re-cap and cool before rechecking level.
Check for Leaks and Monitor After Refill
A successful refill isn’t complete until you verify system integrity.
Inspect for External Leaks
After refilling, check hoses, radiator, water pump, and drain valve for drips. Look under the car after parking.
Watch for Internal Leaks
If coolant drops without visible leaks, check the oil for milky appearance indicating head gasket failure. Look for white exhaust smoke.
Recheck Level After 24 to 48 Hours
Air continues to purge for days. Check daily and top off as needed until level stabilizes.
Maintain Coolant Long-Term
Proper filling is just the start. Ongoing maintenance prevents future issues.
Follow Replacement Schedule
• IAT (Green): Replace every 2 years or 24,000 miles
• OAT (Orange): Replace every 5 years or 150,000 miles
• HOAT (Yellow): Replace every 5 years or 100,000 to 150,000 miles
Test Coolant Condition
Visual check for brown or rusty fluid indicates contamination. Use a hydrometer or refractometer to verify freeze protection. Use pH test strips to detect acidity, which signals degradation.
Dispose of Old Coolant Responsibly
Never pour coolant down drains or onto soil. Take it to an auto parts store, mechanic, or hazardous waste facility. Store in a sealed container.
Frequently Asked Questions About Filling Coolant in a Car
Can I add water instead of coolant in an emergency?
Yes, but only in emergencies to prevent overheating. Water lacks freeze protection and corrosion inhibitors, so replace with proper 50/50 coolant mix as soon as possible.
How often should I check my coolant level?
Check coolant level at every oil change. Also check daily for the first few days after refilling, since air continues to purge from the system.
What happens if I mix different coolant types?
Mixing incompatible coolants can form gel or sludge that blocks coolant passages, deplete corrosion inhibitors, and reduce heat transfer efficiency. Always drain and flush if unsure about what’s in the system.
Why does my car overheat after refilling coolant?
Overheating after refill usually indicates an airlock in the system. Bleed the air by running the engine with heater on high, or the thermostat may not be working properly.
Is it okay to fill coolant when the engine is hot?
No. Never open the cooling system when hot. Pressurized coolant can exceed 100°C and cause severe burns. Wait 30 to 60 minutes after shutdown.
Where is the coolant reservoir located?
The coolant reservoir is usually a translucent plastic container near the front of the engine bay. It has “MIN” and “MAX” markings. Don’t confuse it with the windshield washer tank, which has a blue cap and windshield symbol.
Key Takeaways for Properly Filling Your Car’s Coolant
Filling coolant correctly protects your engine from catastrophic failure. Always use the right type for your vehicle, mix with distilled water only, work on a cold engine, and bleed air thoroughly. Check for leaks after refilling and monitor the level for a few days. When in doubt, especially with European or complex systems, consult your service manual or seek professional help. A few minutes of care now saves thousands in repairs later.



