You wake up to a puddle of hot water near your water heater. The discharge pipe is dripping or gushing, signaling a hot water tank overflow that demands immediate attention. This is not a normal occurrence but a warning from your safety system.
Your Temperature and Pressure relief valve is doing its job or failing under stress. Left unchecked, this issue leads to costly water damage, scalding risks, or even tank rupture. This guide details eleven proven causes, safe diagnostic steps, and clear repair paths.
Diagnose High Incoming Water Pressure Causing Overflow

Water entering your home too forcefully can push the relief valve past its limit. Most residential systems handle up to 80 psi safely. If street pressure exceeds this, the valve may weep continuously even if the heater works fine.
How to Test Static Water Pressure
You need a standard pressure gauge to check your system baseline.
* Screw the gauge onto an outdoor spigot or washing machine valve.
* Turn on the water with no other fixtures running inside.
* Read the measurement carefully.
Readings above 80 psi mean you need a pressure-reducing valve installed on your main line. This device regulates pressure before it reaches the heater, protecting all your plumbing from excessive force.
Resolve Thermal Expansion in Closed Plumbing Systems
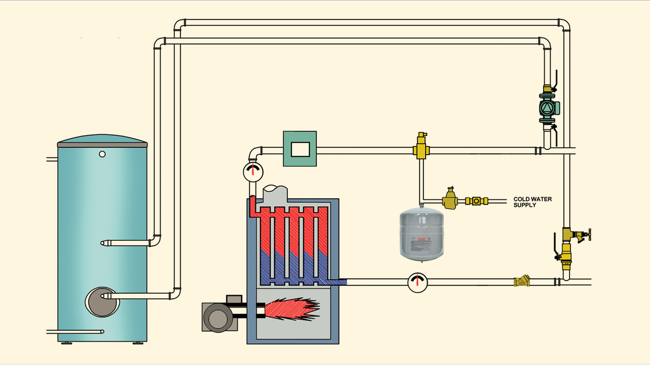
Water expands in volume when heated. Older homes allowed this extra volume to flow back into the city main. Modern systems often have check valves or pressure reducers that block reverse flow, creating a closed loop.
Signs of a Closed Loop Problem
Pressure builds with nowhere to go until the safety valve opens. Look for these specific indicators:
* The valve drips only after heating cycles complete.
* Leaking stops once the tank cools down.
* No other leaks exist in the visible system.
Install an expansion tank on the cold water inlet line to fix this. It absorbs excess volume with an internal air bladder, stabilizing pressure within the closed system effectively.
Replace a Failed or Water-Locked Expansion Tank
Even if you have an expansion tank, it might not be working. Over time, the internal bladder ruptures or loses air, filling the tank with water and making it useless.
Testing Expansion Tank Integrity
Tap the tank with your knuckle to listen for sound differences.
* A hollow sound at the top and solid bottom means it is healthy.
* A solid sound throughout means it is water-logged.
* Check the Schrader valve like a tire stem.
If water sprays out of the valve, the bladder is blown. Replace the unit and pre-charge the new one to match your home water pressure before installing it.
Fix Overheating from Thermostat Failure

If your thermostat will not shut off the heat, water temperature can soar past 210°F. This triggers the relief valve immediately. This issue is common in electric heaters where one element stays on constantly.
How to Verify Water Temperature
Run hot water from a nearby faucet for one to two minutes. Fill a cup and use a kitchen thermometer to check the reading.
* Over 140°F is too hot for standard use.
* Near or above 210°F indicates thermostat failure.
Reset the thermostat to 120°F for safety and efficiency. If the temperature still climbs, replace the thermostat or heating element to prevent tank damage.
Correct Incorrect Temperature Settings
Sometimes the fix is simple because the thermostat is just set too high. While this alone may not hit 210°F, it keeps the system close to the threshold. This makes thermal expansion more likely to trigger the valve unnecessarily.
Set your thermostat to 120°F immediately. This reduces scald risk, saves energy, and lowers stress on the tank components. Homes with dishwashers lacking internal heaters may need 130°F, but consider upgrading the appliance instead.
Replace a Failing T&P Relief Valve
The valve itself can wear out over time. Mineral buildup, corrosion, or a single activation can prevent it from sealing completely. A once-safe valve may start dripping permanently even when conditions are normal.
Testing Valve Function
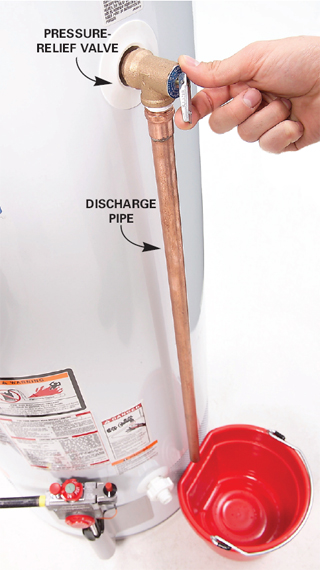
Place a bucket under the discharge pipe before testing.
* Lift the test lever briefly to let water flow strongly.
* Release the lever quickly.
* Watch for the flow to stop immediately.
If it drips afterward, the valve is bad and must be replaced. Never reinstall an old valve because its reliability drops significantly after tripping.
Remove Sediment Buildup and Hot Spots
Hard water leaves mineral deposits on the tank bottom. This layer insulates the burner or heating element, causing localized superheating. Water turns to steam instantly, spiking pressure and opening the valve.
Flushing the Tank
You can remove these deposits with a simple flush procedure.
1. Shut off power and water supply to the unit.
2. Attach a hose to the drain valve at the bottom.
3. Open the valve and let water run until it is clear.
4. Refill the tank and restart the system.
Do this every one to two years to extend tank life and prevent future pressure spikes caused by sediment insulation.
Inspect Partially Closed or Stuck Valves
A cold water inlet or shut-off valve that is not fully open can create turbulence. This causes pressure swings inside the tank that mimic more serious problems.
Check all valves connected to the heater carefully. Ensure they are fully open or fully closed, never partially. Look for leaks around the valve stem, which could mimic a relief valve leak and confuse your diagnosis.
Address Damaged Dip Tube or Mixing Valve Issues
A broken dip tube lets cold water mix at the top of the tank. This confuses the thermostat and causes erratic temperatures. A stuck mixing valve can also cause wild temperature fluctuations.
Replace the dip tube if it is cracked or broken. It is an inexpensive part that is easy to change on newer models. Test or replace mixing valves if temperature fluctuates wildly despite other fixes.
Verify Proper Installation and Sizing
An undersized relief valve or incorrect discharge pipe can cause failure. Code violations are common in DIY repairs and can lead to dangerous back-pressure situations.
Ensure your installation meets these requirements:
* Valve matches heater BTU and capacity.
* Discharge pipe is the same diameter as the valve outlet.
* Pipe slopes downward without kinks or blockages.
* Termination is within 6 inches of the floor.
Correct piping with approved materials like copper or CPVC. Never cap the pipe or use flexible hoses, as this disables the safety system entirely.
Evaluate Age and General Tank Failure
Water heaters typically last 8 to 12 years. Beyond that, corrosion, repeated stress, and worn components make leaks inevitable. Frequent activations may signal the end of the unit life.
Look for these signs it is time to replace:
* Rust on the tank body or base.
* Leaks coming from the tank itself.
* Frequent relief valve activations.
* Age over 10 years.
Replace the unit if you see these signs. Consider upgrading to a tankless model for longer life and better efficiency without storage tank risks.
Emergency Steps for Active Hot Water Tank Overflow
When you see overflow, act fast to prevent damage. For gas heaters, turn the gas knob to Off or Pilot. For electric heaters, flip the breaker labeled Water Heater to OFF. Do not just turn down the thermostat.
Close the cold water inlet valve on top of the tank immediately. Place a bucket under the discharge pipe to catch scalding water. Open a hot water faucet elsewhere to help relieve pressure safely.
| Situation | Action Required |
|---|---|
| Drip after heating cycle | Monitor and schedule repair. |
| Continuous stream of hot water | Emergency. Shut off utilities now. |
| Water over 140°F | Investigate thermostat immediately. |
| Gas smell or soot marks | Evacuate and call gas company. |
| Leaking tank body | Replace unit immediately. |
Frequently Asked Questions About Hot Water Tank Overflow
Is a dripping T&P valve an emergency?
It becomes an emergency if the flow is continuous or the water is scalding hot. A slight drip after a heating cycle needs prompt repair but may not require immediate shutdown.
Can I cap the discharge pipe to stop the leak?
No, never cap the discharge pipe. Doing so removes the only escape route for excessive pressure and creates a high risk of tank rupture or explosion.
How often should I flush my water heater?
You should flush the tank every 1 to 2 years. This removes sediment that causes hot spots and prevents pressure spikes that trigger the relief valve.
What pressure is too high for a residential water heater?
Pressure consistently over 80 psi is too high. You need a pressure-reducing valve installed on your main line if your static pressure exceeds this limit.
When should I replace my water heater instead of repairing it?
Replace the unit if it is over 10 years old, shows heavy corrosion, or has a leaking tank body. Repeated overheating also indicates internal damage requiring replacement.
Key Takeaways for Fixing Hot Water Tank Overflow
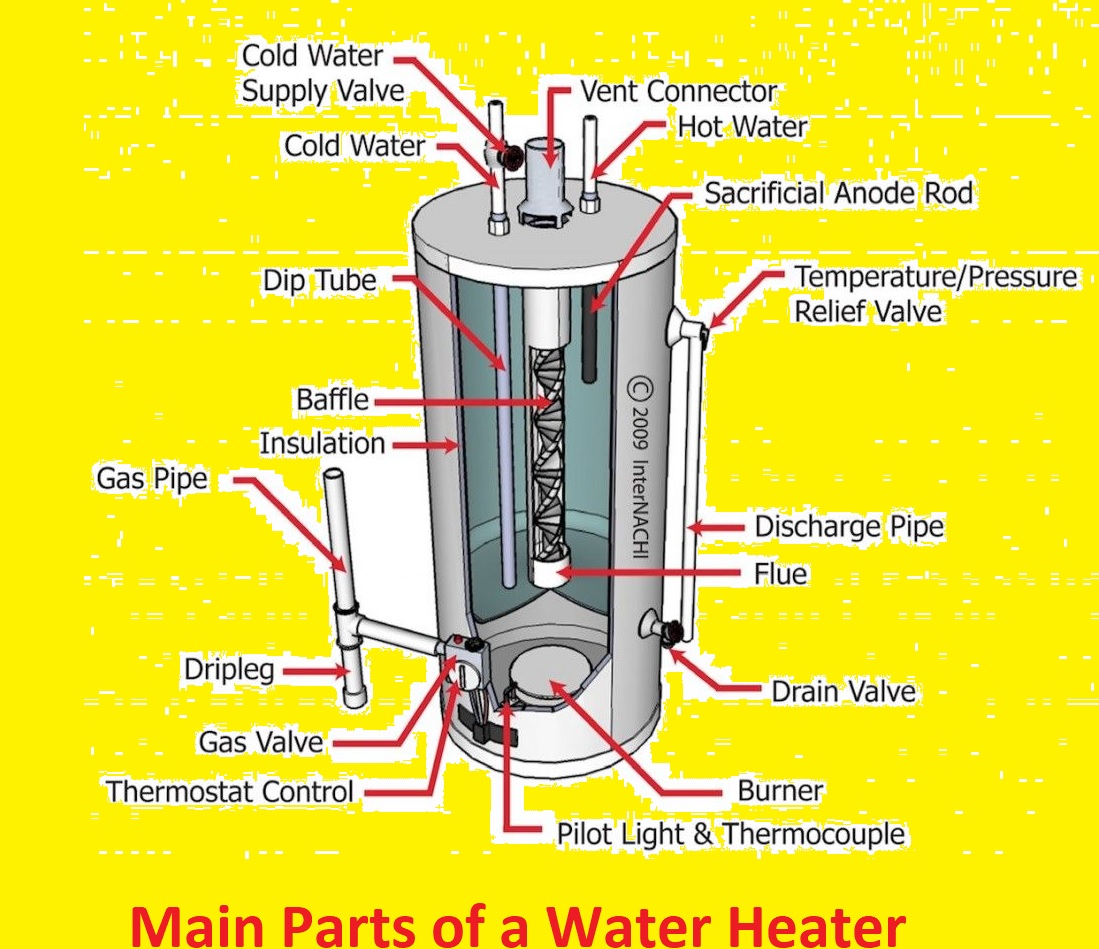
A hot water tank overflow is a critical warning sign of high pressure, overheating, or component failure. Ignoring it risks severe water damage, scalding injuries, or tank explosion. Most causes like high pressure or a bad valve are fixable with simple tools.
However, an aging tank or repeated overheating often signals the need for full replacement. Test your pressure, flush sediment annually, and inspect your expansion tank regularly. If you are unsure about gas lines or electrical components, call a licensed plumber immediately.