

A leaking aluminum radiator can quickly escalate into engine overheating, transmission damage, or complete engine failure. While the concept of patching a radiator sounds simple, modern aluminum units are engineered with remarkable precision. Their tube walls measure just 0.010 to 0.015 inches thick, making them extremely sensitive to heat and physical stress. Most experts consider DIY welding attempts on these components nearly impossible without professional tools.
That said, not every leak demands a full replacement. Small external pinholes and surface cracks can sometimes be addressed temporarily with high-temperature epoxies or heat-activated sealants. This guide walks you through accurate leak diagnosis, honest repair assessments, temporary fix methods, and clear replacement triggers. You will also learn proven prevention strategies to protect your cooling system for years to come.
Diagnose the Leak Accurately Before Any Repair

Before reaching for epoxy or sealants, confirm the radiator is truly the source of coolant loss. Many cooling problems originate from simpler culprits like loose hose clamps, cracked hoses, or failing radiator caps.
Locate the Leak Visually
Always start with a cold, depressurized system. Inspect the entire radiator surface carefully:
- Bottom leaks often signal internal corrosion or age-related metal softening. Weeping at the base usually means replacement is smarter than repair.
- Top leaks typically connect to overheating, pressure buildup, cracked tanks, or failed gaskets.
- Side or core leaks usually come from physical damage like rocks, debris, or rubbing mounts.
- Overflow tank leaks frequently trace back to the hose, cap, or loose connections.
Look for white crusty deposits or oily residue. If transmission fluid appears mixed with coolant, the internal cooler has failed and needs immediate attention.
Pressure-Test the Cooling System
Visual inspection alone often misses small or intermittent leaks. A pressure test delivers reliable confirmation.
- Use a hand-pump pressure tester matched to your radiator neck or reservoir.
- Pressurize the system to the cap’s rated PSI, typically 13 to 18 psi.
- Watch for pressure drops or visible seepage over several minutes.
- If pressure holds but coolant still disappears when hot, suspect a head gasket issue instead.
This step confirms whether the radiator is actually leaking and helps you decide if repair is worth pursuing.
Identify Your Radiator Type First

Not all aluminum radiators share the same construction. Your repair options depend entirely on which design you own.
Plastic Tank Versus All-Aluminum Construction
Plastic Tank Radiators (OE Style):
– Most common in factory vehicles
– Use rubber gaskets to seal plastic tanks against the aluminum core
– Prone to failure from mismatched expansion rates between materials
– Gaskets dry out, plastic cracks, and bypass plugs leak over time
– Generally considered non-repairable for long-term use
All-Aluminum Radiators (High-Performance):
– Feature tanks and core that are fully welded or furnace-brazed together
– Contain no gaskets or plastic components
– Resist heat cycling and pressure far better than plastic-tank designs
– May be repairable by professionals when damage stays localized
Knowing your radiator type determines whether you should patch, replace, or seek expert help.
Assess Repair Feasibility Honestly
Attempting to weld a thin aluminum radiator without proper equipment usually ends in disaster. The metal melts silently with no glowing red warning, and a single second of excess heat can destroy an entire tube.
Can You Weld It Yourself?
The honest answer is almost certainly no.
- Aluminum does not change color as it approaches melting point
- Tube walls are thinner than a soda can at 0.010 to 0.015 inches
- Internal contaminants like coolant residue prevent clean welds
- DIY TIG or brazing attempts frequently cause the metal to “short” or melt completely
Even experienced professionals struggle with field repairs on assembled cores. When damage reaches the core tubes, replacement becomes safer and often cheaper.
When Repair Becomes Possible
A repair may be viable under very specific conditions:
- The leak sits on an external fin or accessible side tank
- The radiator is fully aluminum, not plastic-tank construction
- The damage remains small and isolated, like a single pinhole
- You plan to use epoxy or professional-grade sealant rather than welding
If the radiator shows age, corrosion, or multiple leak points, replace it instead.
Apply Temporary Fix with Epoxy and Sealants

For minor external leaks, a high-temperature epoxy can restore operation temporarily. This approach works best as an emergency measure.
Choose the Right Repair Product
Use only products specifically rated for aluminum and pressurized cooling systems:
- JB Weld ExtremeHeat, rated to 500°F
- Permatex Aluminum Repair Putty
- Stic-Tite Radiator Repair thermoplastic stick
Generic epoxies fail quickly under heat and pressure cycles.
Step-by-Step Epoxy Repair Process
- Cool the engine completely and open the drain plug to remove coolant.
- Clean the repair area with degreaser or isopropyl alcohol, then sand lightly for better adhesion.
- Dry the surface thoroughly because moisture destroys epoxy bonds.
- Mix and apply the product following manufacturer instructions, covering the leak generously.
- Shape and smooth the putty before it sets into place.
- Cure fully for the recommended time, usually 24 hours, before refilling the system.
This method performs best on flat, accessible surfaces and struggles on bent or heavily vibrating components.
Use Heat-Activated Sealants for Pinholes
For tiny cracks or pinholes, thermoplastic sealants function like temporary solder when heated properly.
How to Apply Stic-Tite Sealant
- Drain the radiator and dry the surrounding area completely.
- Hold the Stic-Tite rod directly against the leak point.
- Apply heat with a propane torch or heat gun until the rod melts and flows into the hole.
- Allow the area to cool completely before pressure testing.
Heat only the immediate repair zone because overheating can warp fins or weaken nearby joints. Racers commonly use this method for trackside emergencies, though it remains a temporary solution.
Understand Professional Vacuum-Assisted Epoxy

Some radiator shops use a superior technique that draws epoxy deep into micro-cracks using vacuum pressure.
How the Vacuum Method Works
- The radiator gets sealed and placed under slight vacuum.
- Epoxy flows into the core through the vacuum.
- The vacuum pulls sealant into every pinhole and void.
- Heat is applied to cure the material permanently.
This approach penetrates far deeper than surface application and can extend radiator life significantly for minor internal leaks. Not every shop offers this service, and it typically appears in high-end or vintage radiator restoration work.
Avoid Chemical Stop-Leak for Long-Term Use
Pour-in stop-leak additives represent a last-resort emergency fix only.
Why Stop-Leak Products Are Risky
- Particles can clog narrow radiator tubes or heater cores
- Blockages may form in water pumps or thermostat housings
- Effectiveness drops sharply on larger leaks
- Products can mask serious underlying problems like head gasket failure
If you must use stop-leak, treat it as a short-term solution only. Never use it in high-performance or race engines. Flush the entire cooling system immediately after reaching your destination.
Replace the Radiator When These Signs Appear
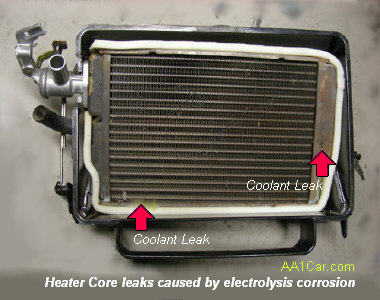
Some radiators cannot be saved regardless of skill level or technique.
Clear Replacement Indicators
- Multiple leaks appearing across the unit, the “Whack-a-Mole” effect
- Metal that feels soft or spongy, signaling internal corrosion
- Cracked plastic tanks with no reliable DIY fix available
- Transmission fluid mixing with coolant, risking transmission destruction
- Radiator age exceeding 8 to 10 years combined with active failure
- Previous repair attempts that have already failed
In these situations, replacement delivers greater safety, reliability, and long-term value than another repair attempt.
Upgrade to Prevent Future Radiator Failures
Prevention consistently outperforms repair. Smart upgrades protect your investment and extend service life dramatically.
Install a Radiator Guard
Front-mounted radiators face constant assault from rocks, bugs, and road debris.
- Expanded metal mesh offers classic, affordable protection
- Nomex screen provides modern high-strength defense used in racing
- Both options cost under $50 compared to a $300+ replacement radiator
Cut the guard to size and secure it with zip ties or mounting brackets.
Maintain Proper Coolant Chemistry
Wrong coolant mixtures cause internal corrosion and electrolysis damage.
- Use a 50/50 mix of distilled water and quality coolant
- Select the correct type (OAT, HOAT, or conventional) for your specific vehicle
- Flush the system every 2 to 3 years or per manufacturer schedule
Avoid tap water entirely because mineral content corrodes aluminum rapidly.
Verify Mounting and Clearance
Poor installation creates stress fractures that destroy radiators over time.
- Use flexible rubber mounts instead of rigid bolts
- Confirm mechanical fans stay centered and clear of overflow tubes
- Inspect core supports to ensure nothing rubs against tanks
A few minutes of careful inspection prevents years of cooling system trouble.
Frequently Asked Questions About Aluminum Radiator Repair
Can aluminum radiators be welded or brazed at home?
Welding aluminum radiators at home is extremely difficult and risky. The tube walls measure only 0.010 to 0.015 inches thick, and aluminum melts without changing color. Without professional equipment and experience, DIY attempts usually destroy the radiator completely.
How long do aluminum radiators typically last?
Quality aluminum radiators last between 8 and 15 years under normal driving conditions. High-stress applications like dirt track racing can cause failures within a single season. Premium all-aluminum units with proper protection often outlast plastic-tank designs significantly.
Is epoxy repair a permanent fix for radiator leaks?
Epoxy repairs function as temporary solutions rather than permanent fixes. They work best on small, external pinholes in accessible locations. Internal corrosion, multiple leaks, or structural damage require professional assessment or full replacement for reliable long-term operation.
What is the difference between plastic-tank and all-aluminum radiators?
Plastic-tank radiators use rubber gaskets to seal plastic end tanks against an aluminum core. All-aluminum radiators feature fully welded or brazed aluminum tanks and cores without plastic components. All-aluminum designs resist heat cycling better and offer superior longevity.
Are chemical stop-leak products safe for aluminum radiators?
Chemical stop-leak products carry significant risks for aluminum radiators. Particles can clog narrow cooling passages and damage water pumps or thermostats. Most professionals discourage stop-leak use except as a true emergency measure to reach a repair shop.
When should I replace instead of repair my radiator?
Replace your radiator when you notice multiple leaks, soft or spongy metal, cracked plastic tanks, transmission fluid mixing with coolant, or age exceeding 8 to 10 years. Replacement also makes more sense when repair costs approach the price of a new budget unit.
Key Takeaways for Repairing Your Aluminum Radiator
Repairing an aluminum radiator demands honest assessment before any action begins. Small external pinholes on all-aluminum units can sometimes accept temporary epoxy or sealant repairs, but structural damage, plastic-tank failures, and multiple leaks all point toward replacement. DIY welding attempts carry extreme risk because the thin aluminum walls melt silently and irreversibly without proper equipment.
The smartest long-term strategy combines prevention with quality components. Invest in an all-aluminum radiator, protect it with a Nomex or metal guard, and maintain proper coolant chemistry throughout its service life. When leaks appear, evaluate honestly whether repair delivers real value or simply delays inevitable replacement.
When uncertainty exists, consult a radiator specialist before committing to any repair path.



