

A radiator fan that refuses to spin puts your engine on borrowed time. Without proper airflow, coolant temperatures climb fast during idle or stop-and-go traffic, eventually triggering overheating, steam from under the hood, and potentially warped cylinder heads. Most fan failures trace back to a handful of common culprits, all diagnosable with basic tools and a logical approach. This guide walks you through every step to make your radiator fan turn on reliably, from quick fuse checks to full motor replacement.
You will learn how to test individual components in the correct order, interpret multimeter readings, scan for trouble codes, and even bypass the relay in an emergency. Whether you are a weekend mechanic or a first-time troubleshooter, the methods below help you pinpoint the fault without wasting money on parts you do not need.
Start with the Radiator Fan Fuse

Before opening panels or pulling connectors, rule out the simplest and cheapest possibility: a blown fuse.
Locate the Correct Fuse
Most vehicles house fuses in two locations: an under-hood box near the battery and a secondary panel inside the cabin. Check your owner’s manual or the diagram printed on the fuse box lid. Some models use separate fuses for low-speed and high-speed fan circuits, so identify both.
Test Voltage Across the Fuse
Set your multimeter to DC voltage on a 20V scale. With the ignition in the “on” position, touch one probe to each metal tab of the fuse.
- 12V on both sides means the fuse is intact.
- 12V on one side and 0V on the other means the fuse is blown.
- 0V on both sides means power is not reaching the fuse, pointing to a battery or ground issue upstream.
Replace any blown fuse with one of identical amperage. If the replacement blows immediately, a short exists in the wiring or motor circuit.
Pro Tip: Keep spare fuses in common ratings (10A, 15A, 20A, 30A) in your glovebox. A two-dollar fuse can prevent a two-thousand-dollar engine rebuild.
Test the Fan Motor with Direct Power
If the fuse is good, the next step isolates whether the motor itself can spin.
Apply 12V Directly to the Motor
- Disconnect the fan motor’s electrical plug.
- Run two jumper wires from a 12V battery.
- Connect the positive wire to the fan’s positive terminal.
- Connect the negative wire to the fan’s ground terminal.
- Step back and watch.
Interpret the Results
- The fan spins smoothly, confirming the motor works. The fault lies in the control circuit.
- The fan does not move or only hums weakly, indicating a dead or seized motor. Replace the fan assembly.
⚠️ Warning: The fan spins instantly at full speed the moment power is applied. Keep fingers, tools, and loose clothing far from the blades during this test.
Swap the Fan Relay to Confirm Function
Relays fail more frequently than most drivers realize, and swapping is the fastest way to confirm.
Identify and Remove the Relay
Find the radiator fan relay inside the under-hood fuse box using the lid diagram. Pull it straight out with needle-nose pliers or your fingers.
Perform the Swap Test
Replace the suspect relay with an identical unit borrowed from a non-critical system, such as the horn or rear defroster. Start the engine and let it warm up.
- If the fan now activates, the original relay was defective. Install a new one.
- If the fan still stays off, the problem is downstream in the sensor, wiring, or ECU.
Expert Note: Listen for a faint click when the relay energizes. Silence during normal operation suggests the ECU is not sending the activation signal.
Check the Coolant Temperature Sensor
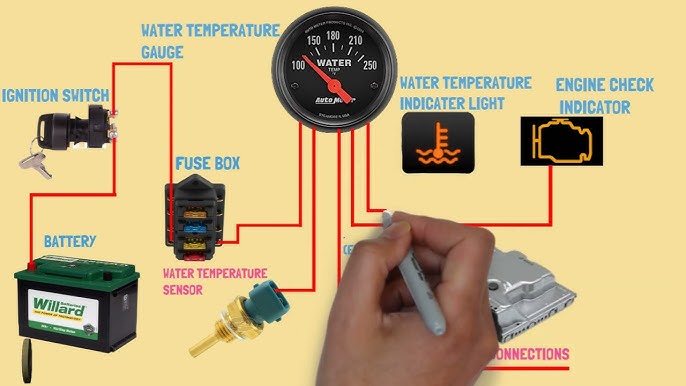
The coolant temperature sensor (CTS) tells the ECU when to switch the fan on. A faulty sensor sends incorrect data and prevents activation.
Locate and Inspect the CTS
The sensor typically threads into the engine block or radiator hose neck and has a two-wire connector. Look for corrosion, bent pins, or loose seating.
Measure Resistance at Various Temperatures
- Unplug the sensor.
- Set your multimeter to ohms.
- Probe the two terminals.
- Compare readings to typical benchmarks:
– Cold engine near 70°F: roughly 2,000 to 3,000 ohms
– Warm engine near 190°F: roughly 200 to 400 ohms
– Hot engine near 220°F: roughly 150 ohms
Readings outside these ranges or an infinite value mean the sensor needs replacement.
Quick Test: Turn on the air conditioning. In most vehicles, the fan should engage even with a cold engine. If it does, the motor and relay are functional and the issue is likely temperature-related logic.
Scan for OBD2 Trouble Codes

Modern vehicles store diagnostic codes that often point directly to fan control faults.
Connect an OBD2 Scanner
Plug the scanner into the diagnostic port beneath the dashboard. Turn the key to the “on” position without starting the engine, then read stored codes.
Key Codes to Look For
- P0128: Coolant thermostat below regulating temperature, often linked to a faulty CTS or stuck-open thermostat.
- P0480: Cooling fan relay one malfunction.
- P0529: Cooling fan speed sensor circuit range or performance.
- P2181: Cooling system performance issue.
Clear all codes after completing repairs and retest to confirm the fix.
Pro Tip: A persistent P0128 may indicate the thermostat is stuck open, preventing the engine from ever reaching the temperature needed to trigger the fan.
Inspect Wiring and Ground Connections
Even with every electronic component in good shape, damaged wiring or a poor ground can stop the fan cold.
Trace the Fan Circuit
Follow the wiring harness from the fan motor back toward the relay and ECU. Look for burnt insulation, pinched sections, rodent damage, and green corrosion on connectors. Repair damaged wires with solder and heat-shrink tubing rather than electrical tape, which fails under hood heat.
Verify the Ground Path
Locate the fan motor’s ground wire, usually black and bolted to the chassis or body panel. Disconnect it, sand the contact point until bare metal shows, and reconnect tightly. Test for continuity between this ground and the battery’s negative terminal.
- Zero ohms confirms a solid ground.
- Infinite resistance means the ground is compromised and must be cleaned or replaced.
Visual Cue: Intermittent fan operation often points to a loose or corroded ground strap rather than a failed component.
Bypass the Relay for Emergency Cooling
When you need immediate airflow and cannot reach a shop right away, a temporary bypass keeps the fan running.
Jump the Relay Terminals
- Remove the fan relay from its socket.
- Insert a fused jumper wire between terminal 30 (battery power in) and terminal 87 (power out to the fan).
The fan now runs continuously whenever the ignition is on.
⚠️ Caution: This method disables all temperature-based safety logic. Monitor the coolant gauge closely and never leave the engine unattended. Use only as a short-term fix until proper repairs are completed.
Replace a Failed Fan Assembly
When the motor fails the direct power test, replacement is the only reliable solution.
Select the Correct Replacement
Match the new fan to the original by blade size, mounting pattern, electrical connector style, and airflow rating (CFM). Cheap universal fans often fit poorly and underperform, so choose OEM or reputable aftermarket brands.
Installation Steps
- Disconnect the battery.
- Remove the fan shroud clips or bolts.
- Unplug the motor connector.
- Lift out the old assembly.
- Seat the new unit and secure it.
- Reconnect the battery and test operation.
Most replacements take 30 to 60 minutes depending on engine bay access.
Cost Insight: Fan assemblies typically run $80 to $250 for parts. Professional labor adds another $100 to $200. Handling the job yourself saves roughly half the total cost.
Prevent Future Fan Failures
Proactive maintenance keeps the cooling system reliable and extends fan life.
Clean the Fan and Radiator Regularly
Debris caught in the blades or radiator fins blocks airflow. Every six months, rinse the radiator with gentle water pressure, remove leaves and insects from the fan blades, and avoid high-pressure sprayers that bend delicate fins.
Inspect Electrical Connections Annually
Check the fan motor plug for moisture or green corrosion. Examine the relay socket for burn marks and verify that fuse box terminals sit tight. A thin layer of dielectric grease on connectors prevents future oxidation.
Watch the Temperature Gauge
If the needle climbs during slow traffic, pull over and let the engine cool before continuing. Test the fan using the air conditioning trick before resuming your trip.
Warning Sign: When the A/C activation method stops forcing the fan on, the control circuit is degrading and needs immediate inspection.
Frequently Asked Questions About Making a Radiator Fan Turn On
Why does my radiator fan only fail at idle but works at highway speed?
Highway driving provides ram-air cooling through the grille, which masks a weak or non-functioning fan. At idle, natural airflow drops to nearly zero, so the electric fan must carry the entire cooling load. If the temperature spikes only when stopped, the fan motor, relay, or control circuit is likely failing.
Can I drive my car if the radiator fan is not working?
Short distances at highway speed are usually safe because moving air cools the radiator passively. However, any stop-and-go driving, idling in traffic, or use of the air conditioning can cause rapid overheating. Monitor the temperature gauge constantly and pull over the moment it climbs above normal. Prolonged driving without a working fan risks severe engine damage.
How do I know if the fan relay or the sensor is bad?
Test the relay first by swapping it with an identical relay from another system. If the fan activates after the swap, the relay was the problem. If the fan still does not run, test the coolant temperature sensor with a multimeter and compare resistance readings to the manufacturer’s specifications. Out-of-range values confirm a faulty sensor.
Will a blown fuse stop the radiator fan from turning on?
Yes. A blown fuse breaks the electrical circuit and prevents any power from reaching the fan motor. Fuses blow to protect the wiring from overcurrent, often caused by a failing motor or a short in the harness. Always replace a blown fuse with one of identical amperage, and investigate the underlying cause if the new fuse blows immediately.
Is it expensive to fix a radiator fan that will not turn on?
Costs vary widely depending on the failed component. Replacing a fuse or relay costs only a few dollars. A new coolant temperature sensor typically runs $20 to $60. Fan motor or full assembly replacement ranges from $80 to $250 for parts, plus $100 to $200 for professional labor. Diagnosing the problem yourself before buying parts keeps expenses minimal.
Can I force my radiator fan to turn on without replacing parts?
Yes, by jumping the relay terminals with a fused wire, you can power the fan directly from the battery. This bypasses all sensors and control logic, forcing the fan to run whenever the ignition is on. Use this method only as a temporary emergency measure, since it disables important safety features and can mask underlying problems.
Key Takeaways for Getting Your Radiator Fan to Turn On
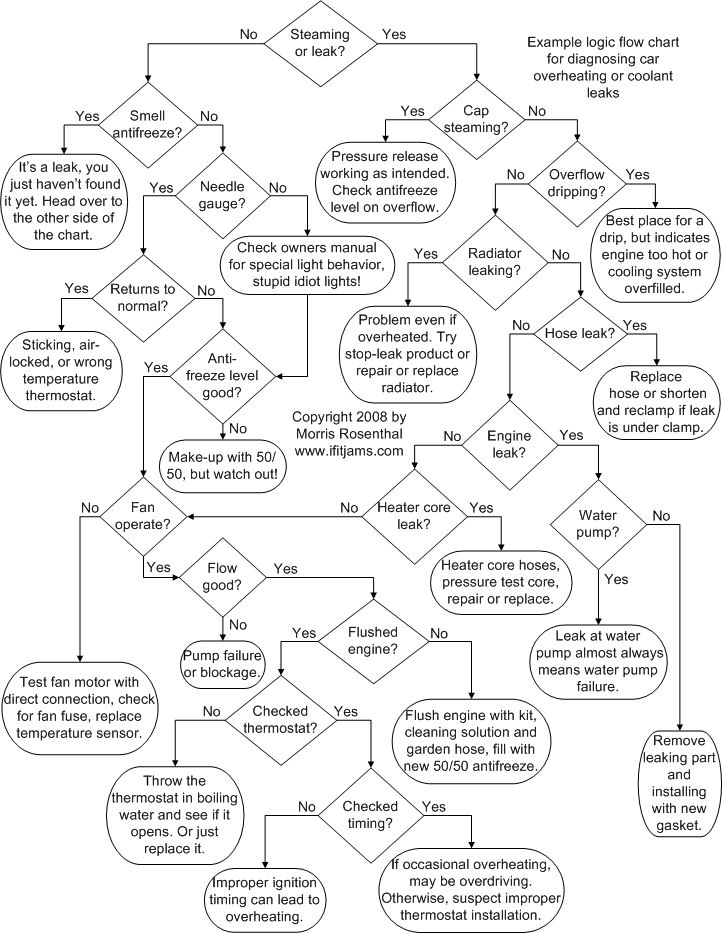
Diagnosing a non-functioning radiator fan starts with the simplest checks and progresses toward more complex components. Always test the fuse first, then verify the motor with direct battery power, swap the relay, and inspect the coolant temperature sensor. Use an OBD2 scanner to surface hidden trouble codes and examine wiring and grounds for corrosion or damage. When the motor itself fails, replace the entire fan assembly with a quality unit that matches the original specifications.
Your next step is to grab a multimeter and begin with the fuse test. Most fan problems resolve within the first three checks, and you will likely save both time and money by working through the diagnostic sequence in order.



