

Your engine’s coolant temperature warning light just came on, and now you’re wondering if this is a minor fix or a major repair. Whether the light is red or blue, understanding what triggers these warnings and how to respond can save you from expensive engine damage. This guide walks you through every major cause of coolant temperature problems, from simple low coolant levels to serious head gasket failures, with clear diagnostic steps and practical solutions you can apply right now.
You’ll learn how to identify the root cause of overheating or cold-engine issues, test key components like the thermostat and water pump, use diagnostic tools effectively, and maintain your cooling system for years of trouble-free operation.
Decode the Coolant Warning Light
Red vs Blue: What Each Color Means
The color of your coolant temperature warning light tells you exactly what is happening under the hood. Understanding this distinction is your first step toward fixing the problem.
Red Light: Your engine is overheating and requires immediate attention. Continuing to drive risks catastrophic damage including warped cylinder heads, blown head gaskets, or a cracked engine block. Pull over safely as soon as possible.
Blue Light: Your engine temperature is below normal operating range, which commonly occurs during cold starts in winter weather. This is normal behavior and should disappear once the engine warms up, typically within five to ten minutes.
Expert Tip: If a red overheating light appears, turn your heater to maximum with the fan on high. This pulls heat from the engine through the heater core and into your cabin, buying you time to reach a safe stopping point.
Check Engine Operating Temperature
Normal Operating Range Explained
Your engine is designed to operate within a specific temperature range for optimal performance and longevity. Knowing this range helps you identify when something goes wrong.
Most internal combustion engines run safely between 70°C and 105°C (160°F to 221°F). Many vehicles only display “C” for cold and “H” for hot on their temperature gauges, but consistent readings approaching the “H” mark signal a cooling system malfunction.
Sustained temperatures beyond this range trigger the red coolant warning light and activate protective systems like limp mode, which reduces engine power to prevent further damage.
Identify Common Overheating Symptoms

Recognizing Early Warning Signs
Before the warning light activates, your vehicle often shows visible and audible clues that something is wrong. Paying attention to these signs helps you catch problems early.
Watch for steam or vapor billowing from the engine bay, which indicates boiling coolant escaping under pressure. A sweet, chemical smell inside or outside the vehicle suggests leaking ethylene glycol-based coolant. Unusual thumping or gurgling noises from the cooling system often point to air pockets or boiling coolant. Colored puddles beneath your car, typically green, orange, or pink, mean coolant is leaking somewhere in the system.
White exhaust smoke indicates coolant is burning inside the combustion chamber, often signaling head gasket failure. Milky oil on the dipstick means coolant is mixing with engine oil, which requires immediate engine shutdown to prevent severe damage.
Pro Tip: Use a non-contact infrared thermometer to compare radiator inlet and outlet temperatures. A significant temperature difference suggests a blockage or poor circulation.
Diagnose Low Coolant Level
Why Low Coolant Causes Overheating
Coolant absorbs heat from your engine and transfers it to the radiator for dissipation. When coolant levels drop, this heat transfer becomes inadequate, causing rapid temperature increases.
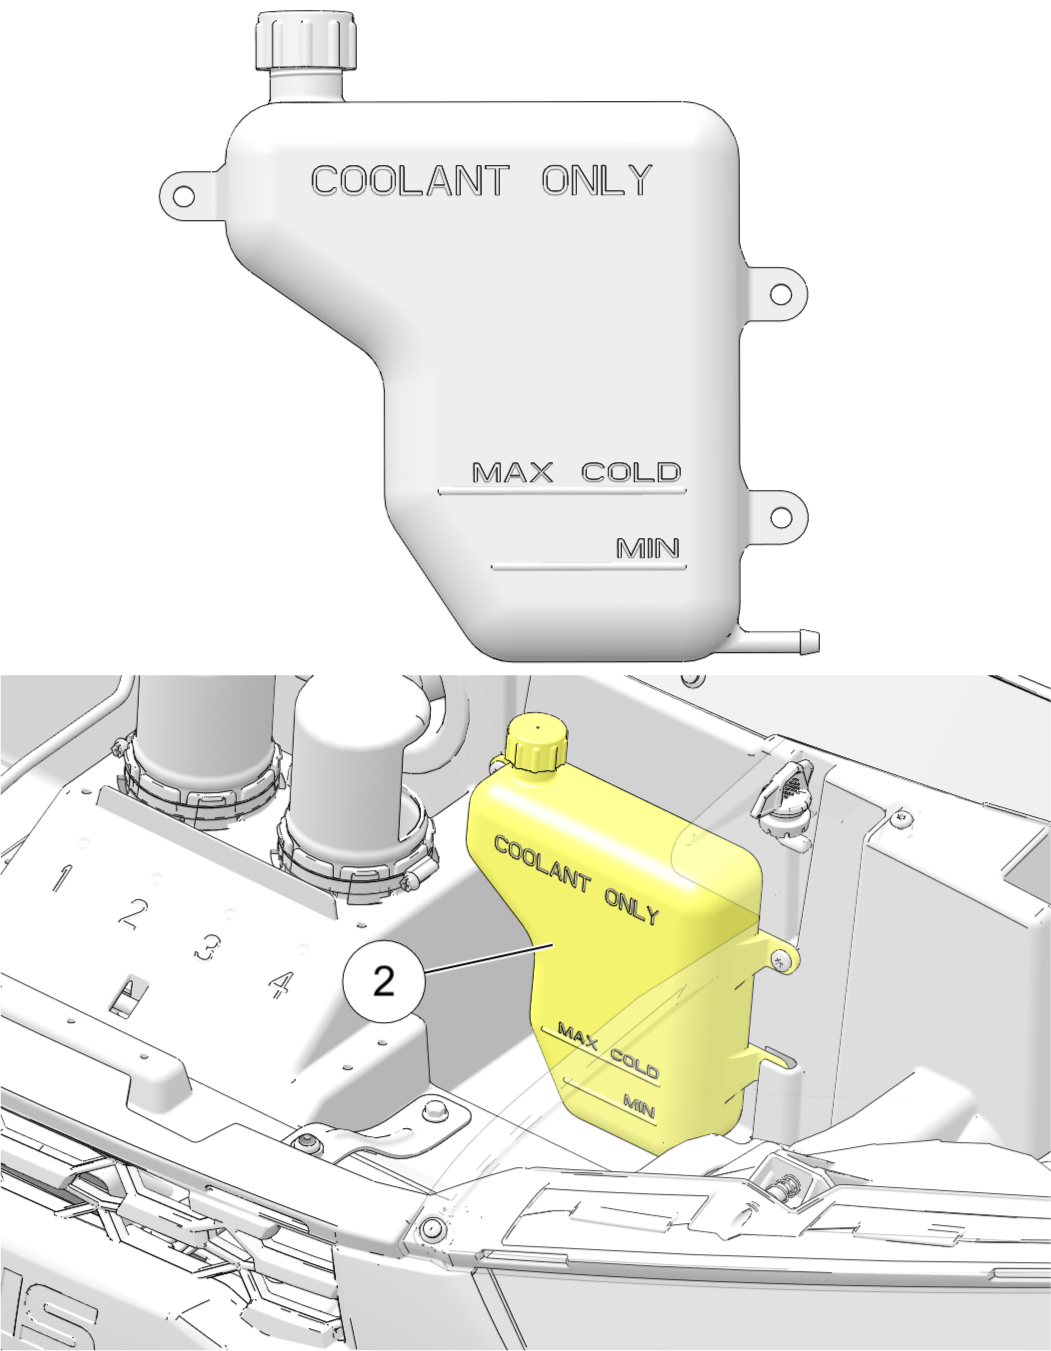
Check the coolant reservoir when the engine is completely cool. The level should sit between the “MIN” and “MAX” marks. Inspect the radiator itself only when cold, removing the cap carefully to avoid pressure release. Top up with the correct coolant type, typically a 50/50 mix of antifreeze and distilled water.
Warning: Never open the radiator cap on a hot engine. Pressurized hot coolant can cause severe steam burns.
Replace coolant every 50,000 km or 3-5 years. Degraded coolant loses thermal efficiency and becomes corrosive, damaging internal cooling system components.
Locate and Repair Coolant Leaks
Common Leak Points and Detection Methods
Coolant leaks reduce system volume and pressure, impairing heat dissipation. Identifying the exact location is essential for proper repair.
Common leak points include the radiator (cracks or corrosion), hoses (cracking or loose clamps), water pump (seal failure at the weep hole), heater core (sweet cabin smell with damp floor mats), and head gasket (internal leak allowing coolant into cylinders or oil passages).
Detect leaks through visual inspection by shining a flashlight under the engine. Use a cooling system pressure tester applying 15-18 psi to identify hidden leaks. Add UV dye to the coolant and inspect with a black light for fluorescent leak markers.
Replace the leaking component promptly. Head gasket failure requires engine disassembly and is best left to professional mechanics.
Test and Replace the Thermostat
How the Thermostat Regulates Temperature
The thermostat controls coolant flow through the engine and radiator. When cold, it stays closed to help the engine warm up quickly. When the coolant reaches approximately 88°C, it opens to allow full circulation to the radiator.
Failure modes include stuck closed, which causes rapid overheating, and stuck open, which keeps the engine too cold, reduces fuel economy, and produces poor cabin heat.
Test the thermostat yourself by removing it and submerging it in a pot of water with a thermometer. Heat the water gradually and observe when the thermostat begins opening. It should start opening at its rated temperature. Replace if it fails to open or closes sluggishly.
Pro Tip: Replace the thermostat every 100,000 km or when replacing the water pump. This low-cost preventive measure avoids future overheating issues.
Inspect the Water Pump
Signs of Water Pump Failure
The water pump circulates coolant through the entire cooling system. When it fails, coolant circulation stops and overheating happens quickly.
Watch for coolant leaking from the weep hole beneath the pump, which indicates seal failure. Whining or grinding noises suggest bearing wear. A wobbling pulley means shaft damage. Corroded or damaged impeller blades reduce flow, especially common when aluminum components degrade.
Inspect by removing the drive belt if accessible. Check the pulley for play or roughness. Look for coolant stains or crust around the housing. Confirm belt tension and alignment are correct.
Replace the water pump with an OEM or high-quality aftermarket unit. Replace the drive belt if it shows wear.
Clean or Replace the Radiator
When to Flush vs Replace
The radiator dissipates heat from coolant flowing through its tubes. Internal blockage from debris, rust, or scale restricts this heat exchange, causing overheating even with full coolant.
Flush the radiator using a radiator cleaner solution and reverse-flush with water if flow is restricted but the unit is otherwise intact. Replace the radiator if fins are bent, the core is damaged, or internal corrosion is severe.
Check: Compare radiator inlet (hot) and outlet (warm) temperatures using an infrared thermometer. A small temperature difference indicates poor heat exchange.
Fix Radiator Fan Problems
Diagnosing Electric and Mechanical Fan Issues
Radiator fans cool the radiator at low speeds and idle when airflow is insufficient. When fans fail to activate, overheating occurs quickly in traffic.
Start the engine and let it warm to operating temperature. Observe the fan, which should activate around 90-95°C. If the fan stays off, check the fuse and relay by swapping with known good components. Test the fan motor directly with 12V power. Inspect wiring and connectors for damage. Verify the engine coolant temperature sensor signal using an OBD2 scanner.
For mechanical fans with a clutch, check that the clutch freewheels when cold and locks when hot.
Replace Faulty Radiator Cap
Why Cap Pressure Matters
The radiator cap maintains system pressure between 13-18 psi, which raises the boiling point of coolant. A weak or damaged cap allows pressure to escape, causing coolant to boil at lower temperatures.
Symptoms of a bad cap include coolant loss to the overflow tank, a collapsed upper radiator hose, and coolant leaks around the cap itself.
Test the cap using a pressure tester. Replace with a cap matching the OEM-specified pressure rating. Never use a generic cap with different specifications.
Bleed Air from Cooling System
Removing Air Locks
Trapped air in the cooling system blocks coolant flow, causing hot spots and false overheating readings. Air enters through improper refilling, leaks, or failed bleed procedures.
Bleed air by elevating the front of the vehicle, which helps air rise toward the bleed valve. Open the bleed valve if your vehicle has one, which is common on German cars. Fill the system slowly while running the engine with the heater on. Burp the system by repeatedly squeezing the upper radiator hose.
Tip: Consult your service manual for model-specific bleeding procedures, as some vehicles require exact steps.
Diagnose Coolant Temperature Sensor
Testing the ECT Sensor
The engine coolant temperature (ECT) sensor sends real-time temperature data to the engine control unit and dashboard. A faulty sensor causes false readings and incorrect system responses.
Failure symptoms include a false red warning light, poor fuel economy from wrong air-fuel mixture, delayed fan activation, and hard cold starts.
Test with an OBD2 scanner by connecting to the diagnostic port. Read live coolant temperature data and compare with actual temperature using an infrared gun. If readings differ by more than 10°C, replace the sensor.
Pro Tip: OBDeleven and similar apps allow real-time coolant temperature monitoring via smartphone, ideal for detecting temperature drift before the warning light appears.
Confirm Blown Head Gasket
Serious but Preventable Damage
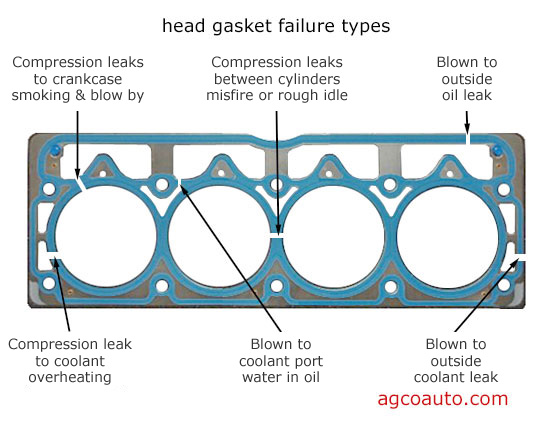
Prolonged overheating often leads to head gasket failure, one of the most expensive cooling system repairs. The head gasket seals combustion chambers and coolant passages. When it blows, combustion gases enter the cooling system while coolant may enter the cylinders.
Telltale signs include white smoke from the exhaust (coolant burning), bubbles in the coolant reservoir (combustion gases entering), milky oil on the dipstick (coolant mixing with oil), and persistent overheating despite full coolant.
Diagnostic tests include a block test detecting hydrocarbons in coolant, a compression test showing low or uneven cylinder pressure, and a leak-down test confirming cylinder-to-coolant leakage.
Fix: This repair requires cylinder head removal, surface inspection, and gasket replacement. Given the complexity, most车主 should entrust this to professional mechanics.
Respond Immediately to Overheating
Emergency Step-by-Step Protocol
When your red overheating light comes on, your actions in the next few minutes determine whether you face a minor repair or a catastrophic engine failure.
Step 1: Ease off the accelerator to reduce engine load immediately.
Step 2: Turn off the air conditioning, as it adds engine load and heat.
Step 3: Turn on the heater full blast to draw heat from the engine into the cabin.
Step 4: Pull over safely at the earliest opportunity. Do not continue driving.
Step 5: Shut off the engine to stop heat generation.
Step 6: Wait at least 30 minutes for the engine to cool. Full cooling may take 2-4 hours.
Step 7: Check coolant level only when the engine is cool.
Step 8: Inspect for leaks under the hood and beneath the vehicle.
Step 9: Call for roadside assistance if the cause is unknown or a leak is present.
Never restart the engine until the issue is resolved. Risk of severe engine damage is immediate and expensive.
Perform Cooling System Pressure Test
Finding Hidden Leaks
A pressure tester simulates operating pressure without running the engine, revealing leaks that are invisible during normal operation.
Attach the tester to the coolant reservoir or radiator. Pump to the cap’s rated pressure, typically 15 psi. Wait 10-15 minutes and observe the pressure gauge. If pressure drops, inspect all components for leaks.
Bonus: This test can detect internal head gasket leaks if bubbles appear in the coolant reservoir.
Flush the Cooling System
When and How to Flush
Coolant breaks down over time, accumulating rust, scale, and debris that restrict flow. Regular flushing maintains optimal cooling performance.
Flush every 60,000-100,000 km, when coolant appears rusty or sludgy, or after replacing major cooling components.
Drain the old coolant and recycle it properly at a auto parts store. Flush with clean water or a radiator cleaning solution. Perform a reverse-flush through the heater core if possible. Refill with the correct coolant type mixed 50/50 with distilled water. Bleed air from the system afterward.
Caution: Never mix coolant types such as OAT, HOAT, or IAT. Different formulations can react and form gel, blocking the system entirely.
Prevent Future Coolant Issues
Maintenance Checklist
Regular maintenance prevents 90% of cooling system failures. Stay ahead of problems with this schedule:
Every 3 months: Check coolant level in the reservoir.
During oil changes: Inspect hoses and clamps for cracks or looseness.
Every 50,000 km or 3-5 years: Replace coolant completely.
Every 80,000 km: Flush the radiator.
Every 100,000 km: Replace the thermostat, either proactively or during water pump replacement.
During annual service: Test the radiator cap pressure.
Use OBD2 Tools for Early Detection
Best Scanners for Coolant Monitoring
Modern OBD2 scanners do more than read error codes. They monitor real-time data, allowing you to catch temperature issues before the warning light appears.
Carista reads codes, resets warnings, and checks live data streams.
OBDeleven provides real-time coolant temperature monitoring through a smartphone app, with customizable alerts for temperature drift.
Benefit: These tools catch problems early, transforming expensive repairs into simple part replacements.
Driving Habits That Prevent Overheating
Smart Practices for Hot Weather
Your driving behavior significantly impacts cooling system stress, especially in hot weather or heavy traffic.
Avoid idling in traffic with the AC on full. Use engine braking on long downhill stretches to reduce engine load. Minimize towing or carrying heavy loads during extreme heat. Monitor the temperature gauge closely when driving in city traffic.
Pro Tip: In slow traffic, shift to neutral and gently rev the engine. This increases water pump speed and improves coolant circulation.
Frequently Asked Questions About Coolant Temperature
Can I drive with the coolant temperature light on?
A red light means stop immediately. Continuing to drive risks catastrophic engine damage. A blue light is normal during cold starts but should disappear within 5-10 minutes.
What type of coolant should I use?
Always use the manufacturer-recommended type specified in your owner’s manual. Common types include G12++, G48, Dex-Cool, and others. Never mix different coolant types.
Why does the coolant light come on only in cold weather?
The blue light commonly appears during cold starts until the engine reaches operating temperature. This is normal behavior and should turn off automatically once warm.
How long does it take for an engine to cool down?
Wait at least 30 minutes before safely opening the hood. Complete cooling to ambient temperature may take 2-4 hours depending on ambient conditions and engine temperature.
Should I turn off the AC if the engine is overheating?
Yes. Turning off the AC reduces engine load and heat generation, helping the cooling system cope.
Why does turning on the heater help when the engine is overheating?
The heater core acts as a secondary radiator. Turning on the heater routes hot coolant through the heater core, transferring heat into the cabin air instead of the engine.
Can low coolant damage the engine?
Yes. Low coolant leads to overheating, which can warp cylinder heads, blow head gaskets, crack engine blocks, and seize pistons. The damage can be permanent and expensive.
Key Takeaways for Fixing Coolant Temperature Issues
The coolant temperature warning light is your engine’s early warning system. Responding quickly and diagnosing methodically prevents small problems from becoming expensive repairs. Always check the simple causes first: low coolant level, visible leaks, and thermostat function. Invest in an OBD2 scanner to monitor real-time temperatures and catch issues before they trigger warning lights. Replace coolant, thermostat, and radiator cap at recommended intervals to maintain system integrity. When in doubt about serious issues like head gasket failure, tow the vehicle to a professional rather than risk catastrophic engine damage. With regular maintenance and quick response to warning signs, your cooling system will provide years of reliable service and protect your engine from heat-related failure.



