

You check your engine bay, look under the car, and find nothing. No drips, no stains, no puddles. Yet your coolant reservoir keeps emptying, and maybe your temperature gauge creeps up during highway drives. This is a classic case of coolant leaking but not visible—an invisible problem that can destroy your engine if left unchecked.
This guide walks you through every hidden leak cause, shows you exactly how to diagnose each one, and gives you repair solutions that actually work. You will learn which tests to run at home, what tools you need, and when it is time to call a professional.
Internal Leak Into Engine Oil
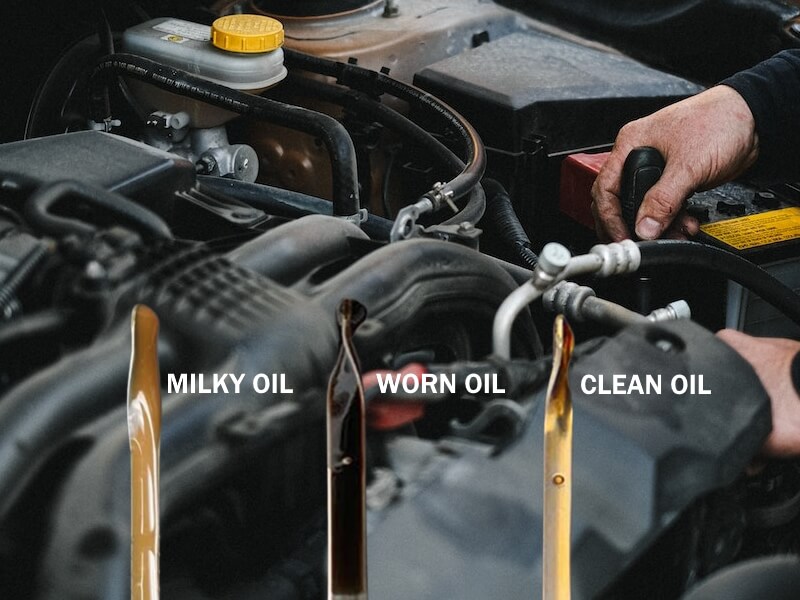
When coolant finds its way into your engine’s crankcase, it mixes with motor oil and creates a thick, milky substance that looks like chocolate milk. This is one of the most serious warning signs you can ignore.
Why Coolant Enters Your Oil
In certain modern engines, the water pump sits inside the front engine cover and runs off the timing chain. The Ford 3.5L V6 is a perfect example. As the water pump seals wear out, coolant seeps past them and directly into the oiling system. This creates the same milky oil symptom you would see with a blown head gasket, but the actual problem is a failing water pump seal.
Other causes include a cracked engine block, a warped cylinder head, or a failed head gasket that allows coolant into the oil galleries. Each of these requires different repair approaches, so proper diagnosis matters.
Signs You Have Coolant in Your Oil
Watch for these indicators before they become catastrophic:
• Oil level on the dipstick reads higher than normal without you adding any
• A frothy, milky residue coats the oil filler cap or the underside of the valve cover
• Your oil pressure warning light flickers or stays on
• The engine makes ticking or knocking sounds under load
Critical Warning: If you see milky oil, stop driving immediately. Coolant destroys oil’s ability to lubricate. Even ten miles can permanently damage bearings.
Confirm With a Pressure Test
Attach a cooling system pressure tester to your radiator neck. Pump the system to 13 to 18 psi and watch the gauge. If pressure stays steady for 15 minutes, your cooling system is holding. If pressure drops, you have an internal leak confirmed. Some leaks only appear when the engine is warm, so repeat the test after the engine reaches operating temperature.
Blown Head Gasket Diagnosis
A failed head gasket lets combustion gases enter your cooling system while simultaneously allowing coolant to slip into the cylinders. Nothing escapes outside, but your engine pays the price.
Symptoms That Point to Head Gasket Failure
Watch for these warning signs:
• White smoke with a sweet smell billowing from your exhaust after the engine warms up
• Bubbles constantly forming in your radiator coolant while the engine runs
• Engine overheats specifically under heavy loads
• Rough idle or cylinder misfires that have no other explanation
• Coolant disappears but you cannot find a single drip anywhere
Note: A light white mist during cold startup is normal condensation. Thick, persistent smoke is not normal and demands investigation.
Use a Block Test Kit
This test detects hydrocarbons in your coolant, which proves combustion gases are leaking somewhere they should not be. Here is how to perform it:
- Allow the engine to cool completely
- Remove the radiator cap
- Install the block tester with blue fluid over the filler neck
- Run the engine until it reaches operating temperature
- Watch the fluid color change
Blue turning to yellow or green means the test is positive for combustion gases. If the blue stays pure, no combustion leak exists in the cooling system.
Check Your Spark Plugs
Pull all spark plugs and examine each one. A single plug that looks cleaner or more washed than the others likely has coolant entering its cylinder during combustion. This pinpointed diagnosis helps you confirm which cylinder is affected.
Cracked Head or Engine Block
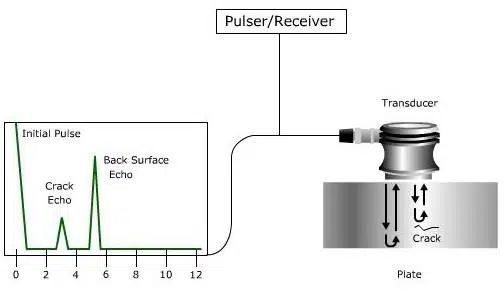
Microscopic cracks in your cylinder head or engine block expand when the engine heats up. These leaks only show up under thermal stress, making them particularly tricky to find.
Hidden Damage Indicators
These symptoms suggest cracks rather than other causes:
• Coolant loss gets worse after highway driving or extended operation
• Intermittent overheating with no pattern you can trace
• One or more cylinders show low compression compared to the others
Diagnostic Tools for Cracks
Finding cracks requires specialized equipment. Ultrasonic testing detects subsurface flaws that no visual inspection would reveal. A borescope lets you look inside coolant passages for signs of seepage. For external cracks, a dye penetrant test works after you remove surrounding components.
Warning: These failures often require engine disassembly or replacement. Catching them early can save you thousands in repair costs.
Leaking Intake Manifold Gasket

Many V6 engines route coolant through the intake manifold itself. When the gaskets fail, coolant leaks directly into the intake tract where it burns or pools.
Engines Commonly Affected
This problem shows up frequently in specific platforms:
• GM 3.1L, 3.4L, and 3.8L V6 engines
• Ford 4.0L SOHC and DOHC V6 engines
• Chrysler 3.3L and 3.8L V6 engines
Warning Signs of Intake Gasket Failure
Watch for these clues:
• Rough idle or multiple cylinder misfires with no apparent cause
• White smoke appearing specifically at startup
• A sweet smell wafting from your heater vents
• Risk of hydrolock if enough coolant collects in a single cylinder
How to Test for It
Remove the intake manifold and inspect the gaskets for erosion, carbon tracking, or obvious deterioration. Look for coolant residue inside the plenum and each runner. You can also perform a pressure test while monitoring the intake area for seepage.
Pro Tip: Use a borescope to examine deep inside the runners without fully removing the manifold. This saves significant labor time.
Failed Heater Core (Cabin Leak)
A leaking heater core does not always leave obvious wet spots. Minor leaks evaporate before they pool, leaving only subtle clues.
Subtle Signs of Heater Core Problems
Watch for these less obvious indicators:
• Coolant level drops gradually over weeks or months
• A musty or sweet smell appears whenever you run the heater
• Your windshield fogs up slightly with no external moisture source
• Coolant traces appear near the firewall or inside the cabin air filter housing
Finding Invisible Leaks With UV Dye
Add fluorescent UV dye to your coolant reservoir. Drive the vehicle for 10 to 20 miles to let the dye circulate. Use a black light to scan the firewall behind the engine, the HVAC housing, and the cabin air filter compartment. Any glow you see pinpoints the exact leak location.
Important: Clean your engine thoroughly before testing. Old coolant residue creates false positives that waste your time.
Pressure Check the Heater System
Pressurize your cooling system while the engine runs with the heater set to high. Watch for dampness or vapor appearing near the firewall. This confirms whether the heater core itself is the culprit.
Radiator Cap or Reservoir Leak
A weak radiator cap or cracked reservoir releases coolant as steam rather than liquid. You never see a drop, but the coolant still escapes.
How This Type of Leak Happens
The cap spring loses tension over time. The seal degrades. The plastic reservoir develops hairline cracks that only open under pressure. Each of these allows coolant to exit as invisible vapor.
Evidence to Look For
• White crystalline crust forming around the cap or reservoir neck
• A coolant smell near the radiator with no visible source
• The overflow tank empties completely after driving
Quick Fix
Replace your radiator cap every 3 to 5 years regardless of appearance. Inspect the overflow tank for stress cracks near seams and hose connections. Test both components with a pressure tester before assuming the leak is elsewhere.
Money-Saving Tip: This $15 part causes more misdiagnoses than any other component. Always check the cap before expensive repairs.
Intermittent Leaks Under Pressure
Some leaks only appear when your engine reaches operating temperature. Metal contracts as it cools, temporarily sealing the leak until heat reopens it.
Where These Leaks Hide
These locations commonly harbor temperature-dependent leaks:
• Radiator seams where plastic meets aluminum
• Water pump weep holes
• Thermostat housing gaskets
• Heater hose connections
• Hose crimps or clamps
Catching Them With a Cold Test
Attach a cooling system pressure tester to a cold system. Pressurize to the specification listed on your cap, typically 13 to 18 psi. Wait 20 to 30 minutes. Any pressure drop means a leak exists, even if you cannot see it. Repeat the test after warming the engine, since some leaks only appear when hot.
Air Pockets Mimicking Coolant Loss
After a coolant replacement, trapped air can make you think coolant is vanishing. The air expands when hot and pushes coolant into the overflow tank. When the system cools, the fluid does not return fully, tricking you into thinking you lost coolant.
Preventing This Problem
Follow the manufacturer bleeding procedure exactly. Elevate the front of your vehicle. Open any bleed screws if equipped. Run the engine with the heater on high. Top off the reservoir as needed during the process.
Best Practice: Use a vacuum-fill tool during refill. This removes all air from the system in one step and prevents the problem entirely.
Overheating and Boil-Off
Repeated overheating boils your coolant, forcing it out as vapor through the overflow cap or loose connections.
Root Causes of Overheating
These failures lead to boil-off:
• A clogged radiator restricting coolant flow
• A failed water pump not circulating properly
• A thermostat stuck in the closed position
• A cooling fan that never engages
• Air pockets remaining after your last coolant job
Why It Looks Like Normal Loss
Coolant slowly disappears over time. You might blame evaporation, which seems reasonable. The truth is that coolant does not evaporate under normal conditions. If your level drops, a leak exists somewhere.
Step-by-Step Leak Detection Plan
Follow this systematic approach to diagnose invisible coolant loss efficiently.
1. Check Your Oil Condition
Pull the dipstick and inspect the oil cap. Milky or frothy appearance means coolant is entering your crankcase. An overfilled dipstick confirms internal leak. Frothy residue under the oil cap signals emulsification in progress.
Stop the engine immediately if contamination is present.
2. Perform a Pressure Test
Use a hand-pump pressure tester. Attach it to the radiator or reservoir. Pump to 15 psi or the cap rating. Monitor for 20 minutes or longer. A pressure drop confirms a leak exists. Re-test warm to catch temperature-dependent leaks.
3. Run a Block Test
Detect combustion gases in your coolant. Install the block tester with blue fluid. Run the engine to operating temperature. Blue turning yellow or green means head gasket or crack failure. No change suggests the combustion side is intact.
4. Add UV Dye
Pour fluorescent dye into the coolant reservoir. Drive 15 to 30 miles. Scan with a black light across the engine bay, firewall, intake manifold, and radiator. Any glow spots reveal even microscopic leaks.
5. Inspect Your Exhaust
Start the engine cold and watch the tailpipe. Brief mist is normal. Thick white smoke with a sweet smell indicates coolant burning in combustion.
Repair Solutions by Cause
Water Pump Replacement
For engines like the Ford 3.5L V6 with timing-cover-mounted pumps, expect 6 to 10 hours of labor. The job requires timing cover removal and chain alignment. Replace the thermostat and coolant at the same time. Use OEM-spec pumps since aftermarket units frequently fail faster.
DIY Difficulty: Advanced only. Incorrect timing causes catastrophic engine damage.
Head Gasket Replacement
Only proceed after a positive block test confirms combustion leak. Remove the intake, valve covers, and timing components. Unbolt the head and inspect for warping. Send the head to a machine shop if needed. Install new torque-to-yield head bolts and follow the factory sequence exactly.
Critical: Never reuse head bolts. Always use new ones.
Intake Manifold Gasket Fix
This common fix applies to GM and Ford V6 platforms. Replace the intake manifold gaskets, coolant crossover seals, and thermostat housing gasket. Expect 4 to 8 hours of labor depending on accessibility.
Heater Core Replacement
One of the most labor-intensive repairs. You must remove the dashboard, disconnect HVAC lines, extract the old core, and reinstall everything carefully. Plan for 6 to 10 hours. Consider professional help unless you have extensive experience.
Cap and Reservoir Replacement
The easiest fix but often overlooked. Replace the radiator cap every 3 to 5 years. Inspect the overflow tank for cracks. Test both under pressure. Total cost stays under $30 while preventing costly misdiagnoses.
When to See a Professional
Seek expert help immediately if your coolant loss exceeds one cup per week, persistent white smoke appears after warm-up, your oil shows milky contamination or rises unexpectedly, the engine overheats repeatedly, or diagnostic tests confirm internal failure.
Choose shops equipped with cooling system pressure testers, combustion leak block testers, UV inspection lights, and vacuum coolant fill tools. These instruments find what visual inspection cannot.
Frequently Asked Questions About Coolant Leaking But Not Visible
How can I tell if my coolant is leaking internally?
Check your engine oil first. If it looks milky, frothy, or chocolate-colored, coolant is entering the crankcase. Also watch for white exhaust smoke, sweet smells from vents, or unexplained overheating. A cooling system pressure test and block test confirm internal leaks.
Why does my car lose coolant but leave no trace?
The leak is likely internal, occurring inside the engine, heater core, or as vapor. Internal leaks into the oil, combustion chamber, or cabin heating system never leave external puddles. Vapor leaks from a bad radiator cap escape as steam you cannot see.
Can I drive with an invisible coolant leak?
Driving with any coolant leak risks engine damage. Internal leaks into the oil system or combustion chamber cause rapid destruction. If your temperature gauge rises or you see warning signs, stop driving immediately. Continuing with a confirmed leak leads to expensive repairs.
What is the most common cause of invisible coolant loss?
A blown head gasket ranks as the most frequent culprit. It allows coolant to enter the combustion chamber or oil passages without external evidence. Faulty radiator caps, failed water pump seals, and leaking intake manifold gaskets follow closely.
How much does it cost to repair an invisible coolant leak?
Costs vary dramatically by cause. A radiator cap costs under $15. Intake manifold gaskets run $50 to $200 in parts plus 4 to 8 hours labor. Head gasket replacement averages $1,000 to $2,500 depending on the engine. Water pump replacement on complex engines like the Ford 3.5L V6 costs $600 to $1,200.
Can UV dye really find invisible leaks?
Yes, fluorescent dye works extremely well for finding hidden leaks. Add it to your coolant, drive the vehicle to circulate it, then scan with a black light. Even microscopic seeps show up as glowing traces. This method finds leaks in heater cores, intake manifolds, and around gaskets that pressure tests sometimes miss.
Key Takeaways for Fixing Invisible Coolant Leaks
Coolant does not simply evaporate. If your level drops without visible puddles, the fluid is escaping internally through failed seals, cracked components, or as vapor. The most common hidden leak sources are head gaskets, water pump seals, intake manifold gaskets, and faulty radiator caps. Always check your oil first because milky oil signals a critical internal problem requiring immediate attention. Use diagnostic tools like pressure testers, block tests, and UV dye to pinpoint the exact cause before spending money on repairs. Monthly coolant checks, regular cap replacement every 3 to 5 years, and following manufacturer maintenance schedules prevent most invisible leak problems before they start. Address these leaks at the first sign of trouble because waiting leads to catastrophic engine failure and repair bills that climb into thousands of dollars.



