
Your motorcycle’s engine runs hot during every ride, and the radiator works overtime to keep temperatures in check. Over time, coolant breaks down, debris accumulates, and corrosion threatens internal components. If you notice overheating, discolored fluid, or it has been over two years since your last service, learning how to flush a motorcycle radiator protects your engine from costly damage.
This guide covers every step of the flushing process, from workspace setup through final testing. You will learn how to choose compatible coolant, drain old fluid safely, clean the reservoir, flush the system, bleed air pockets, and verify proper operation. Whether you ride a sportbike, cruiser, or adventure bike, these techniques apply to most liquid-cooled motorcycles.
Set Up Your Workspace and Gather Tools
A clean, organized workspace prevents spills and keeps you safe from hot, pressurized coolant.
Park the bike on level ground using a center stand or rear paddock stand. Tilting the motorcycle traps air pockets or leaves coolant behind in low spots. Work outdoors or in a well-ventilated garage since the engine must run during flushing. Lay down cardboard or absorbent mats to catch drips.
Gather these supplies before starting:
– Service manual or Haynes guide for your specific model
– Drain pan rated for at least 2.5 liters
– Funnel
– Wrenches or sockets matching your drain bolt
– New copper crush washer (never reuse the old one)
– Distilled water
– Fresh, compatible coolant
– Optional flushing agent (vinegar mix or commercial flush)
– Gloves, eye protection, and clean rags
Confirm the engine is completely cold before proceeding. Never open the radiator cap on a hot engine. Cover the cap with a rag, turn it slowly to the first detent, and wait for any hissing to stop before removing it fully.
Identify the Correct Coolant Type
Using the wrong coolant causes sludge, corrosion, and potential engine failure.
Most motorcycle coolants use ethylene glycol (toxic but effective) or propylene glycol (less toxic, common in track settings). The critical factor is chemical compatibility. Additives like silicates, phosphates, and organic acids vary between formulations. Mixing incompatible types creates a gel-like reaction that blocks coolant passages.
Never choose coolant by color alone. Red, blue, green, and orange coolants do not guarantee compatibility across brands. Always verify the product label specifies protection for your engine’s metals, especially aluminum.
Pre-mixed coolant eliminates mixing errors and is recommended for motorcycles. If using concentrate, mix only with distilled water. Tap water contains minerals that cause scaling inside the cooling system. Check your owner’s manual for the manufacturer-approved type and total system capacity, typically 2.0 to 2.5 liters.
Can You Mix Different Coolant Brands?
No. If switching types, perform a complete flush with distilled water before adding the new coolant. Even small amounts of incompatible fluid trigger chemical reactions. A thorough water flush between fills is essential.
Drain the Old Coolant Completely
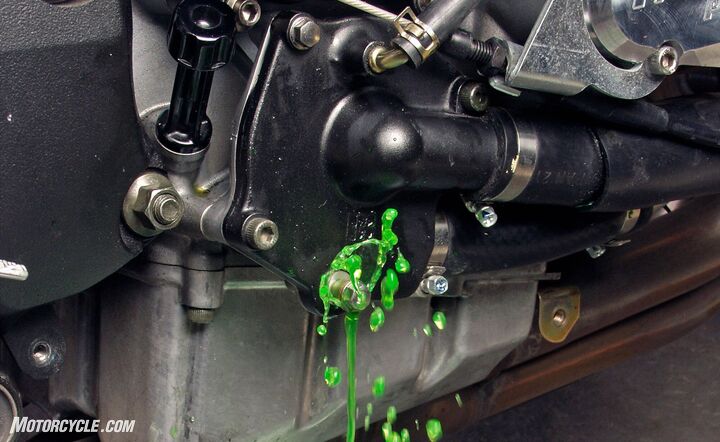
Begin with a cold engine and the bike secured on its stand.
Remove any fairing panels blocking access to the radiator cap and drain bolt. On most sportbikes, the drain bolt sits on the left side of the engine near the water pump cover. Place your drain pan underneath.
Remove the radiator cap using the rag method to speed up drainage. Unscrew the drain bolt and let the coolant flow out for 5 to 10 minutes. Tip the bike gently from side to side to dislodge trapped fluid in the engine block.
Disconnect the lower hose from the coolant reservoir to drain it fully. If accessible, removing the bottom radiator hose ensures a more complete drain, especially when sludge is present.
Reinstall the drain bolt temporarily using the old washer. You will replace it with a new copper crush washer during reassembly.
Clean the Coolant Reservoir Tank
The reservoir collects sediment and can harbor algae or debris that recontaminate fresh coolant.
Remove the tank, usually clipped or bolted in place. Plug the hose ports or turn the tank upside down. Pour in a mixture of isopropyl alcohol and a spoonful of table salt. The salt acts as a mild abrasive while the alcohol dissolves grime.
Shake the tank vigorously for about one minute. Rinse thoroughly with distilled water and let it dry completely before reinstalling. Inspect the overflow hose for cracks or blockages and replace it if brittle or swollen.
Flush the Cooling System Thoroughly
Flushing is essential when coolant appears brown, rusty, or milky, when switching types, or after two years of service. Skip this step only for routine changes with known, compatible coolant.
Vinegar Flush for Gentle Cleaning
Mix equal parts white vinegar and distilled water. Pour the solution into the radiator filler neck. Run the engine until the radiator fan activates, typically around 75 to 80°C. Shut off the engine and let it cool completely.
Drain the vinegar mixture. Repeat with plain distilled water, running the engine briefly before draining again. Continue flushing until the outflow runs clear.
Commercial Flush for Heavy Buildup
Use an aluminum-safe product like Holts SpeedFlush. Fill the system halfway with tap water, add the flush agent, then top up with water. Run the engine at fast idle for 10 minutes, let it cool, then drain.
Refill with clean tap water, run another 10 minutes, then drain again. Finish by flushing with a garden hose at standard pressure until water runs clear. Avoid high pressure that could damage radiator fins.
Water-Only Flush for Routine Maintenance
Insert a garden hose into the filler neck without a nozzle. Block the drain hole briefly to fill the system, then release to flush debris. Repeat until the outflow is clear, and confirm the reservoir is also flushed.
Refill With Fresh Coolant

Proper refill prevents air pockets and ensures complete cooling coverage.
Install a new copper crush washer on the drain bolt. Reusing the old washer or stacking two washers causes leaks. Torque the bolt to specification, often as low as 5 ft-lbs. Over-tightening strips threads.
Reconnect all hoses and reinstall the reservoir tank. Use a funnel to slowly pour in the correct coolant, preferably pre-mixed. Pour in stages, pausing when gurgling stops to allow air to escape.
Fill to the top of the radiator neck and leave the cap off for now.
Bleed Air From the Cooling System

Air pockets cause overheating, false low coolant readings, and poor circulation.
Start the engine and let it idle for 2 to 3 minutes. Blip the throttle to 4,000 to 5,000 RPM several times to force coolant through the system and push air out. Squeeze the upper and lower radiator hoses to dislodge trapped bubbles.
Rock the bike gently from side to side. As air escapes, the coolant level drops. Keep topping up until it stabilizes at the filler neck.
Turn off the engine and let it cool slightly. Top up again if needed, then securely replace the radiator cap. Fill the reservoir to the Full or Upper line.
Test and Verify Proper Operation

Validate your work before returning to regular riding.
Start the bike and let it warm up while watching the temperature gauge. The radiator fan should engage between 75°C and 80°C. If the temperature reaches 105°C without the fan activating, shut off immediately and check the fuse, fan blades, and thermostat.
Inspect the drain bolt, hoses, and reservoir for leaks. After a short ride, let the engine cool completely, then remove the radiator cap safely and check the level. Top up if low, since some air purges only after a full heat cycle.
Monitor the reservoir daily for the first week. A slowly dropping level indicates a hidden air pocket or small leak that needs attention.
Troubleshoot Common Flushing Problems
Even careful work can encounter issues. Here is how to address them.
Milky Coolant After Refill
This indicates oil in the cooling system. Likely causes include a blown head gasket, cracked cylinder head, or damaged engine block. Stop riding and inspect immediately.
Engine Overheats After Flush
Possible causes include an incomplete air bleed, clogged radiator fins, a stuck thermostat, or fan circuit failure. Re-bleed the system first. If overheating persists, inspect the thermostat and fan wiring.
Drain Bolt Leaks
The most common cause is a double washer. When removing the bolt, the old copper washer sometimes sticks to the engine surface. Always verify only one new washer is installed.
Radiator Fan Does Not Activate
Check the fuse first. Inspect fan blades for debris like stones or leaves. Test the temperature sensor if the fuse and power supply are functional.
Sludge Forms After Mixing Coolants
You mixed incompatible types. Drain the system immediately and flush thoroughly with distilled water before refilling with a single, compatible coolant.
Dispose of Old Coolant Safely
Coolant is hazardous waste that requires proper handling.
Ethylene glycol is highly toxic and has a sweet taste that attracts pets. Dogs are particularly vulnerable to accidental poisoning. Never pour used coolant down drains, onto soil, or into storm sewers.
Collect all used coolant and flush water in sealed containers. Take them to auto parts stores that offer free recycling, local hazardous waste facilities, or certified motorcycle repair shops. Recycling protects your community and the environment.
Maintain Your Cooling System Long-Term
Prevention reduces the need for major repairs.
Change coolant every 2 years or 16,000 to 24,000 miles, even if it looks clean. Additives degrade over time and lose effectiveness. Inspect hoses annually for cracks, swelling, or brittleness, and consider upgrading to silicone hoses for durability.
Check coolant level monthly and top up with the same type of coolant. Never add plain water as a permanent solution. For extreme heat or track days, consider using distilled water with a surfactant like Water Wetter, then switch back to proper coolant afterward.
Replace the thermostat every few flush cycles, especially if you have experienced overheating issues.
Frequently Asked Questions About Flushing a Motorcycle Radiator
How Often Should You Flush a Motorcycle Radiator?
Most manufacturers recommend flushing every 2 years or 16,000 to 24,000 miles, whichever comes first. Riders in extreme climates or off-road conditions should flush more frequently. Always consult your owner’s manual for model-specific intervals.
What Happens If You Mix Different Coolant Types?
Mixing incompatible coolants causes chemical reactions that produce sludge and gel-like substances. These block coolant passages, reduce cooling efficiency, and accelerate corrosion. A complete flush with distilled water is required before switching types.
Can You Use Tap Water Instead of Distilled Water?
Tap water contains minerals like calcium and magnesium that cause scaling inside the cooling system. Use distilled water for the final fill and for mixing concentrate. Tap water is acceptable only for intermediate flushing steps.
Why Is My Coolant Milky or Brown?
Milky coolant indicates oil contamination, often from a blown head gasket or cracked engine components. Brown or rusty coolant suggests corrosion inside the system. Both conditions require immediate inspection and a thorough flush.
How Do You Know If Air Is Trapped in the System?
Symptoms include overheating, fluctuating temperature readings, and a coolant level that keeps dropping. Bleed the system by running the engine, blipping the throttle, and squeezing the hoses until the level stabilizes.
Is It Safe to Flush a Motorcycle Radiator Yourself?
Yes, with proper preparation and safety precautions. Work on a cold engine, depressurize the system before opening the cap, and dispose of old coolant properly. Following the correct procedure protects your engine and ensures reliable cooling.
Key Takeaways for a Successful Motorcycle Radiator Flush
Learning how to flush a motorcycle radiator saves money and extends engine life. Always work on a cold engine, use the correct coolant type, and replace the copper crush washer on the drain bolt. Bleed air pockets thoroughly and verify fan operation before riding.
Your next step is to gather your tools, review your service manual for model-specific specs, and schedule a weekend for the job. A clean cooling system delivers cooler running temperatures, better performance, and peace of mind on every ride.



